Gluten-Free Recipes for Breads
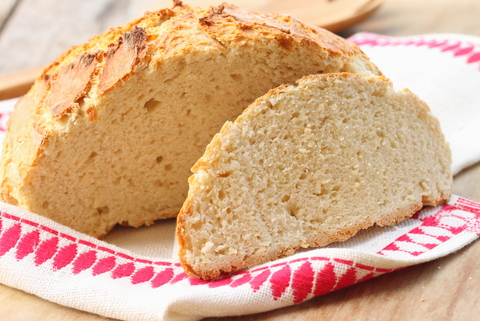
Irish Soda Bread
March 17, 2014Irish Soda Bread
From Chef Oonagh Williams of Royal Temptations Catering
Ingredients:
- 1 cup Oonagh’s Gluten-Free Flour Mix
- 1 cup brown rice flour
- ½ tsp. baking powder
- ½ tsp. salt
- ½ tsp. xanthan gum – essential
- 2 tsp. sugar
- 2 Tbsp. butter
- ¾ cup buttermilk (plus more as needed)
- 1 + 1/4 tsp. baking soda
- 1 Tbsp. potato flour
Directions:
- Preheat oven to 400 degrees.
- In a wide shallow bowl, mix together gluten-free flour mix, brown rice flour, baking powder, salt, xanthan gum and sugar.
- Rub butter into flour mix until it resembles fine breadcrumbs.
- Stir baking soda and potato flour into buttermilk.
- Stir buttermilk mix into dry mix with a wooden spoon or spatula until mix resembles a sticky dough – almost a paste, not a dry dough. Depending on the brands you use, the flour mix might suck up liquid and be quite dry, needing more of the buttermilk. Start at ¾ cup and add more. I normally have to use ¾ cup + 2 Tbsp. for this mix.
- Gather dough together and pat with wet hands into a roughly 6-7” round on a lined cookie sheet. Use a spatula to mark the dough into four quarters.
- Bake in preheated oven for 45-60 minutes. Cook until bread is well risen, hard on top and sounds hollow if you tap the bottom of the bread.
- Remove from oven and place on cooling rack.
<< Back to Recipes
TAGS: BREADS
Cornbread with Honey and Thyme
November 4, 2013Cornbread with Honey and Thyme
From Jackie Ourman of C.A.F.E.

Ingredients
Cornbread
- 1 ¼ cup ground cornmeal
- ¾ cup gluten-free flour blend
- ¼ cup granulated sugar
- 1 tsp. kosher salt
- 2 tsp. baking powder
- ½ tsp. baking soda
- cup whole milk
- 1 cup buttermilk
- 2 eggs, lightly beaten
- 1 stick butter, melted
- 3 sprigs thyme, leaves removed, plus additional for garnish
- 2 Tbsp. honey
Honey Butter
- 1 stick butter
- ¼ cup honey
Instructions
Cornbread
- Heat oven to 425 degrees and place a 10-inch cast iron skillet inside to heat it while you prepare the batter
- Melt butter in a small saucepan
- Whisk together cornmeal, gluten-free flour blend, salt, baking powder and baking soda in a large bowl.
- Whisk all remaining items into the bowl, reserving about 1 Tbsp. of butter for the skillet.
- Carefully remove the hot skillet from the oven and reduce oven temperature to 375 degrees.
- Coat the bottom and sides of the hot skillet with the remaining butter.
- Pour the batter into the skillet and place it in the center of the oven.
- Bake until the center is firm and a cake tester or toothpick inserted into the center comes out clean, 20 to 25 minutes.
- Allow to cool for 10 to 15 minutes and serve.
Honey Butter
- Whip together butter and honey and keep at room temperature until ready to serve. Store any remaining in the refrigerator.
<< Back to Recipes
TAGS: BREADS
Gluten-Free Irish Soda Bread (Version 2012)
May 5, 2012Gluten-Free Irish Soda Bread (Version 2012)
From Chef Oonagh Williams of Royal Temptations Catering
Ingredients:
- 1 cup Oonagh’s Gluten-Free Flour Mix
- 1 cup brown rice flour
- ½ teaspoon baking powder
- ½ teaspoon salt
- ½ teaspoon xanthan gum
- 2 teaspoons sugar
- 2 tablespoons butter
- ¾ cup buttermilk (plus more as needed)
- 1 and 1/4 teaspoon baking soda
- 1 tablespoon potato flour
Directions:
- Preheat oven to 400°F.
- In a wide shallow bowl, mix together gluten-free flour mix, brown rice flour, baking powder, salt, xanthan gum and sugar.
- Rub butter into flour mix until it resembles fine breadcrumbs.
- Stir baking soda and potato flour into buttermilk.
- Stir buttermilk mix into dry mix until it resembles a sticky dough—almost a paste, not a dry dough.*
- Gather dough together and pat with wet hands into a roughly 6-7” round on a lined cookie sheet. Use a spatula to mark the dough into four quarters.
- Bake in preheated oven for 45–60 minutes. Cook until bread is well risen, hard on top and sounds hollow if you tap the bottom of the bread.
- Remove from oven and place on cooling rack.
Tips and Alternatives:
This recipe can also be scooped into scones. The scones are great with soups and portable for school or work.
*Depending on the flour brands you use, the flour mix might suck up liquid and be quite dry, needing more of the buttermilk. Start at ¾ cup and add more. I normally have to use ¾ cup + 2 Tbsp. for this mix.
<< Back to Recipes
TAGS: BREADS
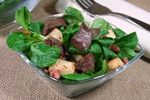
Homemade Croutons
June 6, 2011Homemade Croutons
![]()
Courtesy of Rudi’s Gluten-Free Bakery
Ingredients:
- 1 package of Rudi’s Gluten-Free Multigrain Hamburger Buns
- Olive oil or melted butter
- Dried herbs or seasonings (i.e. basil, oregano, garlic powder)
- Parchment paper
Directions:
1. Preheat oven to 375 degrees.
2. Cube the buns and place on a lined baking sheet.
3. Drizzle olive oil or melted butter over the cubes and sprinkle dried herbs on top. Toss lightly to coat.
4. Place baking sheet in oven and toast cubes for 15 minutes until lightly golden.
5. Use croutons to top your favorite soup or salad.
Note: This recipe is a great use for leftover buns. Buns can also be cut into smaller cubes to use in your favorite stuffing recipe.
*The voting stage of Rudi’s Unbelievably Good Gluten-Free Recipe Contest ends June 6. Vote now and get the chance to win prizes.*
<< Back to Recipes
TAGS: APPETIZERS/SNACKS, BREADS
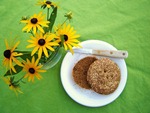
Wonder Buns
May 16, 2011Wonder Buns
From Linda Simon, RD, of Kitchen Therapy
Makes one 3 1/2-inch bun
Ingredients:
- 1 large egg
- ¾ teaspoon molasses
- 2 tablespoons sorghum flour
- 1 tablespoon almond meal
- 1 tablespoon ground flax seed
- ½ teaspoon baking powder
- ½ teaspoon cocoa powder
- a pinch of salt, optional
- 1 teaspoon sesame seeds
Directions:
1. In a small bowl, beat the egg and molasses with a fork, for about a minute.
2. In another small bowl, add the sorghum flour, almond meal, ground flax seed, baking powder, and cocoa powder. Add a pinch of salt if you like. Make sure everything is thoroughly mixed so you do not see little balls of cocoa or bitter baking soda.
3. Add the eggs to the dry ingredients, stir until smooth.
4. Oil a 10 oz Pyrex custard cup and sprinkle sesame seeds on the bottom and sides.
5. Pour the batter into the cup. Top with more sesame seeds.
6. Microwave for 90 seconds.That’s it! A ready to eat, tasty bun.
Try this recipe using different flours and seeds. Or, add herbs or cheese. Cinnamon and raisins also make tasty additions.
See a video demonstration of this recipe here.
<< Back to Recipes
TAGS: BREADS
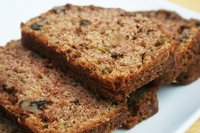
Zucchini Bread with Walnuts
August 16, 2010Zucchini Bread with Walnuts
From Jenny Manseau, of
Creatively Cooking Gluten-Free
Wet Ingredients:
- 1 cup zucchini, finely chopped (washed but not peeled)
- 2 egg
- 1⁄2 cup canola oil
- 1 teaspoon gluten-free vanilla
Dry Ingredients:
- 1⁄2 cup white rice flour
- 1⁄2 cup sweet rice flour
- 1⁄4 cup corn starch
- 2 Tablespoons tapioca starch
- 1⁄2 teaspoon xanthan gum
- 1 cup sugar
- 3⁄4 teaspoon baking soda
- 1 teaspoon baking powder
- 1⁄2 teaspoon salt
- 1 teaspoon cinnamon
- 1/3 cup chopped walnuts
- Zest from one small lemon
- Glaze:
- 1 Tablespoon powdered sugar
- 1⁄2 teaspoon lemon juice
- Instructions
Directions:
Combine wet ingredients and mix well. Set aside.
In a large bowl, combine dry ingredients and mix well.
Add wet ingredient mix to dry ingredient mix. Stir until blended well. Grease a loaf pan and put mixture in pan. Bake at 325 ° for 1 hour or until toothpick comes out clean. Remove from oven and let cool for a few minutes. Prepare glaze. Remove bread from pan and drizzle with glaze. Let cool.
<< Back to Recipes
TAGS: APPETIZERS/SNACKS, BREADS
Brown Bread Recipe
November 3, 2009Brown Bread Recipe
from Gluten Free Mom, by Jamie Eppenauer
This is the recipe that satisfied all of our criteria in the search for a great gluten free bread:
- Easy enough for me, and hopefully the Gluten Free Kid at some point, to make it once a week. (This recipe rises very quickly making it easy to add into our weekly schedule).
- Somewhat nutritious – no white rice flour with a bunch of starch.If I am going to make homemade bread, I want it to have some health benefits. That is why I added the rice bran for added fiber.
- It has to taste good!!
- It needed to be moist – no more dry bread!
- When sliced, it needs to be sturdy enough to stand up in the lunch box challenge.
- 1 ¼ cup milk or almond milk
- 1 T sugar
- 1 package yeast
- ¾ cup brown rice flour
- ¼ cup sorghum flour
- 1 cup potato starch
- ½ cup tapioca flour
- ½ cup rice bran (you can substitute ground flax seed)
- 1 ¼ t xanthan gum
- 1 ¼ t guar gum (if you do not have guar gum you can use an additional 1 1/4 t xanthan gum)
- 2 T brown sugar
- 3 eggs
- 3 T canola oil
- 2 t cider vinegar
- 2 T honey
- 1 T 100% apple juice
Lightly spray a 9 x 5 inch loaf pan with cooking spray and dust with rice flour.
Prepare a Warm place for Bread to Rise:
I have found that my oven is a great place for bread to rise. When I start making the bread, I turn my oven on to its lowest setting. For my oven it is 135 degrees. As soon as the oven preheats to this temperature, turn it off. By the time everything is mixed together and in the bread pan, the oven is at a perfect temperature for the bread to rise. Caution – be careful with this procedure. If you put your dough in a place that is too warm, it will cook and not rise.
Proof the Yeast:
The thought of proofing yeast was overwhelming to me at first. Before going gluten free, I was “challenged” in the cooking department and as such, had never even considered the idea of making bread and proofing my own yeast. But for you first timers, it really is not that scary.
The most important part is getting the liquid to the right temperature. I have found that the easiest way to do this is to fill a two cup glass measuring cup with 1 ¼ milk and microwave it. After experimenting with my microwave a few times, I have found that 55 seconds gets me the perfect temperature of around 110 – 115 degrees F. Once you figure this out, you never have to worry about checking the temp again.
Warm up the milk, add 1 T sugar and then sprinkle the yeast on top and give it a quick stir. Let it sit for 5 to 10 minutes. If it is working properly, you will get a tanish foam on top of the liquid.
While yeast is proofing, thoroughly mix together the dry ingredients. The idea is to get all of the different gluten free flours to mix together in such a way that they become one flour. Some recommend sifting the flour to achieve this. I have adopted Donna Washburn’s method in The 125 Best Gluten-Free Recipes Simply add all of the dry ingredients into a large gallon size freezer bag. Shake the bag around to mix the flours together. Mixing them all together with a whisk also works well.
Once the dry ingredients are well mixed, add to bowl on your stand mixer.
In a separate bowl, mix together the 3 eggs lightly beaten, oil, vinegar and honey. Mix well then stir in the apple juice.
To the dry ingredients, add the wet mixture and then quickly add the proofed yeast. Mix until blended, stopping to scrape the sides of the bowl. Beat at high for 4 minutes. Don’t be surprised if the dough does not resemble your idea of wheat bread dough. It will be just a little thicker than cake batter.
Spoon into the prepared baking pan, spray a piece of saran wrap with cooking spray and lightly cover. Put in a warm place (around 75 degrees) to rise.
Please note that this bread rises very rapidly. Thirty minutes is generally all it takes. Only let it rise to the top of the bread pan or the bread will lose its strength and not be strong enough for sandwiches.
Once it has risen to the top of the bread pan, remove the saran wrap and bake at 350 degrees for 40 minutes or until an internal temp of 200 degrees is reached.
Let cool in the pan for 10 minutes, then let cool on a bread rack. This bread is super moist so if the sides and bottom of the bread seem “wet” simply turn the bread on its top to rest and the sides and bottom will dry out nicely.
For many more delicious recipes like this one visit Gluten Free Mom
<< Back to Recipes
TAGS: BREADS
Banana Bread
November 17, 2008Banana Bread
Banana Bread
By Rachel Kay
Ingredients
- 2 cups Pre-Leavened Flour (I used Pamela’s Ultimate Baking and Pancake mix, but you can use anything that you feel comfortable with)
- 2 tsp Ground Cinnamon
- 2/3 cup Brown Sugar
- 1/2 cup Milk (cow, goat, soy, rice, etc)
- 2 Eggs or Egg Replacement
- 3 tbsp Oil
- 2 Medium Bananas, mashed
- optional: 1/2 cup chopped nuts or chocolate chips
- Preheat oven to 350ºF. Spray a 5″ by 10″ bread pan with non-stick cooking spray, or approximately 15 muffin tins. Line the bread pan with parchment paper (NOT wax paper), allowing it to overhang the edges of the pan.
- Mix flour and cinnamon together in a large mixing bowl. Stir in the brown sugar and create a well in the center of the flour. Place the liquid ingredients (NOT including the mashed banana) into the middle of the well and stir until well combined.
- Add the mashed bananas to the mixture and incorporate completely.
- If you are choosing to add chopped nuts or chocolate chips (or whatever strikes your fancy) mix them in now.
- Spoon the batter into the prepared bread pan or muffin tins and smooth the surface.
- Bake in a preheated oven for 45-50 minutes, or until a toothpick inserted into the center comes out cleanly.
- Remove the loaf or muffins from the oven and let cool for 5 minutes before
<< Back to Recipes
TAGS: BREADS
Steamed Brioche Buns
November 14, 2008Steamed Brioche Buns
Steamed Brioche Buns
By Edgar Steele,
NFCA Chef Spokesman
Ingredients
- 2 1/2 – Cups Gluten Free All Purpose Flour
- Extra Flour For Dusting And Kneading
- 1 1/2 – Teaspoons Active Dry Yeast
- 1 1/2 – Tablespoons Granulated Sugar
- 1 – Teaspoon Salt
- 1/4 – Cup Cool Water
- 2 – Teaspoons Xantham Gum
- 4 – Large Eggs
- 1 – Egg Yolk
- 1 – Cup Cold Unsalted Butter, Cut Into Small Cubes, About 1/2 Inch
Put the water and xantham gum in a blender, and blend on high speed until completely smooth. Place 1 1/2 cups of the G.F.A.P. flour, yeast, sugar, salt, water with xantham gum and eggs into a bowl and mix them until they come together. Knead these ingredients in the bowl just until smooth until smooth (a bit of oil may be used on your hands to prevent sticking). Cover the mixture with plastic film, and let it sit for 45 minutes.
Add the remaining cup of flour, transfer the dough to a flat surface, and knead it until it is shiny and elastic and doesn’t stick to the surface, about 10 minutes.
Sprinkle the flat surface with some flour. Put the dough ball on the floured surface and flatten it a bit, then spread the butter cubes over it. Knead the dough with the butter until the butter is completely mixed in.
Cover the dough again with plastic film and allow it to rise for 1 hour. It will be very soft at this point, and should have risen by about one-third.
Place the dough again onto a lightly floured surface and fold it over several times. Place the dough into an oiled bowl, cover the bowl tight with plastic film, and refrigerate it for at least six hours, and up to about twelve hours.
Remove the dough from the refrigerator and cut it into 2 oz. Pieces, then form them into balls. The dough will become very sticky as it warms, so work quickly. Place the portioned brioche balls onto the racks of a bamboo steamer, and cover the dough with a light cloth towel. Allow it to rise for 2 1/2 to 3 hours, or until it has doubled in size.
Whisk the egg yolk with a pinch of salt, and brush all exposed surfaces of the brioche balls with it.
Choose a saucepot whose diameter is slightly smaller than the diameter of the bamboo steamer trays. Fill the pot half full with water, and bring the water to a boil. Place the bamboo trays on top of the pot, and allow the brioche buns to steam cook for about 30 minutes.
Remove the bamboo trays from the pot, and allow them to cool at room temperature for 5 minutes. After five minutes, place the buns onto a cooling rack to cool completely.
* If an electric mixer is available and you wish to save some elbow grease, the kneading of the bread may be done with a dough hook with the machine set on medium speed.
<< Back to Recipes
TAGS: BREADS
Gluten-Free Irish Soda Bread
May 5, 2008Gluten-Free Irish Soda Bread
From Chef Oonagh Williams of Royal Temptations Catering
Makes one 7-inch round loaf
Ingredients:
- 2 cups Oonagh’s Gluten-Free Flour Mix, or gluten-free flour mix
- 3/4 tsp xanthan gum (leave out if your flour blend already has it)
- 1 tbsp gluten-free baking powder
- pinch of salt
- 2 tbsp butter
- 2 tsp sugar
- 1 tsp baking soda
- 2/3 cup buttermilk or mix of sour cream and milk (equal parts, whisked together)
- 1 large egg
Directions:
- Preheat oven to 400 degrees F.
- Add egg to buttermilk or sour cream/milk blend. Stir in baking soda.
- In a separate bowl, combine gluten-free flour, salt, xanthan gum, baking powder and sugar. Stir together.
- Rub in butter until mixture resembles fine breadcrumbs.
- Add buttermilk or sour cream/milk mixture to the flour mixture and stir with a wooden spoon until soft, moist dough forms. Add more liquid if needed. This dough should not be dry and hard, and it may be necessary to add some more milk or water to get a soft, sticky dough to form. If you think mix is too wet, wait a moment or two. I find that baking powder and xanthan gum almost immediately thicken dough.
- Place dough on a baking sheet dusted with gluten-free flour or stone and gently pat out to a 7” circle, 3/4” thick, (any thinner and the bread will be tough). Cut halfway through the top of the loaf with a sharp knife, one way and then the other so that when bread is cooked it will form into four crusty quarters but still joined together.
- Bake for about 35-40 minutes until bread is well risen, hard on top to the touch and sounds hollow if you tap the bottom of the bread. When you think bread is cooked, cook for about 5 minutes more. Undercooked bread will leave a floury, grainy taste in mouth.
- Remove from oven and serve with fresh butter.
Tips and Alternatives: For special occasions, add raisins or gluten-free chocolate chips. You can also serve the bread with imported Irish smoked salmon for a real St. Patrick’s Day treat.
<< Back to Recipes
TAGS: BREADS