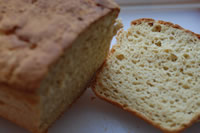
Brown Bread Recipe
from Gluten Free Mom, by Jamie Eppenauer
This is the recipe that satisfied all of our criteria in the search for a great gluten free bread:
- Easy enough for me, and hopefully the Gluten Free Kid at some point, to make it once a week. (This recipe rises very quickly making it easy to add into our weekly schedule).
- Somewhat nutritious – no white rice flour with a bunch of starch.If I am going to make homemade bread, I want it to have some health benefits. That is why I added the rice bran for added fiber.
- It has to taste good!!
- It needed to be moist – no more dry bread!
- When sliced, it needs to be sturdy enough to stand up in the lunch box challenge.
- 1 ¼ cup milk or almond milk
- 1 T sugar
- 1 package yeast
- ¾ cup brown rice flour
- ¼ cup sorghum flour
- 1 cup potato starch
- ½ cup tapioca flour
- ½ cup rice bran (you can substitute ground flax seed)
- 1 ¼ t xanthan gum
- 1 ¼ t guar gum (if you do not have guar gum you can use an additional 1 1/4 t xanthan gum)
- 2 T brown sugar
- 3 eggs
- 3 T canola oil
- 2 t cider vinegar
- 2 T honey
- 1 T 100% apple juice
Lightly spray a 9 x 5 inch loaf pan with cooking spray and dust with rice flour.
Prepare a Warm place for Bread to Rise:
I have found that my oven is a great place for bread to rise. When I start making the bread, I turn my oven on to its lowest setting. For my oven it is 135 degrees. As soon as the oven preheats to this temperature, turn it off. By the time everything is mixed together and in the bread pan, the oven is at a perfect temperature for the bread to rise. Caution – be careful with this procedure. If you put your dough in a place that is too warm, it will cook and not rise.
Proof the Yeast:
The thought of proofing yeast was overwhelming to me at first. Before going gluten free, I was “challenged” in the cooking department and as such, had never even considered the idea of making bread and proofing my own yeast. But for you first timers, it really is not that scary.
The most important part is getting the liquid to the right temperature. I have found that the easiest way to do this is to fill a two cup glass measuring cup with 1 ¼ milk and microwave it. After experimenting with my microwave a few times, I have found that 55 seconds gets me the perfect temperature of around 110 – 115 degrees F. Once you figure this out, you never have to worry about checking the temp again.
Warm up the milk, add 1 T sugar and then sprinkle the yeast on top and give it a quick stir. Let it sit for 5 to 10 minutes. If it is working properly, you will get a tanish foam on top of the liquid.
While yeast is proofing, thoroughly mix together the dry ingredients. The idea is to get all of the different gluten free flours to mix together in such a way that they become one flour. Some recommend sifting the flour to achieve this. I have adopted Donna Washburn’s method in The 125 Best Gluten-Free Recipes Simply add all of the dry ingredients into a large gallon size freezer bag. Shake the bag around to mix the flours together. Mixing them all together with a whisk also works well.
Once the dry ingredients are well mixed, add to bowl on your stand mixer.
In a separate bowl, mix together the 3 eggs lightly beaten, oil, vinegar and honey. Mix well then stir in the apple juice.
To the dry ingredients, add the wet mixture and then quickly add the proofed yeast. Mix until blended, stopping to scrape the sides of the bowl. Beat at high for 4 minutes. Don’t be surprised if the dough does not resemble your idea of wheat bread dough. It will be just a little thicker than cake batter.
Spoon into the prepared baking pan, spray a piece of saran wrap with cooking spray and lightly cover. Put in a warm place (around 75 degrees) to rise.
Please note that this bread rises very rapidly. Thirty minutes is generally all it takes. Only let it rise to the top of the bread pan or the bread will lose its strength and not be strong enough for sandwiches.
Once it has risen to the top of the bread pan, remove the saran wrap and bake at 350 degrees for 40 minutes or until an internal temp of 200 degrees is reached.
Let cool in the pan for 10 minutes, then let cool on a bread rack. This bread is super moist so if the sides and bottom of the bread seem “wet” simply turn the bread on its top to rest and the sides and bottom will dry out nicely.
For many more delicious recipes like this one visit Gluten Free Mom
<< Back to Recipes