Gluten-Free Recipes for Side Dishes
Green Bean Casserole
December 17, 2018Courtesy of Crunchmaster ![]()

Ingredients
- 1/3 cup Crunchmaster® Roasted Vegetable Multi-Grain Crackers, finely crushed
- 1 large Vidalia onion, thinly sliced
- 1 clove garlic, finely chopped
- 2 cups button mushrooms, thinly sliced
- 1 pound fresh green beans
- 2 Tbsp olive oil
- 1 ½ cups 2% milk (or dairy-free milk)
- 1/4 cup (2 oz) goat cheese, crumbled
- ½ cup slivered almonds
Directions
- Preheat oven to 350°F.
- In a large skillet, sauté onions and garlic in oil for 20 minutes or until caramelized. Add mushrooms and milk.
- Meanwhile, steam green beans in a large pot over medium heat for 4 minutes; transfer to a bowl of ice water. Drain and set aside.
- Transfer green beans into prepared baking dish. Cover with onion mixture and crumbled goat cheese. Top with almonds and crushed Crunchmaster crackers.
- Bake for 15 minutes or until golden brown.
- Serve warm and enjoy!
TAGS: VEGETARIAN, THANKSGIVING, SIDE DISHES, HOLIDAY
Curried Butternut Squash Soup
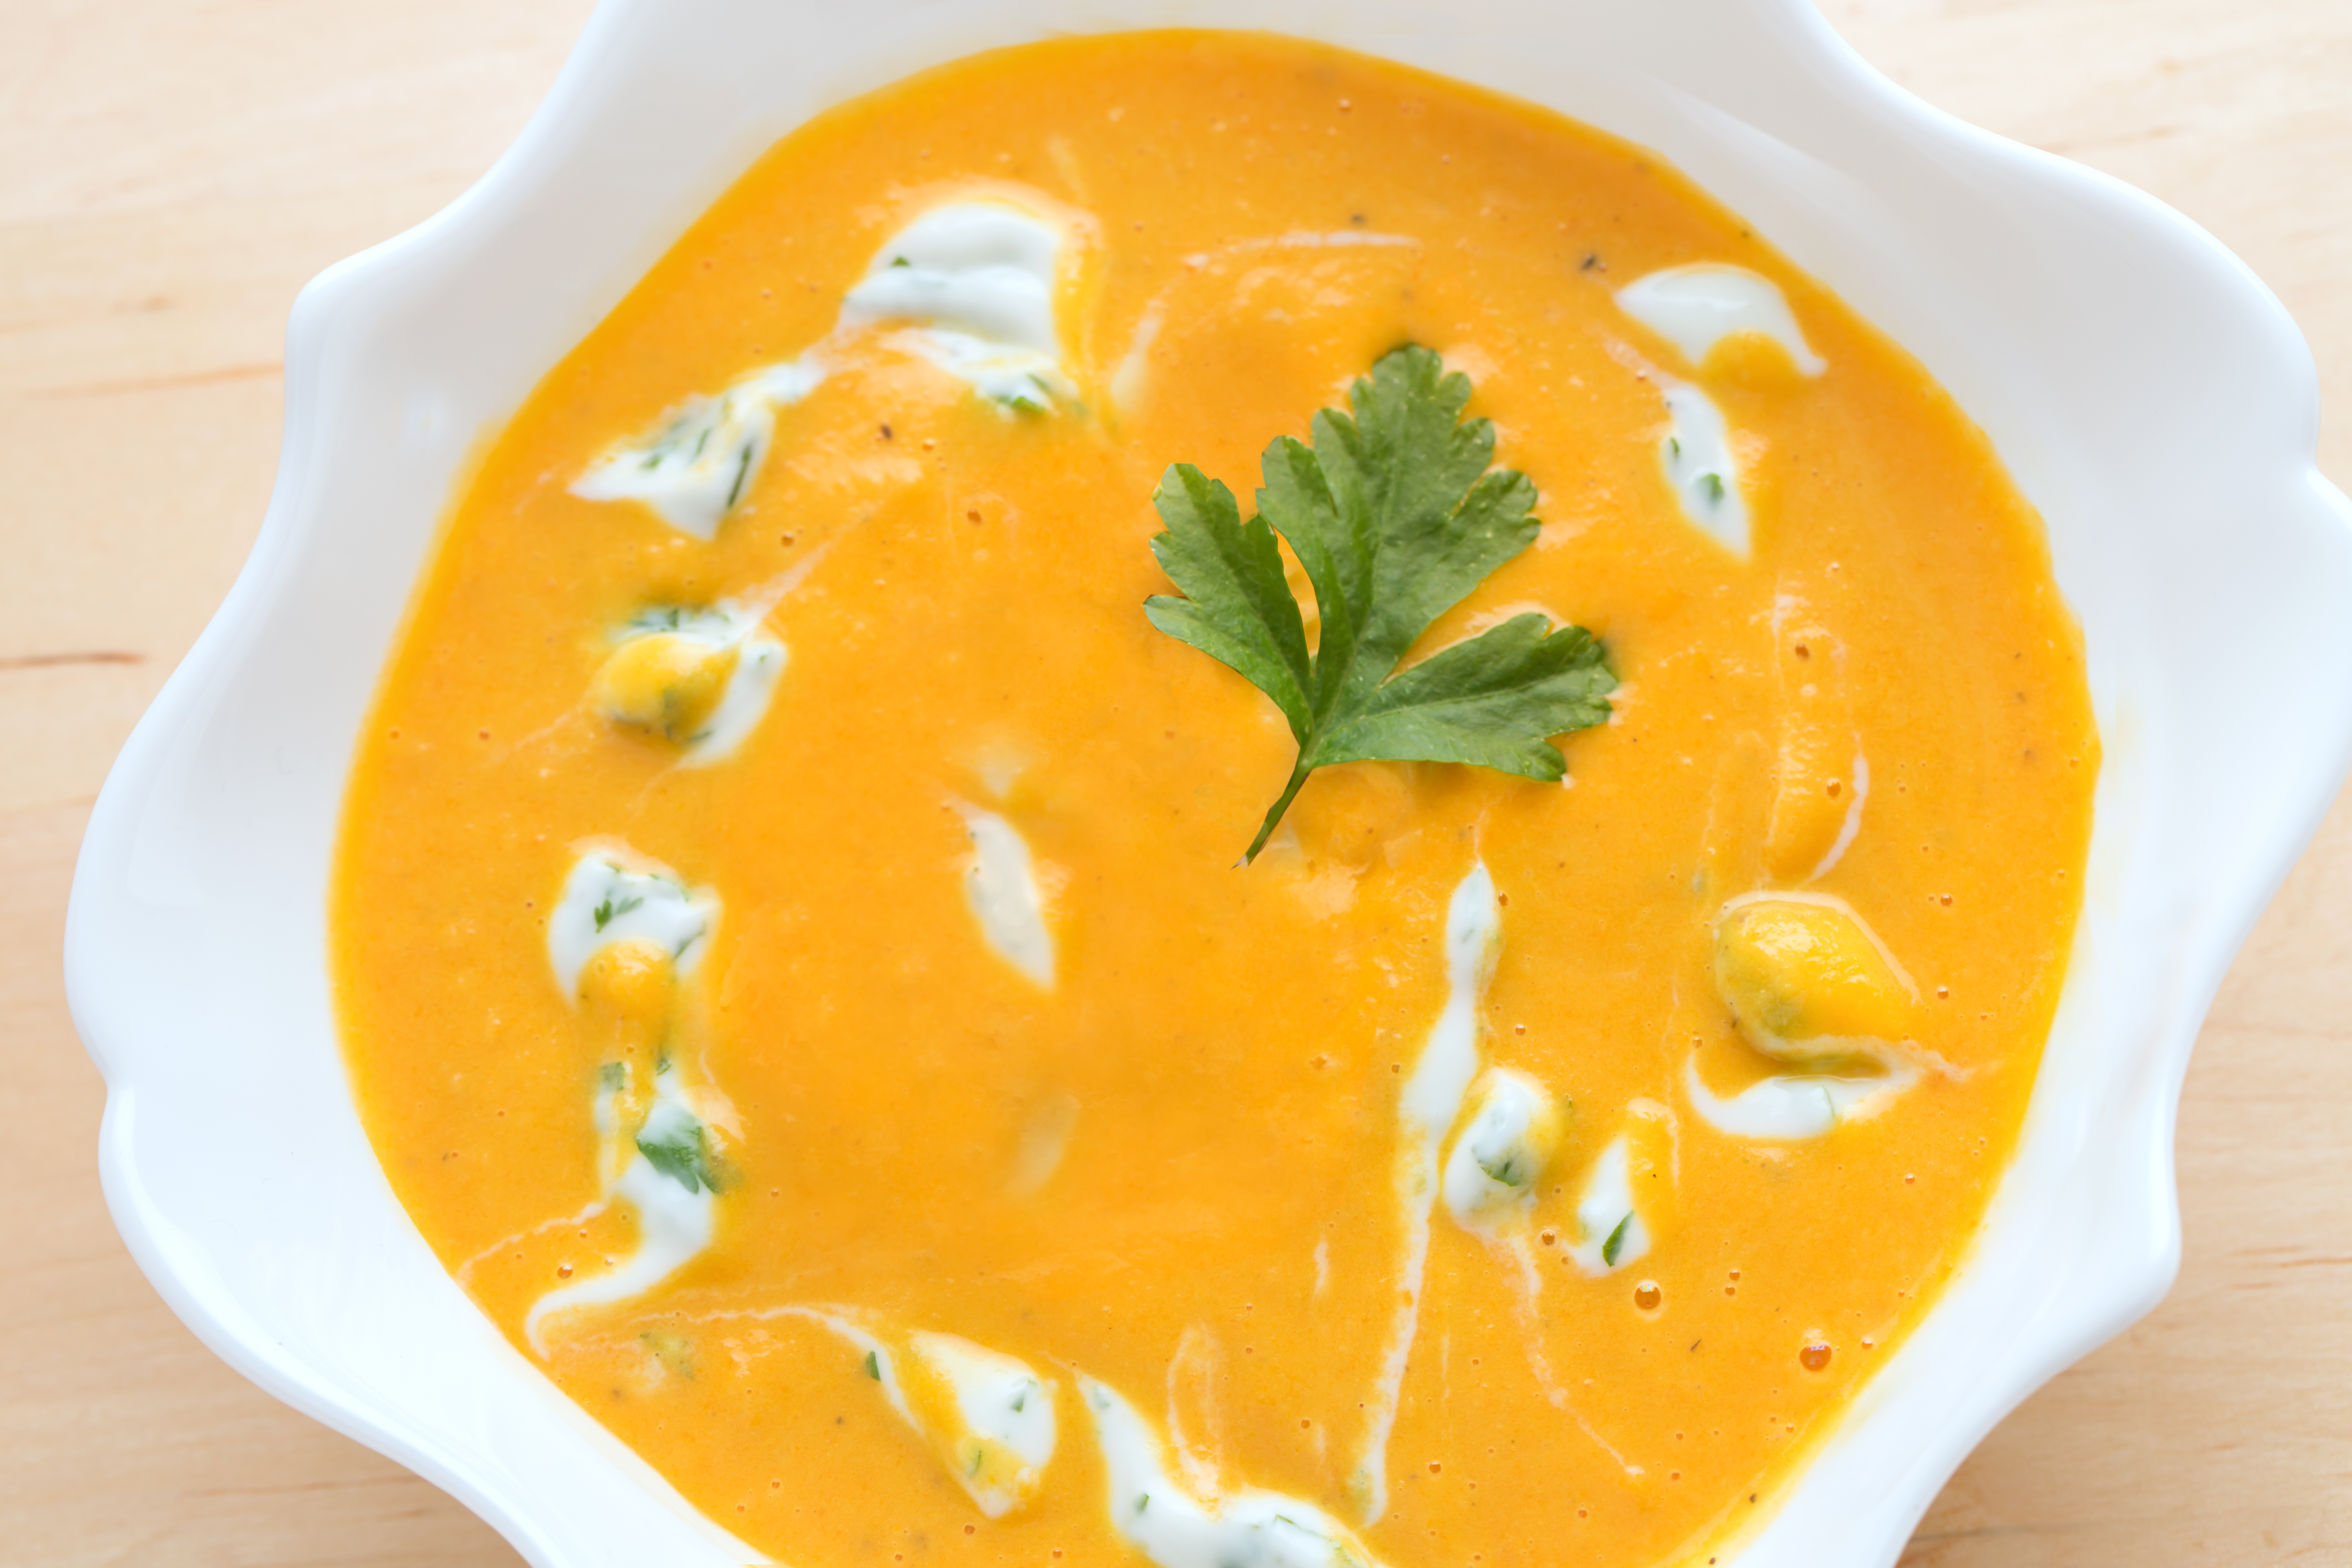
September 26, 2018Curried Butternut Squash Soup
This gluten-free soup is a good starter for people not sure of curry since it adds just a lift of a different flavor to a soup that is very mild. Perfect for fall!
From Chef Oonagh Williams of Gluten-Free Cooking with Oonagh
This is a warming soup, both in the fact that it is a hot soup but also the curry provides additional inner warmth. It’s a good starter for people not sure of curry since it adds just a lift of a different flavor to a soup that is very mild. The squash, apples and carrots make a sweeter soup.
Gluten-Free Curried Butternut Squash Soup
Ingredients:
- 20 oz bag frozen squash cubes, preferably thawed (about $1.20 a bag in my grocery store)
- 1 large onion, peeled and chopped
- 2 Granny Smith apples peeled, cored and chopped
- 2 ribs/stalks celery, washed and chopped – older outside stalks of celery can be stringy even when puréed
- 2 large carrots, peeled and chopped
- 1 tbsp gluten-free mild tikka masala curry paste – (if you really don’t want the curry flavor, I have made a similar variation of carrot ginger soup with butternut squash and vegetables by adding 2-3 tablespoons of freshginger to soup instead of curry paste. Or perhaps some red pepper flakes or hot peppers and cilantro)
- 2 tbsp butter or olive oil
- 6 c water with 1 tbsp gluten-free chicken stock concentrate (I use Orrington’s labeled gluten-free, $4 for 12 oz container) or chicken stock
- fresh nutmeg
- salt and pepper to taste
- 1 tsp brown sugar
- 1 c half and half or light cream, fat free half and half, evaporated skimmed milk or Asian brand of coconut milk
- 1/2 c (2oz) grated Swiss cheese or strong cheddar (optional)
Directions:
Make an herb packet (bouquet garni) of 1 bay leaf, some parsley stalks and1/2 tsp dried thyme in a small coffee filter bag tied shut and let it cook with vegetables for the half hour. Remove for puréeing and return to soup if you are not yet ready to serve soup or will be refrigerating leftovers.
Note that the smaller you chop the vegetables, the quicker they will cook. Chop all the vegetables the same size. But note that if you chop vegetables in food processor they tend to be too small to be puréed by the immersion blender and need to be puréed in food processor. Squash cooks down quite quickly since it is frozen and then thawed.
1. Melt butter in a large saucepan. Add apple and raw vegetables, stir well and cook, covered, gently for about 10 minutes until softening, this is known as sweating and brings out the natural sugars in the vegetables. Add squash and stir well.
2. Stir in curry and cook for one minute. Add stock, bring to boil, cover and simmer for 30 minutes or until all vegetables are tender. The length of cooking time will depend on whether the squash was frozen to start with and how large you cut all the fruit and vegetables. Obviously frozen squash and large pieces of vegetable will take longer.
3. Remove herb packet and use an immersion blender in the pan or purée in a processor.
4. Add half and half/cream and cheese. Then once cheese has melted, season to taste with salt, pepper and nutmeg. I often just offer shredded cheese on the side so people can add their own.
5. For an individual serving. Mix 1 tablespoon sour cream with chopped parsley, celery leaves and green of green onions, all finely chopped and spoon into a Ziploc bag. Cut off tip and pipe little dabs of mix in a circle on soup. Draw a knife through sour cream dabs to make a pattern or pipe sour cream in a whirl.
<< Back to Recipes
TAGS: APPETIZERS/SNACKS, SOUPS/STEWS, SIDE DISHES
Gluten-Free Nachos
September 17, 2018Gluten-Free Nachos
Cheese sauce, beef, and corn… oh my!
From Chef Oonagh Williams of Gluten-Free Cooking with Oonagh
.jpg) Locally, some restaurants have been ‘expanding’ what they put on nachos. I’ve had and made nachos with cheese and added cooked bacon, sour cream, olives. I’ve also been playing around with the 3 cheese queso dip. Yes, queso is cheese in Spanish. There’s lots of recipes for this and making them seems to depend on where you live for availability of ingredients. Many of them quote White American cheese, from both grocery store and restaurant. White American melts wonderfully but it is processed, so not the healthiest cheese. From labels I’ve read, it has double the sodium of regular cheddars and my mouth was very aware of how salty sauce was. Another recipe had smoked Gouda cheese. Again many versions are processed not regular Gouda and double the sodium as well, but a lovely smoky flavor. Use the cheese sauce for nachos, scalloped potatoes, add to mashed potatoes, a stand alone dip – devoured, I even put it on top of a cheese lasagna.
Locally, some restaurants have been ‘expanding’ what they put on nachos. I’ve had and made nachos with cheese and added cooked bacon, sour cream, olives. I’ve also been playing around with the 3 cheese queso dip. Yes, queso is cheese in Spanish. There’s lots of recipes for this and making them seems to depend on where you live for availability of ingredients. Many of them quote White American cheese, from both grocery store and restaurant. White American melts wonderfully but it is processed, so not the healthiest cheese. From labels I’ve read, it has double the sodium of regular cheddars and my mouth was very aware of how salty sauce was. Another recipe had smoked Gouda cheese. Again many versions are processed not regular Gouda and double the sodium as well, but a lovely smoky flavor. Use the cheese sauce for nachos, scalloped potatoes, add to mashed potatoes, a stand alone dip – devoured, I even put it on top of a cheese lasagna.
What I do, vary as you like, what you have, but so easy for a meal anytime with ingredients sitting in the fridge after busy day at work, kids starving and something they can assemble without you. As you can see from list of ingredients, very similar to my Mexican salad, so you can do both for week night rotation. Arrange tortilla chips on jelly roll pan and sprinkle with cheese to melt in oven, or arrange chips on individual plates, sprinkle with cheese and microwave. Then let everyone choose their own toppings, like a taco bar.
Gluten-Free Mexican Nachos
Ingredients:
- Tortilla chips – I like Tostitos original as they’re flat and crispy and labeled gf.
- Mexican cheese, either a mixed blend of cheeses or one of the blocks of Mexican cheese you can crumble.
- Cheese dip (see below)
- Cooked beef (see below)
- Deliberately leftover, fresh corn roasted or bbq’d, niblets cut off
- Salsa of your choice
- Tomatoes, cut up
- Avocado, peeled, deseeded and cut into small cubes.
Cheese Dip
- 2 cups, 16 oz, 480 ml, half and half, or whole milk
- 8 oz, 250 g soft cream cheese
- 8 oz, 2 c, 250 g sharp cheddar shredded
- 8 oz, 2 c, 250 g Smoked Gouda, shredded. Cut off any dark outer skin as it doesn’t melt well
- 1-2 cloves garlic, peeled and crushed.
- I like to add an Al Fresco sweet spicy gluten-free chicken sausage, skin removed, 1/4’d lengthwise and cut into small slices
- some green of green onion thinly sliced
- chopped cilantro if you want
- add some pepper flakes or smoked paprika, or substitute pepper jack. Add salsa, chopped tomatoes or roasted hot peppers to sauce
- no extra salt
Cheese Dip Directions
1. Gently melt half and half, cheeses and garlic until smooth. Add rest of ingredients. Add some more milk if very thick.
Beef Topping
- Make and keep in fridge for nachos, salad, tacos, baked potatoes. Add to chili
- 1-1+1/2 lbs (750g) ground beef or ground turkey
- one medium onion, peeled and finely chopped
- 2 cloves garlic peeled and crushed.
- 1 tablespoon (15 ml) ground cumin
- 1 tsp (5 ml) smoked paprika or pepper flakes, Tabasco to taste
- salt and pepper to taste
Directions:
1. Heat a 4 cup (1 ltr) pan over medium heat.
2. Add meat, onion, garlic and gently fry until meat is browning and producing fat. I find with ground turkey you often have to add a tablespoon of oil to stop meat sticking.
3. Add spices and 1/4 c (60 ml) water, cover and cook for about 10 minutes over low heat. Watch meat doesn’t burn and that it is cooked at end of time. Add salsa or substitute salsa for water.
Then assemble the nachos.
<< Back to Recipes
TAGS: SIDE DISHES, LUNCH, APPETIZERS/SNACKS
My Father’s Real Mayonnaise
June 29, 2018My Father’s Real Mayonnaise
A simple gluten-free recipe for homemade mayonnaise that can be jazzed up with spices for a variety of dishes!
 From Chef Oonagh Williams of Gluten-Free Cooking with Oonagh
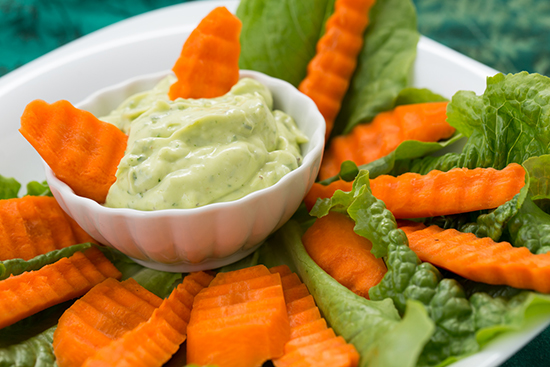
My father always made real homemade mayonnaise, in a bowl with a whisk. It was velvety smooth, just as it has been made for centuries. For years I made mayo in food processor using his quantities along with lots of fresh herbs from my garden, then I found this immersion blender version. It’s very very quick and an immersion blender is far cheaper and takes up so much less space than a food processor.
I now also serve this mayo as a dip with veggies or add garlic to make aioli for beef fondue. Spice it up any way you like!
Gluten-Free Mayonnaise from Scratch
Ingredients:
- 1 large egg, room temperature
- 1/2 tsp (3 ml) salt
- 50 ground pepper
- 1 tsp (5 ml) sugar
- 1/2 tsp dry English gluten-free mustard or jarred mustard
- Green of 2 green onions, cut small
- 1/4 c loose fresh parsley
- 1/4 tsp garlic powder or fresh chopped garlic
- 3/4 c + 2 tbsp(210 ml, 7 fl oz) neutral flavored gluten-free oil, I use avocado oil
- 2 tbsp (30 ml) extra virgin olive oil
- 1 tbsp (15 ml) genuine white wine vinegar or lemon juice
- Boiling water, if needed
- 15.5 oz (440 g) empty jar (such as one used for salsa) – you want a jar the head of an immersion blender can fit into
Directions:
- Put salt, pepper, sugar, mustard, vinegar and herbs in jar. Add oil. Add egg.
- Wait for egg to fall to bottom of jar – room temperature egg, it falls almost immediately.
- Insert immersion blender almost to thebottom of jar, you need to leave a space for blender to start pulling up ingredients and blend. It won’t work if you have blender at top of jar. Egg needs to be allowed to form an emulsion with oil and egg is at the bottom of jar.
- Turn on immersion blender, run slightly above bottom of jar, for about 20 seconds and then very slowly raise the blender up from the bottom. By the time you reach top of jar everything should be nicely blended, all oil blended in. Run blender a little longer if you need to. If it doesn’t seem to be thickening push blender to bottom of jar again and run a little longer.
- Remove blender, taste and adjust seasoning as needed. It can be difficult to remove blender from jar as there’s very little space. If mayo is too thick, add boiling water teaspoon at a time.
Note: herbs will make mayo either completely green or flecked with green. Of course you can make plain mayo and then finely chop herbs and add them on top to keep the white color.
<< Back to Recipes
TAGS: VEGETARIAN, SIDE DISHES, APPETIZERS/SNACKS
Chilled Beet Soup
May 30, 2018Chilled Beet Soup
This chilled gluten-free Lithuanian soup, also known as šaltibarščiai(pronounced shaltee-barsh-chay), is ideal for a summer luncheons and garden parties.
F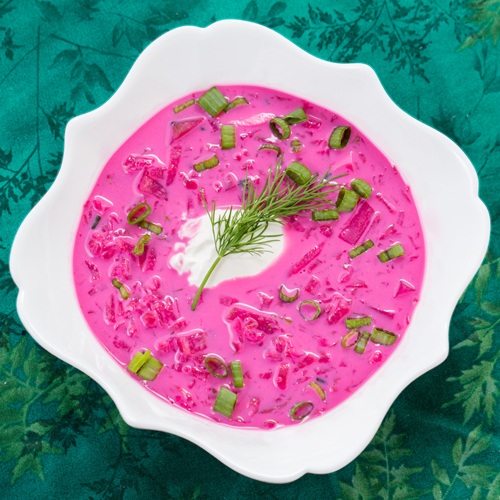 rom Chef Oonagh Williams of Gluten-Free Cooking with Oonagh
I gave Lithuanian cooking classes demos for about 10 years at our local ethnic library and spent July 2005 in a Lithuanian language course at the University of Vilnius, capital of Lithuania. And no, I am not of Lithuanian descent, but I was given so many old and new Lithuanian cookbooks, tried the recipes, made them for class and was told they brought back memories of grandmother making them. This particular recipe is a mix of two cold beet soup recipes. One is taken from the Lithuanian Heritage magazine and the other is from ‘Treasures of Lithuanian Cooking.’ The recipes are almost identical as to ingredients. Now I give talks with vibrant photos of Lithuania with history, culture, and a gluten-free Lithuanian buffet to libraries, clubs etc.
Chilled Beet Soup
Makes about 12 half-cup servings
Ingredients:
- About 1 lb raw beets, cooked, peeled, and shredded in food processor
- Half a European cucumber, peeled, quartered lengthwise and finely diced
- 2 eggs, hard boiled, peeled and finely diced – optional
- 4 green onions, leaves only finely scissored
- 2 c buttermilk (I buy Kate’s of Maine that is genuine buttermilk, labeled gluten-free, not from a culture)
- 1 c cold water or beef broth
- ¼ tsp sugar or honey or more to taste once chilled
- salt and pepper
- ¼ c sour cream (or more)
- 2 tablespoons finely chopped fresh dill – dill is a strong flavor, so don’t add too much at first
Directions:
1.Mix all the ingredients together and chill for 1-2 hours or overnight. The flavor does improve on chilling as everything melds together.
2. Taste after chilling and add more salt, pepper or herbs to taste.
Traditionally this soup is served with a dollop of sour cream (100% of course – Friendship brand is most authentic) in the middle of each bowl and an individual plate of slices of hot, plain boiled potato. You take a spoonful of hot potato from the plate and dip the spoon into the cold soup so you get the contrast of hot and cold in each mouthful. It tastes really good this way.
<< Back to Recipes
TAGS: SOUPS/STEWS, SIDE DISHES, LUNCH, APPETIZERS/SNACKS
Spinach and Sundried Tomato Quiche or Frittata
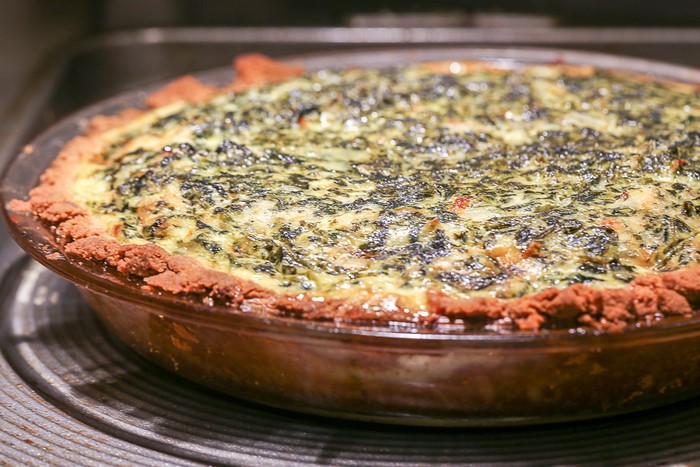
March 19, 2018Spinach and Sundried Tomato Quiche or Frittata
Great for vegetarians and anyone who enjoys a savory breakfast treat!
Courtesy of Chef Oonagh Williams of Gluten-Free Cooking with Oonagh
For this gluten-free quiche recipe, the spinach mix can be poured into a partially cooked gluten-free pie crust or cooked on its own in a pie plate without a pie crust to be served as a frittata, or even a vegetable side dish. I tend to bake it without a crust in an 8 x 8” Pyrex dish. Also, you can cook the mix in regular muffin pans for a portable breakfast or lunch, or in mini muffin pans for parties. I’ve mixed up the recipe with cooked broccoli and feta cheese.
Make sure to point out the tomatoes aren’t bacon. Some people won’t believe you!
Ingredients:
- 1 recipe of partially baked, gluten-free pie crust.-optional
- 1 large onion, peeled and finely chopped
- 2-4 cloves garlic, peeled and finely chopped
- 2 Tbsp. (30ml) olive oil (or butter if you want)
- 10 oz. (300g) container/block of frozen chopped spinach (not leaf spinach), thawed and squeezed dry. Or roughly half of 16 oz. bag of frozen chopped loose spinach
- 1/3 cup (2 oz, 56 g) sundried tomatoes in oil, cut into small pieces
- 3 extra large eggs or 4 large eggs. Or 2 eggs and 1/2 cup gluten-free liquid egg substitute
- 1 cup (8 fl oz, 250 ml) half and half or cream (I really notice the difference between half and half and cream in the finished quiche. But, I found that if you mix in 1 Tbsp. (15 ml) gluten-free cornstarch/corn flour to cooked vegetables and add just half and half or even fat-free half and half, it cooked to the creamy texture of heavy cream but with significantly less calories.)
- Salt and pepper
- ½ cup (2 oz, 50 g) shredded Swiss cheese
- ½ cup (2 oz, 50 g) shredded smoked Gouda or use 1 cup total of Swiss cheese or strong cheddar (Please use a strong cheese, mild cheddar doesn’t add any flavor.)
- ¼ cup finely chopped fresh parsley (optional)
- ¼ cup fresh basil (optional)
Directions:
- Put onion in an 8 cup non-stick pan and add olive oil or 2 Tbsp. oil from the sundried tomato container. Cook onions for about 10 minutes until they are very soft and starting to turn gold but not burning.
- Add garlic, spinach and sundried tomatoes and cook gently, covered, for about 10 minutes. I found it was important to have plenty of onion and to cook spinach for enough time before putting in quiche, otherwise the quiche had a raw flavor.
- Lightly beat eggs, pour cream into spinach mix to cool slightly, add eggs and cheese mix with salt and pepper, and herbs if desired.
- Pour into partially baked pie crust, place on metal baking sheet and bake in preheated 350* oven for 30-45 minutes until the custard is set and the quiche is browning around the edges. There is no need to cook the quiche until it rises like a cake and is brown all over. Think of it as a custard that just needs sufficient cooking to set the eggs and remain creamy. Cooked at a higher temperature it will have consistency of overcooked scrambled eggs. Cooked until it rises like a cake produces a dry quiche.
- Remove from oven, allow to cool for about 10 minutes (it will deflate) and serve warm or at room temperature, not cold from fridge.
Options: You can leave out sundried tomatoes. I didn’t find adding roasted red pepper added significantly to the flavor. Cooked spinach works just as much on your body as spinach salad.
<< Back to Recipes
TAGS: VEGETARIAN, SIDE DISHES, HOLIDAY, BREAKFAST
Lithuanian Garlicky Farmer’s Cheese with Walnuts
February 26, 2018Lithuanian Garlicky Farmer’s Cheese with Walnuts
A cheesy, gluten-free Lithuanian delight!
From Chef Oonagh Williams of Gluten-Free Cooking with Oonagh
.jpg) For many years I gave Lithuanian cooking demos at our local ethnic library after attending summer school at the University of Vilnius in Lithuania. I still give talks on Lithuania featuring many photos and a gluten-free buffet with Lithuanian dishes. March 11th is the anniversary of the 1990 Restoration of Independent State of Lithuania, after years of Russian occupation, so it’s a good time to try this special snack!
For many years I gave Lithuanian cooking demos at our local ethnic library after attending summer school at the University of Vilnius in Lithuania. I still give talks on Lithuania featuring many photos and a gluten-free buffet with Lithuanian dishes. March 11th is the anniversary of the 1990 Restoration of Independent State of Lithuania, after years of Russian occupation, so it’s a good time to try this special snack!
To make this Lithuanian dish, I always use fresh garlic chopped in a food processor and frozen. I never use jars of garlic, garlic powder or garlic salt for this recipe. Also, I recommend using fresh herbs, chopped and not dried.
Gluten-Free Lithuanian Garlicky Farmer’s Cheese with Walnuts
Ingredients:
- 1 lb Friendship brand Farmer’s cheese ($3.99/lb in my market’s specialty cheese section). This Farmer’s cheese is like a dry ricotta, but still soft. Andrulis brand is a sliceable brick.
- ½ c sour cream (or Greek yogurt)
- ¼ c light or heavy cream (the mix was too heavy to puree without added liquid)
- 1 tbsp honey – the cheese is quite tangy so I like little bit of honey
- 1/2 c finely chopped toasted walnuts – divided in 2
- 1 clove of garlic peeled and finely crushed
- 1/4 c parsley
- 2 tbsp dill. Chop leftover dill and freeze flat in ziploc bag.
- Green of half a bunch of green onions
- Pepper, no salt for me as I cook naturally low sodium
Directions:
1. Process farmer’s cheese, sour cream/yogurt, cream, garlic in a food processor until smooth.
2. Add honey and half the walnuts, pulse, add fresh herbs and pulse until slightly chopped. If you run food processor for too long you end up with green colored cheese.
3. Line a round bowl with plastic wrap and fill with cheese mix. Cover and refrigerate for 4 hours to allow flavors to mellow and blend.
4. Line a small serving plate with lettuce leaves and unmold cheese ball onto lettuce leaves.
5. Press extra coarsely chopped walnuts into the ball until they almost cover it. Serve with gluten-free crackers.
Sometimes walnuts (even when fresh) taste too strong for me, so I leave them out. Make it without nuts and see what you think.
If desired, the cheese mix can be mixed by hand so that the nuts remain whatever size you choose to chop them and you chop herbs with scissors or knife. Or place cheese mix in pretty serving bowl with small knife.
You can also sprinkle walnuts on a flat piece of plastic wrap, form cheese mix into a log, place on top of nuts and fold saran wrap around cheese to form a nut encrusted log. Refrigerate.
<< Back to Recipes
TAGS: SIDE DISHES, APPETIZERS/SNACKS
Easy Sweet and Spicy Sausage Cheese Balls
January 2, 2018Easy Sweet and Spicy Sausage Cheese Balls
Perfect for your next party!
 From Chef Oonagh Williams of Gluten-Free Cooking with Oonagh
I know this recipe has been around for years, mainly cooked with Bisquick, I believe. I’ve only used Bisquick on a few occasions, so decided to try other add ins. FYI, most recipes quote 3 cups Bisquick (wheat, gluten-free Bisquick version had very small amount of sausage), 1 lb sausage meat and 1 lb of cheese.
I used my favorite Jones Dairy Farm sausage meat, always labeled gluten-free. Remember that meat comes under USDA and DOES NOT have to follow FDA gluten-free labeling guidelines, but quality sausage meat should be naturally gluten-free. The quality of the sausage meat is really important. (Years ago I bought an unknown brand of maple sausage thinking it would be tasty and it was mainly melted fat, a total waste of money.) Some people have used hot sausage, plus pepper jack.
I like to make a recipe to as small a quantity as possible first time, so less chance of waste. I tried this with a larger quantity of corn chex and felt the flavor of the corn chex was too strong. I then tried soft gluten-free breadcrumbs, but that was mushy and horrible to me… We liked this version best, it keeps well in the fridge and is moist, not dry.
Gluten-Free Sausage Cheese Balls
makes about 36 balls
Ingredients:
- 1 x 12 oz (375 g) Jones Dairy Farm raw sausage meat, thawed, labeled gluten-free. Remove from fridge about half an hour before mixing. Cut open plastic wrapping and peel bag away from sausage meat like a banana.
- 2 oz (56g) soft cream cheese, I buy lite.
- 1/4 c (60ml) hot pepper jelly, gives a nice slightly sweet bite.
- 1/4 c (60ml) my tomato relish
- 1 c (240 ml) corn chex crushed to 1/2 c (120 ml). Rice chex if you can’t have corn chex, but corn does add a bit of flavor.
- 1 c (4 oz, 112g) Shredded Swiss Cheese or Strong Cheddar. MiId cheddar has very little flavor.
- 2 tsp (10 ml) gluten-free baking powder
- pinch of garlic powder
- No added salt or pepper, it really doesn’t need it, and think twice about recipes that add teaspoons of salt to a recipe already containing a lot of salt
Directions:
1. Preheat oven to 350*F/175C.
2. I find it easiest to put all ingredients except for sausage meat in bowl of mixer, mix together until well blended. Or mix with scrupulously clean hands – I use the disposable latex gloves.
3. Mix in sausage meat.
4. I use a #60, one tablespoon (15 ml) scoop (number is engraved inside bowl of scoop), available at Kitchen stores, Home Goods, on line etc. Scoop meat against side of bowl, squish meat around outside of scoop back onto the bottom. I’ve never been one that likes to spend forever forming meat into really tidy balls, but I do try to make sure there isn’t an excess of meat on outside of scoop. Plop ball onto a lined jelly roll pan, broiler pan, pam sprayed cooling rack sitting on lined pan with edges, skillet with ridges. It does help fat to drain away if balls are raised above surface of cooking pan. A flat cookie sheet means fat dripping on floor of stove and smoking.
5. Bake for 20-30 minutes, until softly firm, cut one open to check it’s fully cooked. Some recipes talk about them being crispy, perhaps if you broil them or cook for longer.
6. I’ve used Maries Italian, Chipotle Ranch dip/dressing, Rothschilds Pineapple Coconut Tequila sauce, Sweet Chili Sauce. Others say bbq sauce.
Alternatives:
Instead of my tomato relish, perhaps salsa for moistness and even more heat, some pesto, cilantro and chili peppers, sage and maple syrup, Stonewall Kitchen Curried Mango grill sauce in sausage and to serve. Crush some cornbread instead of chex. Get creative. I’ve tried them with chopped water chestnuts for crunch, chopped bread and butter pickles.
<< Back to Recipes
TAGS: SIDE DISHES, HOLIDAY, APPETIZERS/SNACKS
Tasty Spinach and Artichoke Squares
Tasty Spinach and Artichoke Squares
So delicious!
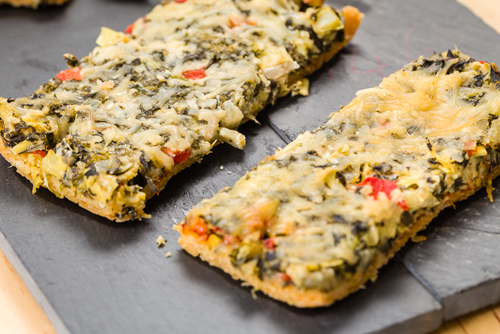 From Chef Oonagh Williams of Gluten-Free Cooking with Oonagh
This spinach and artichoke square recipe is based off of a Pampered Chef recipe from their gluten-free cookbook. I knew when I read their recipe for crescent roll dough, that their weight quantities were off. I made my own gluten-free flaky pastry recipe that I use for pot pies, English sausage rolls, then did my thing with the topping.
Gluten-Free Spinach and Artichoke Squares
Makes roughly 24 x 2×2″ squares
Ingredients:
Pastry
I make this quantity of pastry (makes 1+1/2 lbs of dough) and then freeze half of it to use later.
1/2 recipe for 10″ pie crust base or a thick top crust.
- 1 c ( 4oz, 112 g) my gluten-free flour blend. If you sub a different blend, you need to weigh flour and remember that every gluten-free blend cooks up differently.
- 1 c (4oz, 112g) almond meal. This is almonds with skin that have freckly appearance on baking. Almond flour is almonds ground without skin but usually more than $10/lb.
- 2/3 c (3 oz, 84g) gluten-free cornstarch, I buy Argo labeled gluten-free.
- 1 tsp (5 ml) baking powder, I buy Rumford’s labeled gluten-free, non-GMO and aluminum-free.
- 1/2 tsp ( 3ml) xanthan gum
- 1/3 c (80 ml) ice water, ice cube in small cup with ¼ cup water
- 1/3 c (80 ml) liquid egg substitute or a large egg plus 1 tbsp egg sub, broken up with a fork.
- Salt
- 2 sticks (8 oz, 224g) butter, cut into thin slices, put in freezer for about half an hour until really hard and cold.
Topping
Note, that I rarely use just mayo in a recipe but prefer to mix it 50/50 with Greek Yogurt.
- 1 x 10 oz (280g) block of frozen, chopped spinach, thawed and squeezed dry.
- 1 x ~ 14 oz (400g) can of artichokes, drained and chopped.
- 2 roasted red bell peppers, rinsed if from jar, patted dry and cut into fingernail size pieces. I normally used freshly roasted red peppers, but with all these flavors, jarred peppers are fine.
- 1 x ~ 6 oz (180g) can of sliced water chestnuts, chopped small. I like the crunch, neutral flavor. I have tried this with cornichons that taste like bread and butter pickles.
- 1 c (4 oz, 112g) shredded Swiss cheese. Original recipe used Feta cheese, I preferred flavor of Swiss.
- 2 cloves of garlic, peeled and finely crushed.
- 3/4 c ( 6 fl oz, 180 ml) of mayo and Greek yogurt mixed.
- 4 green onions (spring onions) trimmed and scissored small.
- 1/4 c (60ml) Parmesan cheese to top.
- I didn’t add extra salt. Add some freshly ground pepper.
Optional: add some chopped olives, either black or green with pimiento stuffing.
Use pepper jack cheese for heat. Smoked Gouda. Mozzarella doesn’t add much flavor. Thin slices of baby corn can be added for crunch.
Directions:
Pastry
1. Put gf flour, almond meal, cornstarch, baking powder, xanthan gum and salt in bowl of food processor or in mixing bowl. Pulse or stir to combine.
2. In food processor or in bowl, pulse or cut in 4 oz butter until it is in large breadcrumb size- think panko breadcrumbs.
3. I then change to coarse large shredding/grating blade for food processor and shred remaining 4 oz butter into mix.
4. Empty into 8 cup (2 ltr) bowl. Stir to separate butter clumps. Sprinkle on iced water and egg and stir until mix starts coming together. If you still have dry mix at bottom of bowl, scoop it with your fingers without squeezing butter or warming up mix in your hands. Only if mix stays really dry, add about 1-2 tsp more of iced water. This makes a moist dough, not wet. If dough is dry then it crumbles and cracks on rolling out.
5. Divide dough in half, wrap and freeze one half for later use. Refrigerate dough for half an hour.
6. Preheat oven to 375F/190C. Put dough on parchment (greaseproof) paper and top with plastic wrap. Dust parchment paper and top of dough with gf flour, dough easily sticks. Roll out to roughly 10 x12″, lifting dough to stop it sticking. Try and roll to a rectangle with few cracks or tears. A bit of water on fingers patches cracks, take pieces from uneven edges to patch larger cracks. Don’t worry if it doesn’t look perfect, it still will taste good and will be hidden by topping. I then lift parchment paper with rolled out dough and place it on 10×15 sheet. This is far easier than trying to lift dough from parchment paper. Don’t forget to remove plastic wrap.
7. Bake in preheated oven for about 30 minutes, it should be golden brown allover, edges will be a bit crispier than middle, as edges tend to be thinner. I find if you don’t cook it enough now, it will taste under cooked for serving.
Toppings
1. Mix all topping ingredients together except for parmesan.
2. Spread topping on cooked pastry base right up to the edge, it won’t flow over sides or rise.
3. Sprinkle with parmesan and bake in oven for about 20 more minutes. It won’t rise, or really brown. Cooking is to marry the flavors, melt the cheese and cook the garlic and spinach. Parmesan doesn’t brown.
4. Remove from oven, allow to cool slightly then cut into squares with pizza cutter. Base should be sturdy to pick up in fingers, good cold, base goes soft if microwaved.
<< Back to Recipes
TAGS: SIDE DISHES, LUNCH, APPETIZERS/SNACKS
Mini Bacon Cheddar Cheesecakes
November 20, 2017Mini Bacon Cheddar Cheesecakes
![]()
Courtesy of Crunchmaster
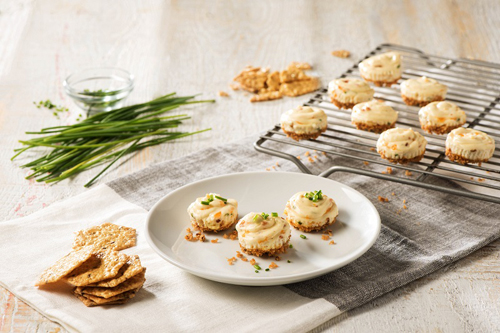 Ingredients:
- 1/2 cup crushed Crunchmaster® Multi-Seed Crackers
- 2 tbsp grated Parmesan cheese
- 2 tbsp butter, melted
- 1 pkg (8 oz) plain brick-style cream cheese, softened
- 3 tbsp sour cream
- 1/3 cup shredded Cheddar cheese
- 1 tbsp finely chopped fresh chives, divided
- 2 strips bacon, cooked crispy and finely chopped
- 1/4 tsp each salt, pepper and granulated sugar
- 1 egg
Directions:
- Preheat oven to 350°F. Line 24-cup mini-muffin pan with paper liners. Stir crackers with Parmesan cheese until combined; toss with melted butter. Divide evenly into bottom of cups, pressing down, to form crusts. Bake for 10 to 12 minutes or until lightly golden and set. Let cool completely.
- Using electric mixer, beat cream cheese, salt, pepper and sugar until smooth and fluffy. Beat in egg until blended; beat in sour cream. Fold in Cheddar cheese, bacon, and 2 tsp chives. Spoon over crust.
- Reduce oven temperature to 325°F; bake for about 15 minutes or until just set. Let cool to room temperature in pan on rack; cover and refrigerate for at least 1 hour or until thoroughly chilled. Sprinkle with remaining chives for serving.
Tips:Garnish with additional bacon, pepper jelly, caramelized onions or chives if desired. Use an aged or sharp Cheddar for full flavor.
<< Back to Recipes
TAGS: SIDE DISHES, HOLIDAY, APPETIZERS/SNACKS