Gluten-Free Recipes for Side Dishes
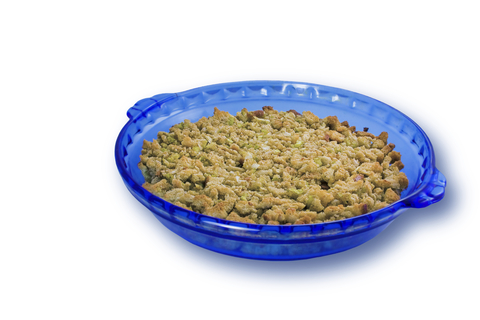
Mary’s Apricot Stuffing
September 10, 2012Mary’s Apricot Stuffing

Courtesy of Mary’s Gone Crackers
Ingredients:
- 1 jar Mary’s Gone Crackers Original or Savory Crumbs (or crumble Mary’s Gone Crackers Sticks & Twigs or crackers)
- 1 cup onion (finely chopped)
- 2 stalks celery (finely chopped)
- 1/3 cup parsley (chopped)
- 1/2 to 3/4 lb. Shiitake or other mushrooms (sliced and chopped)
- 6-8 dried apricot halves, finely chopped
- 4 Tbsps. olive oil or other cooking oil
- 1/2 cup white wine (optional)
- 1-2 cup gluten-free stock (turkey, chicken, or vegetable)
- 1 tsp. dried or fresh rosemary (crumbled)
- 1 tsp. dried or fresh sage (crumbled)
Directions:
- In a large skillet, add several tablespoons of olive oil, sauté onion on medium heat, stirring often, then cover to keep in the moisture, until soft.
- Add celery and continue to cook several more minutes.
- Add mushrooms and 1/2 cup wine (or a little broth). Continue to cook, stirring frequently, until the vegetables are nicely cooked.
- Add parsley, herbs and chopped apricots and cook a few more minutes to blend in the flavors.
- Turn off heat and keep covered.
- In a large bowl, pour in Mary’s Gone Crackers Original or Savory Crumbs. Add vegetable/apricot mixture to the bowl and mix well.
- Pour in broth and mix thoroughly. Add more liquid if needed (if stuffing a turkey, let it be drier, as the juices from the turkey will moisten it sufficiently; if baking in a casserole, adjust liquid so it doesn’t dry out).
- Season with salt and pepper to taste, if desired.
- Bake in covered casserole dish for 30 minutes at 350 degrees or until heated through and browned. Add more broth if stuffing looks too dry. Mary’s Gone Crackers Original or Savory Crumbs should absorb the liquid and soften somewhat.
<< Back to Recipes
TAGS: HOLIDAY, THANKSGIVING, SIDE DISHES
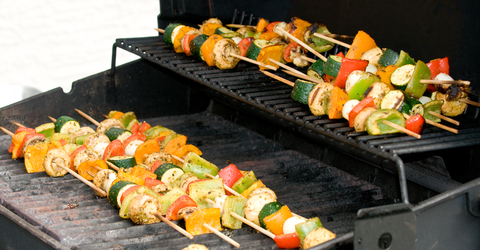
Vegetable Kabobs
August 13, 2012Vegetable Kabobs

Courtesy of Thai Kitchen
Ingredients:
- 1 can (13.66 ounces) Thai Kitchen Lite Coconut Milk
- 1 tablespoon Thai Kitchen Premium Fish Sauce
- 2 teaspoons Thai Kitchen Red Curry Paste
- 1 cup medium mushrooms
- 1 small zucchini or summer squash, cut into 1-inch chunks
- 1 small green or red bell pepper, cut into 1-inch chunks
- 1 medium onion, cut into thin wedges
- 4 long bamboo or metal skewers
- Thai Kitchen Sweet Red Chili Sauce
Directions:
- Mix coconut milk, fish sauce and curry paste in small bowl until well blended. Set aside. Thread vegetables onto skewers. Place kabobs in shallow dish. Pour marinade over kabobs; turn to coat well. Refrigerate 2 hours or overnight for extra flavor.
- Broil or grill kabobs over medium heat 10 to 12 minutes or until vegetables are tender, turning occasionally. Serve with Sweet Red Chili Sauce for dipping.
Thai Kitchen Tip: Soak bamboo skewers thoroughly in water for at least 30 minutes before threading with vegetables. This prevents them from burning when on the grill.
<< Back to Recipes
TAGS: SIDE DISHES
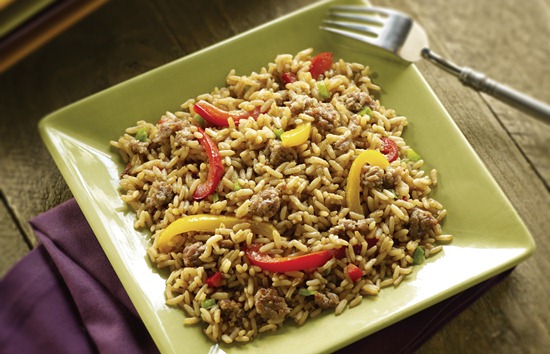
Mardis Gras Dirty Rice
May 25, 2012Mardis Gras Dirty Rice
![]()
Courtesy of Zatarain’s
Prep Time: 5 minutes
Cook Time: 35 minutes
Serves 7.
Ingredients:
- 1 tablespoon oil
- 1 medium red bell pepper, thinly sliced
- 1 medium yellow bell pepper, thinly sliced
- 1 pound bulk gluten-free pork sausage
- 1 package Zatarain’s Dirty Rice Mix
- 2 1/2 cups water
Directions:
1. Heat oil in large skillet on medium-high heat. Add bell peppers; cook and stir 3 to 5 minutes or until tender-crisp. Remove from skillet. Add sausage to skillet; cook and stir 5 minutes or until no longer pink.
2. Stir in Rice Mix and water. Bring to boil. Reduce heat to low; cover and simmer 20 minutes. Return bell peppers to skillet. Cover and cook 5 minutes longer or until rice is tender. Remove from heat. Let stand 5 minutes.

This recipe is featured in NFCA’s new Summer Cooking Guide, sponsored by Zatarain’s.
<< Back to Recipes
TAGS: SIDE DISHES
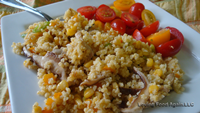
Shiitake and Bean Power Salad
April 4, 2012Shiitake and Bean Power Salad
« Return to the Allergic Living Recipe Box
This salad makes a wonderful side dish or an easy gluten-free and protein-packed lunch.

Courtesy of Allergic Living and Chef Simon Clarke
Serves 4-6.

Ingredients
Salad
- 4 cups cooked brown rice
- 1 can each, Borlotti, pinto and Cannellini beans*, drained and rinsed OR 1½ cups cooked dry beans (Pre-soak according to package directions.)
- 1 cup shiitake mushrooms, sliced
- 1 red pepper, diced
- 1 cup celery, diced
- 1 clove garlic, minced
- 1 cup cucumber, diced
- 1 apple, diced
*Note: It’s fine to substitute other beans of your liking. Beans come in a wide variety of healthy choices.
Dressing
- 1 cup olive oil
- 1 ⁄ 2 cup white wine vinegar
- 1 Tablespoon brown sugar
- 1 teaspoon Dijon mustard
- 2 medium tomatoes, seeds and skin removed
- 1 jalapeño pepper, halved, seeds removed
- 1 Tablespoon fresh oregano
- 2 green onions, roughly chopped
- 2 garlic cloves
- 1 teaspoon salt
- I teaspoon pepper
Directions
- Combine all salad ingredients.
- For dressing, place all ingredients into a blender. Blend on high for 30-40 seconds.
- Pour dressing over salad, toss.
This salad can be made up to an hour in advance.
<< Back to Recipes
TAGS: VEGETARIAN, VEGAN, SIDE DISHES, LUNCH
Amaranth and Black Bean Salad
February 6, 2012Amaranth and Black Bean Salad
![]()
Courtesy of The Hain Celestial Group, Inc. and Renegade Kitchen
Ingredients:
- 1 cup Arrowhead Mills Amaranth
- 2 ½ cups Imagine Vegetable Broth

- 15-ounce can black beans, rinsed and drained
- 1 cup corn kernels (frozen or fresh)
- 1 cup cherry tomatoes, halved
- 1 cup roasted red peppers, chopped
- ½ red onion, minced
- ¼ cup chopped walnuts
- ½ cup tomato juice
- 1 tablespoon Spectrum Balsamic Vinegar
- 1 tablespoon Spectrum Extra Virgin Olive Oil
- ½ cup fresh mint leaves, shredded
- 1 tablespoon chopped garlic
Directions:
1. Stir the amaranth and veggie stock together in a sauce pot. Cover and bring to a boil. Drop the heat to low and simmer, covered, for 20 minutes. The amaranth will cook up almost like porridge. Set aside and allow to cool while you prepare the remaining ingredients.
2. In a large bowl, mix the beans, corn, tomatoes, peppers, onion and walnuts. Add the cooled amaranth and stir to combine.
3. In a separate small bowl, whisk together the tomato juice, vinegar, oil, mint and garlic. Pour this dressing over the amaranth mixture and stir until well blended.
Learn more about amaranth and other gluten-free ingredients.
Plus, enter to win a gluten-free prize pack worth $100!
Celebrate the “Thrill of the Choice”
<< Back to Recipes
TAGS: VEGETARIAN, SIDE DISHES
Warm Millet Salad
December 22, 2011Warm Millet Salad
From Paul Biscione of Healthy Xpectations
Ingredients:
- 1 cup of Millet; rinsed about 2 or 3 times and drained
- 2 cups of Water
- 8 oz pkg of Shiitake Mushrooms
- 1 orange or yellow Bell Pepper; diced
- ½ of an Onion; diced
- 15 oz can of Corn; drained
- 2 small or 1 large Scallions; green and white parts
- 1 cup of Mustard Vinaigrette (see recipe below)
- Salt and Pepper to taste
Basic Mustard Vinaigrette
(Mix all ingredients below and whisk thoroughly to combine)
- 2/3 cup Extra Virgin Olive Oil
- 1/3 cup Rice Vinegar
- 2 Tbsp Dijon Mustard
- A pinch of Salt and Pepper
Directions:
1. In a large pot (or wok), add the rinsed millet and dry it out from the rinsing over a medium low heat; keep it moving in the pan so it does not burn.
2. After it is dry (about 2 minutes), add 1 Tbsp of olive oil and continue to stir to coat the millet for about 1 more millet; remove the pan from the heat.
3. In a second large pot with a heavy or a snug fitting lid, bring the 2 cups of water to a boil.
4. Add the millet to the pot of water and bring the pot back to a boil; place the cover on and lower the heat to low. Set a timer for 25 minutes (do not uncover or touch the millet again until it is done).
5. While the millet is simmering; in a large sauté pan or wok, sauté the onions and bell pepper in about 3 Tbsp of olive oil over a medium low heat for about 4 minutes until the peppers and onions are slightly tender.
6. Now add the corn and the shiitake mushrooms to the pan and raise the heat to high and continue to cook mixture for about 3 minutes; you are only looking to warm the corn and mushrooms through at this point. After the mixture is done, set aside and cover the pan to keep warm.
7. After 25 minutes when the millet is done, shut the heat off, uncover the pot and set the timer for 10 minutes (do not touch or stir the millet). This will allow the millet to dry out a bit and fluff up nicely.
8. After the 10 minutes, use a fork with large tines and fluff by raking the fork through the millet.
9. Dump the millet into a large mixing bowl (big enough for the millet and vegetable mixture), add the vegetable mixture to the bowl along with the scallions and gently fold to combine.
10. Add all of the vinaigrette to the millet mixture with your desired amount of salt and pepper and again fold gently to combine.
11. Place millet salad in the fridge for about 20 minutes so the flavors have a chance to combine.
12. Take the millet out of the fridge after the 20 minutes and zap it in the microwave for about 30 seconds or so just to bring it back to a warm temperature (but not hot). Serve.
Note: I find that letting the millet sit for a while really allows all of the flavors to come together and to intensify. Of course, you can eat the millet right after you make it without refrigeration, but the full impact of the flavors will not be present without a little resting. In fact, you can let this chill in the fridge for quite a few hours if you want to make this beforehand for a party.
For more gluten-free holiday recipes and tips:
Gluten-Free Holiday Central
<< Back to Recipes
TAGS: VEGETARIAN, VEGAN, SIDE DISHES, DAIRY-FREE
Hazelnut Sage Stuffing
November 7, 2011Hazelnut Sage Stuffing
![]()
Courtesy of Rudi’s Gluten-Free Bakery and Renegade Kitchen
Makes one 9 x 13 dish.
Prep Time: 40-50 minutes
Baking Time: 15-20 minutes
[Click on the photo to watch a video of this recipe.]
Ingredients:
- 1 loaf Rudi’s Gluten-Free Multigrain Bread
- ¼ cup olive oil
- 1 whole yellow onion, chopped
- 1 bulb fennel, chopped
- 2 garlic cloves, minced
- 4 tablespoons sage, minced
- ~1 pound Cremini mushrooms, chopped
- salt and pepper
- 1 ½ cup veggie stock (homemade is always better)
- 2 eggs
- ½ cup chopped hazelnuts
Directions:
1. Preheat your oven to 250 degrees.
2. Cut the loaf of bread into rough cubes, anywhere from ½ inch to ¾ inch pieces. Spread the bread cubes over a cookie sheet and toast them in the oven for 10-15 minutes, or until they’re light brown and slightly crisp on the outside.
3. Set the bread aside and turn the oven temperature up to 350 degrees.
4. Heat the oil in a sauté pan over medium heat and cook the onion, fennel, and garlic until they’re slightly translucent, about 5-7 minutes.
5. Add the sage and mushrooms and cook everything down for 10 minutes, or until the veggies are ~50% of their original volume. Season everything with salt and pepper as you go along and taste, taste, taste.
6. Put the bread cubes in a large bowl and mix in the cooked veggie mixture. Make sure you mix everything well, no giant pockets of bread or veggies hanging out on their own.
7. Pour the veggie stock and two eggs (unscrambled) over the bread mixture and stir everything one more time. You want it to be moist but not mushy, the egg should coat everything (it will help the stuffing set in the dish).
8. Spread the stuffing into a 9 x 13 dish and sprinkle the hazelnuts over the entire casserole.
9. Bake the stuffing for 15-20 minutes, or until the bread is nicely toasted on top and moist in the middle. The nuts on top will toast as the stuffing bakes and release their most Thanksgiving-y aroma into your house.
10. Get a spoon, a turkey and a bib. It’s Thanksgiving.
For more family friendly gluten-free recipes, see Rudi’s Gluten-Free Recipe Box.
<< Back to Recipes
TAGS: VEGETARIAN, THANKSGIVING, SIDE DISHES
Spicy Corn Salad
August 15, 2011Spicy Corn Salad

Ingredients: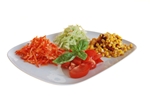
- 1 bag (12 ounces) frozen corn
- 1 cup chopped red bell pepper
- 1/2 cup finely chopped red onion
- 1/4 cup finely chopped fresh cilantro
- 3 tablespoons lime juice
- 1 to 2 tablespoons Thai Kitchen Spicy Thai Chili Sauce
- 1 to 2 tablespoons sugar
Directions:
1. Bring saucepan of water to boil on high heat. Add corn; cook 2 to 3 minutes or until heated through. Drain well.
2. Place corn in large bowl. Add bell pepper, red onion and cilantro; toss well. Mix lime juice, chili sauce and sugar in small bowl until sugar is dissolved. Pour over the corn; toss well. Let stand at least 1 hour to allow flavors to blend.
For more Asian-inspired gluten-free recipes, visit the Thai Kitchen Recipe Box on beyondceliac.org.
<< Back to Recipes
TAGS: VEGETARIAN, VEGAN, SIDE DISHES, DAIRY-FREE
Grilled Potato Salad
May 23, 2011Grilled Potato Salad
![]()
Courtesy of Thai Kitchen and Dan Kohler of Renegade Kitchen
Ingredients:
- Red-skinned New Potatoes (or Yukon Golds, you want a waxy potato here)
- Asparagus

- Red peppers
- Olive oil
- Salt & pepper
- Mayonnaise (Make your own! Recipe follows.)
- Thai Kitchen Spicy Thai Chili Sauce
(All quantities are up to you. The recipe is easily adapted to feed a small family or a large dinner party.)
Directions:
 1. Start with the potatoes. Slice them into thick wedges and place them in a pot with cold water. Bring the water up to a boil for 5 minutes and then take it off the heat. Drain the potatoes and run them under cold water to stop the cooking while you prepare the other vegetables. You have to boil the potatoes before they hit the grill so they are cooked in the middle. They should be barely fork tender after the boiling. (Click the image to the right to watch a video of this recipe.)
2. Cut the red peppers into thick strips and toss away the seeds. Remove the tough ends of the asparagus and leave them whole.
3. Toss the pre-cooked potatoes with some olive oil, salt and pepper, and do the same with the red peppers and asparagus. Keep the potatoes separate so you can grill them first.
4. Crank your grill to medium-high heat and give it time to warm up with the lid closed. Open the grill and place the potatoes down. When they’re all spread out over your grill, shut the lid and cook the potatoes for 5-10 minutes, or until they have grill marks. Flip the potatoes over to get color on the other side and make room for the other veggies. Lay the asparagus and peppers on the grill and leave the lid open. Cook everything together for 7-10 minutes, or until the peppers and asparagus are lightly charred. Remove the veggies from the grill and bring them inside to dress the salad.
5. Using either your homemade mayonnaise (once you do it, you’ll never go back to store bought) or your favorite brand, whisk together a dressing of mayonnaise and Thai Kitchen’s Spicy Thai Chili sauce. Proportions are up to you. Want it spicier? More Thai Kitchen, less mayo. Like a creamy salad? More mayo, less Thai Kitchen.
6. Pour the dressing over your mixed grilled veggies and stir everything to combine.
7. Serve it to your family and watch them drool. It’s that good.
Make Your Own Mayo
(Free of gluten, dairy, soy, corn, nuts and tree nuts)
Ingredients:
- 3 large egg yolks
- 1/4 cup lemon Juice
- 1/4 cup brown rice syrup
- 3 cloves garlic, minced
- 4 tablespoons whole grain mustard (make sure it’s gluten-free!)
- 2 tablespoons garlic powder
- 1/2 teaspoon salt
- 1/2 teaspoon ground black pepper
- 2 cups olive oil
Directions:
1. In the bowl of a stand mixer, combine the egg yolks, lemon juice, brown rice syrup, minced garlic, mustard, garlic powder, salt and pepper. Whip it. Whip it good. Seriously, use a machine to blend these together; your arms will burn wielding a whisk.
2. Turn your mixer on high and pour the oil into the bowl in the thinnest stream possible. Yes, it will dribble down the side of your measuring cup; it will get on your counter; you’ll pour it in cautiously slowly and sometimes too fast. The mayonnaise will survive as long as you try to pour it in slowly. This is how emulsification works.
3. When you’ve finished pouring in the oil, let it whip for another minute and then turn off the mixer. The mayonnaise should be pale yellow, flecked with mustard grains and thick (but not as thick as it will be after a stay in your fridge to chill). You’re finished. Wasn’t that easy?
*For more simple and delicous gluten-free Asian recipes, visit the Thai Kitchen Recipe Box.
<< Back to Recipes
TAGS: VEGETARIAN, SIDE DISHES
Fried Rice with Ham & Peas
May 2, 2011Fried Rice with Ham & Peas
![]()
Courtesy
of
Zatarain’s
Prep Time:10 minutes
Refrigerate Time: 1 hour
Cook Time:20 minutes
Ingredients:
- 2 1/2 cups water
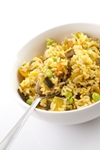
- 1 package ZATARAIN’S Original Jambalaya Mix
- 2 cups diced smoked ham (make sure it’s gluten-free!)
- 1 tablespoon oil
- 1 cup thinly sliced green onions
- 1 cup frozen peas, thawed
- 2 eggs, lightly beaten
Directions:
1. Bring water to boil in medium saucepan. Stir in Jambalaya Mix and ham; return to boil. Reduce heat to low; cover and simmer 15 minutes or until rice is tender. Remove from heat. Let stand 5 minutes. Transfer rice mixture to large bowl.
2. Refrigerate at least 1 hour or until chilled.
3. Heat oil in large skillet on medium-high heat. Add green onions; stir-fry 20 seconds. Add rice mixture and peas; stir-fry 1 minute or until heated through. Make a well in the center of the rice. Add eggs; stir-fry eggs 1 minute or until scrambled. Stir-fry eggs into rice mixture until well mixed.
For more ways to “Jazz Up” your meals, visit Zatarain’s Gluten-Free Recipe Box »
<< Back to Recipes
TAGS: SIDE DISHES, DINNER