Gluten-Free Recipes for Dairy-Free
Panna Cotta (Plus Dairy-Free Variation)
June 5, 2015Panna Cotta (Plus Dairy-Free Variation)
From Chef Oonagh Williams of Royal Temptations Catering
Makes 4 portions
Ingredients:
Panna Cotta:
- ¼ cup water
- 1 envelope unflavored gelatin (7g or ¼ oz weight)
- 2 cups (1 pint carton) of heavy cream (or 15-16 oz can of coconut milk)
- 6 tbsp sugar
- 1-2 tsp vanilla extract
- 4 tbsp rum (optional)
Fruit Sauce:
- 12-16 oz. bag frozen mixed berries or equivalent of fresh berries
- ½ cup water
- ½ cup white sugar or 1/3 cup packed light brown sugar
- 2 tablespoons Amaretto, Chambord or your favorite gluten-free liqueur
Directions:
Panna Cotta:
1. Sprinkle the contents of the gelatin packet over the water in a small microwave safe cup. Stir in. The gelatin will look like a thick paste as it mixes with the liquid. Stand for 5 minutes, then melt the gelatin in the microwave for about 15 seconds. It will be translucent but a pale brown color. It is very important to ensure the gelatin totally dissolves; otherwise, your custard will have chewy bits.
2. Heat 1 cup of heavy cream, sugar and 1 tsp of vanilla extract in a 4 cup microwave safe bowl or jug in the microwave. Slowly heat until the sugar is dissolved.Do not boil.Add second cup of heavy cream and dissolved gelatin. This cools the mixture and makes it set quicker.
3. Taste the mixture and decide if you want to add 1-2 tablespoons more sugar or the second teaspoon of vanilla extract. Add rum or other liqueur to taste.
4. Moisten a small piece of paper towel with a tasteless oil (not olive, sesame, peanut oil, etc.) and wipe the oil around the inside of four ½ cup ramekins, cocotte dishes or custard cups. You could even use regularly shaped tea cups as molds if you don’t own ramekins. Stand the ramekins in a dish such as a 9” pie plate.
5. Use a half cup measure to carefully ladle custard into the ramekins. Leave to cool, then refrigerate for at least 4 hours. Once the custard is set firm, run around the inside edge with a thin knife or spatula to loosen the custard and then invert onto individual small serving plates and shake to loosen. You can also stand the custards in hot water reaching about half way up the sides for 10 seconds to loosen the custard before turning out.
6. Serve as they are or finish with fresh fruit, fruit sauce or fresh chocolate sauce.
Fruit Sauce:
1. Mix water and sugar in a non-stick 2 quart saucepan. Bring to a boil, stirring to dissolve sugar and cook over a medium flame for about 3-5 minutes until liquid is slightly thickened.
2. Add contents of bag of fruit – no need to thaw. Cook over a low heat until fruit breaks up, releases juices and softens. Add liqueur and simmer for 1-2 more minutes. Taste and add more sugar if desired.
3. Serve warm or cold. This sauce keeps in the refrigerator for about a week. It is great with gluten-free waffles, pancakes, ice cream, etc.
Tips & Alternatives:
I have tried making these by adding 4 teaspoons of liqueur to the total liquid custard quantity (that is 1 teaspoon per individual cup), but I really prefer the simple flavor of vanilla. You can try adding 1 teaspoon of liqueur to one ramekin and see what you like. I have tried Grand Marnier and Kahlua, as well as lemon zest, but I still prefer plain vanilla.
To make DAIRY-FREE:
I have made this with Asian style coconut milk and Piña Colada coconut milk. The Piña Colada style coconut milk has a far richer texture but makes the panna cotta very sweet, even without the addition of sugar. Ask your grocer for an Asian style coconut cream and add sugar as per recipe or to your taste.
<< Back to Recipes
TAGS: DAIRY-FREE, DESSERT
Quinoa Black Bean Salad
Quinoa Black Bean Salad
From Anne Lee, MSEd, RD, LD, Director of Nutritional Services, Dr. Schar USA
Serves 4 as a side dish.
Ingredients:
- 1/3 cup quinoa
- 1 cup water
- 1 teaspoon olive oil
- 4 teaspoons fresh lime juice, or more to taste
- ¼ teaspoon ground cumin
- ¼ teaspoon ground coriander
- 1 tablespoon finely chopped fresh cilantro
- 2 tablespoons minced scallions
- 1-½ cups cooked black beans (15 oz can, drained)
- 2 cups diced tomatoes
- 1 cup diced bell peppers (red, green, yellow, or a mixture)
- 2 teaspoons minced fresh green chilies
- salt and ground black pepper to taste
- Lemon or lime wedges
Directions:
1. Rinse the quinoa well in a sieve under cool running water.
2. In a saucepan, bring the water to a boil; add the quinoa, cover, and simmer on low heat, until all of the water is absorbed and the quinoa is tender, about 10 to 15 minutes. Allow to cool for 15 minutes.
3. In a large bowl, combine the oil, lime juice, cumin, coriander, cilantro, and scallions. Stir in the beans, tomatoes, bell peppers, and chilies.
4. Add the cooled quinoa, and salt and pepper to taste, and combine thoroughly.
5. Refrigerate until ready to serve. Garnish with lemon or lime wedges.
<< Back to Recipes
TAGS: VEGETARIAN, SIDE DISHES, LUNCH, DAIRY-FREE, APPETIZERS/SNACKS
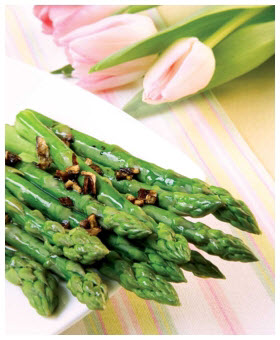
Asparagus with Ginger Butter
June 1, 2015Asparagus with Ginger Butter

Courtesy of Allergic Living and Chef Simon Clarke
Ingredients:
- 3 bunches fresh asparagus
- 2 Tbsp. butter alternative
- 1 tsp. fresh ginger, grated
- 1 clove garlic, minced
- 1 tsp. gluten-free Tamari sauce (optional)
- Fresh ground black pepper to taste
Directions:
- Wash and trim asparagus.
- In a medium sauté pan, melt butter or alternative. Add ginger, garlic and sauté for 2-3 minutes, stirring frequently. Add Tamari sauce and pepper and keep warm on very low heat.
- In a large skillet, heat 4 cups (1 L) water to a boil. Cook asparagus until tender, about 4-5 minutes.
- Drain well, transfer to platter, drizzle with ginger mixture. Serve.
<< Back to Recipes
TAGS: VEGETARIAN, VEGAN, SIDE DISHES, DAIRY-FREE
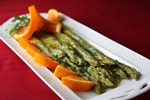
Asparagus in Orange Vinaigrette
May 5, 2015Asparagus in Orange Vinaigrette
From Chef Oonagh Williams of Royal Temptations Catering
6-8 portions
Ingredients:
- Buy enough asparagus for 3-5 pieces per person (or more), depending on whether the spears are thick or thin
- 1/3 cup olive oil
- 1 tablespoon white wine vinegar or champagne vinegar
- ¼ c orange juice concentrate, undiluted
- 1 teaspoon Dijon mustard
- 2 teaspoons maple syrup or honey
- Grated zest of 1/4 or 1/2 orange
- 1/2 teaspoon salt or to taste, freshly ground black pepper
- 2-4 tablespoons finely chopped fresh parsley
- 1-2 tablespoons ends of green onions or fresh chives
- Chopped salted cashews – quantities to taste (optional)
Directions:
1. In a small jug, mix together oil, vinegar, orange juice concentrate, mustard, honey or maple syrup, orange rind, salt and pepper. Stir well until honey/maple and salt are dissolved. Add fresh parsley and chives or green onions.
2. Alternatively put dressing ingredients (except parsley and green onions/chives) in small blender and run. Add herbs and run just to chop. If you run the blender too long then the dressing will turn pale green. The dressing will stay thick mixed in a blender. If you just mix it in a jug it tends to separate out on standing. The dressing stays a more orange color if you don’t use the immersion blender to chop the herbs. Or, you can add some sour cream or mayo to give both a creamier texture and a lighter color.
3. Break asparagus at the bending point, discard ends and cook in single layer in a skillet of boiling water until tender. Just keep taste testing the asparagus to your preference. Roughly 10 minutes, but keep testing.
4. Drain and rinse in cold water containing some ice, drain again. This helps keep the bright green color of asparagus. You can cook the asparagus the day before.
5. Pour about half of dressing over cooked asparagus in 9” pie plate or similar size container where asparagus can lie flat in one layer. Refrigerate for about 2 hours. (Decant leftover dressing into jam jar or plastic container. It will last in the fridge for about 2 weeks. Stir well before use.)
6. Remove asparagus from fridge about half an hour before arranging on plates. Arrange asparagus spears together on individual plates, with tips pointing in one direction
7. Top with sprinkling of chopped cashews and serve with additional vinaigrette for those that like plenty of dressing.
Tips/Alternatives:You can also top asparagus with tiny, cooked salad shrimp, smoked salmon, crab, lobster, etc. (Just make sure it’s gluten-free)
Don’t choose asparagus by how thick or thin it is. The thickness difference is due to different varieties of asparagus (similar to Granny Smith v. Gala apples). Instead, look for tightly closed flower tips, no wetness/sliminess visible on the flower tips, and firm stalks without wrinkles.
Using orange zest as well as orange juice concentrate gives a really tangy orange vinaigrette. Leave out orange zest if you prefer vinaigrette to be less tangy.
<< Back to Recipes
TAGS: VEGETARIAN, VEGAN, SIDE DISHES, DAIRY-FREE
Avocado, Mango and Shrimp Salad
Avocado, Mango and Shrimp Salad
From Chef Oonagh Williams of
Royal Temptations Catering
This dish goes great on a bed of lettuce as its own meal or used as a side dish with grilled salmon, tilapia, etc. You can also keep it simple and serve in a bowl with gluten-free tortilla chips.

Ingredients:
1-2 ripe, sweet mangoes
3/4–1 lb. fresh, sweet pineapple with skin attached, prepared
Green tops of 2 scallions, trimmed and thinly sliced
1 Tbsp. hot pepper jelly
2 Tbsp. olive oil
1 large ripe but firm avocado, prepared
½ lb. cooked salad shrimp
2 Tbsp. chopped fresh cilantro (optional)
Pinch of salt
Add oregano, lemon, thyme, basil for different flavors
Directions:
1. To prepare the mango: Stand the mango upright with the pointed end up, slice down either side of the flat inner stone to get two pieces like small shoulder pads. Using a sharp knife carefully cut through the flesh to the skin in a “tic tac toe” pattern. Press the middle of the skin one direction while pushing the edges in the opposite direction (turning it inside out). This makes the mango pieces stand individually upright so you can cut them off the skin with a sharp knife or scoop them with a spoon. Return to the semi-peeled mango and follow the curve of the stone to cut off the remaining skin/flesh in two pieces. Cut these pieces away from skin.
2. To prepare the pineapple: I buy the semicircular pieces of fresh golden pineapple. Cut off the skin, remove core and any bits of “eyes” still left in flesh. Normally the pineapple needs to be cut in half through the length of the slice, and then cut into small pieces.
3. Put pepper jelly into a 3-4 cup mixing bowl and microwave for 10-20 seconds to melt the jelly. Add lime juice, lime rind, cilantro (if using), olive oil, onions and salt. Mix well. Stir in shrimp.
4. Stir in mango and pineapple. Taste now if you want but in only one hour the salsa will blend and mellow to a very different flavor with no ‘raw’ taste.
5. Prepare and add avocado just prior to serving, as it will darken. Halve the avocado and remove the stone. Cut down through the flesh to the skin in slices. Then cut crosswise to make a “tic tac toe” pattern so the end result is small, diced pieces of avocado. Insert a serving spoon between skin and flesh and ease out the cubes of avocado. Add avocado to mango and shrimp.
<< Back to Recipes
TAGS: DINNER, LUNCH, DAIRY-FREE
Quinoa Peanut Soup (Sopa de Mani)
Quinoa Peanut Soup (Sopa de Mani)
From Chef Oonagh Williams of Royal Temptations Catering
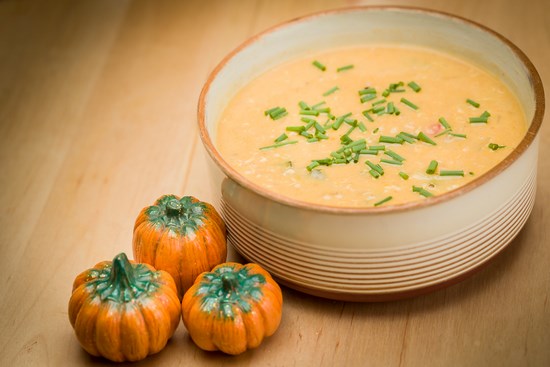
EatingWell said, “This spicy vegetable, quinoa and peanut soup recipe is a modern take on a traditional Bolivian soup recipe called Sopa de Mani. Serve this healthy quinoa soup recipe as a starter or make it a heartier meal by adding diced cooked chicken or turkey breast to the soup.”
I saw this on EatingWell.com in March/April 2013 as part of a series of quinoa recipes. It was similar to a recipe I make with brown rice, curry and peanut butter, so I married the recipes. They used hot sauce like Tabasco, but you can use whatever you like and can tolerate. This only has a slight bite of heat, not runny nose and tingling lips. They used just a regular potato, but I use frozen butternut squash since I like the way it disintegrates to a smooth and creamy soup base. I have also made it with sweet potato which is better nutritionally than a regular potato. Quinoa is a naturally gluten-free, usually also labeled organic and therefore non-gmo, and is a grain from South America known as a “super grain” or “mother of all grains.” It contains all the essential amino acids and is high in protein and fiber. I find it is cheapest at Costco’s. The price has rocketed in recent years. Do make sure to rinse it in a sieve with tiny holes before use even if the packet says pre-rinsed. It has a chemical smell from the naturally occurring insect repellent known as saponin that needs rinsing off. We happily eat this on its own for dinner just with some bread.
For Halloween, use the sweet potato and perhaps food coloring to make it orange-y colored. Think of adding some canned, solid pack pumpkin. Far too often in New Hampshire, Halloween is very cold or rainy so a bowl of spicy hot soup would be ideal. Serve it in a pumpkin ceramic tureen or hollow out small or large pumpkins. And remember garlic keeps the vampires away.
Ingredients:
- 2 Tbsp. olive oil
- 1 medium onion peeled and finely chopped
- 2 cloves garlic, peeled and finely chopped
- 2 medium to large carrots, peeled and chopped into small dice
- 2 stalks of celery, washed, quartered lengthwise and cut into ½ inch pieces.
- ½ x 20 oz. bag of frozen, cubed butternut squash or 1 sweet potato peeled and cut into 1 inch cubes. (My local market in New Hampshire normally carries frozen butternut squash, but I know it’s not so easily available in warmer states all year.)
- 1/2 cup quinoa (Rinse it well before using. I do this even if packaging says pre-washed.)
- 1 tsp. Penzeys smoked paprika (has flavor and gives a slight bite. Cans of Szego paprika in the grocery store are almost tasteless.)
- 1 tsp. Penzeys Arizona Dreaming, slightly spicy, tasty, salt-free seasoning (ancho, chipotle, jalapeňo, cocoa, smoke flavoring, onion, garlic, lemon, red pepper)
- 6 cups gluten-free vegetable broth or reduced-sodium gluten-free chicken broth or water plus gluten-free chicken stock concentrate.
- 1 cup Asian-style coconut milk or whole 15 oz can. (Do not use piňa colada coconut milk, it is full of sugar which tastes really strange with a soup.)
- ½ red bell pepper, cut into small dice
- 1/3 cup peanut butter (I like crunchy for texture. You can use another nut butter or you can leave out nut butter altogether. It’s still good.)
- 1 Tbsp. chopped fresh parsley or cilantro
- Freshly ground pepper to taste
Directions:
- Heat oil in a large saucepan over medium heat. Stir in onion and cook, stirring, until softened, 4 to 5 minutes. Stir in garlic, carrots, celery, sweet potato or squash, quinoa, smoked paprika, and Arizona dreaming, then add stock. Bring to a boil over high heat.
- Reduce heat to a simmer, cover and cook until the quinoa is cooked and the vegetables are tender, about 25-30 minutes. Depending on how well the lid fits on saucepan, the soup might have evaporated more or still be runny after cooking for 25-30 minutes.
- Soup will be thick, stir in coconut milk.
- Stir in red bell pepper and cook, stirring, for about 3 minutes more. Stir in peanut butter until it is combined into the soup. Peanut butter will thicken soup more. Remove from heat.
- Taste and adjust seasoning. I normally don’t add extra salt, but do add ordinary pepper or more hot seasonings to your taste. I’ve also served this with some chopped cooked chicken on top, or some spicy sausage, turkey drumstick (but quinoa and peanut butter are protein rich anyway).
- I had leftover baby zucchini to use up so I added two of them cut into small dice with the coconut milk. Think of adding a handful of chopped (frozen) spinach.
<< Back to Recipes
TAGS: VEGETARIAN, SOUPS/STEWS, DAIRY-FREE
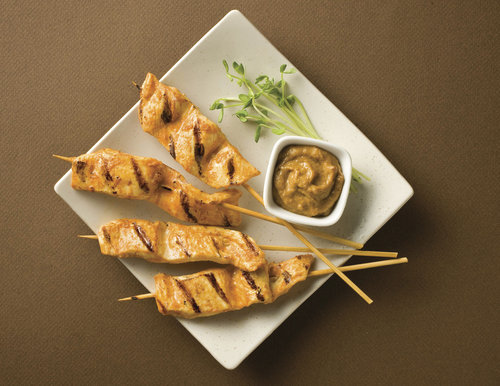
Chicken Satay with Peanut Dipping Sauce
Chicken Satay with Peanut Dipping Sauce
Prep Time: 15 minutes
Refrigerate: 1 hour
Cook Time: 6 minutes
Makes 8 appetizer servings.
Ingredients:
- 1/2 cup Thai Kitchen Coconut Milk
- 2 Tbsp.Thai Kitchen Premium Fish Sauce
- 2 Tbsp. Thai Kitchen Red Curry Paste
- 2 tsp. minced fresh lemon grass
- 1 lb. boneless skinless chicken breasts, cut into 3/4-inch strips
- Bamboo skewers
- 1/2 cup Thai Kitchen Peanut Satay Sauce
Directions:
- Mix coconut milk, fish sauce, curry paste and lemon grass in small bowl until well blended. Place chicken in large resealable plastic bag or glass dish. Add marinade; toss to coat well.
- Refrigerate 1 hour or longer for extra flavor. Remove chicken from marinade. Discard any remaining marinade. Thread chicken strips onto skewers.
- Broil or grill over medium-high heat 3 minutes per side or until chicken is cooked through. Serve with Peanut Satay Sauce for dipping.
Thai Kitchen Tip: Soak bamboo skewers thoroughly in water for at least 30 minutes before threading with chicken. This prevents them from burning when on the grill.
<< Back to Recipes
TAGS: DINNER, DAIRY-FREE
Speedy Bean Salsa (Island Caviar)
Speedy Bean Salsa (Island Caviar)
From Chef Oonagh Williams of Royal Temptations Catering
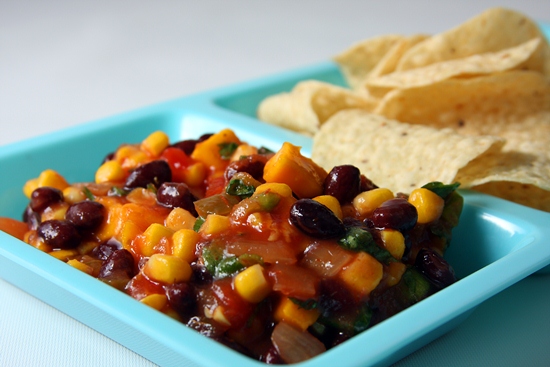
The inspiration for this recipe came from an ad for Tostitos. I altered the recipe considerably since I prefer to “dump” complete containers of beans, corn, salsa etc. rather than measuring out smaller quantities. This salsa has a nice bite to it, no runny nose and tingling lips – at least that’s what we think with the ingredients we use.
Ingredients
- 1 jar (15oz, 430 g) of medium heat salsa
- 1 can (15oz, 430 g) black beans, drained, rinsed well and drained again.
- 1 x 11 oz (311g) can of corn, drained
- 2 Tbsp. (30 ml) hot pepper jelly (Note: It must be hot pepper jelly, as sweet pepper jelly has no heat, just sweetness. I find that hot pepper jelly gives a mellow heat with a touch of sweetness.)
- Zest and juice of ½ lime
- 1 Tbsp. (15ml) chopped fresh parsley
- 1 Tbsp. (15ml) chopped fresh cilantro (optional)
- Half a bunch of green onions – use green part only
Note: No extra salt should be added.
Instructions
- Melt pepper jelly in 6-8 cup (roughly 2+1/2 to 3 pt, or 1.5 to 2 liters) microwave-safe bowl in microwave.
- Stir in lime juice and rest of ingredients.
- Cover and refrigerate for about 1 hour to allow flavors to blend.
- Serve in a bowl with chips.
Tips and Alternatives:
I like to use black beans for the color difference, but choose whichever bean you prefer.
If you want the salsa to be thicker, add 1/4 tsp. (1g) xanthan gum and stir in well. Add more if you like it thicker, but do give it time to thicken before adding more.
You can do more with this recipe than just serve it with chips. I like to put in cubes of mozzarella or Mexican cheese. You can also add cubes of avocado, ham or pepperoni. Cubes of fresh mango or pineapple are also amazing.
To serve this as a main course, add leftover cooked chicken or BBQ meats and serve over rice, hot or cold.
This recipe keeps well in the fridge for several days. It can also be added to a chili or other cooked dish as an ingredient.
We also like to put gluten-free tortilla chips on a flat plate, sprinkle with Mexican cheese and microwave or oven heat until the cheese is melted. You can top this salsa with cooked ground beef with cumin and green onion, cooked grilled chicken, fresh cubed tomatoes, cubes of avocado, guacamole, or sour cream. Use your imagination! It’s great for a special appetizer and easy for a meal if you have a variety of stuff sitting in the fridge.
<< Back to Recipes
TAGS: VEGETARIAN, DAIRY-FREE, APPETIZERS/SNACKS
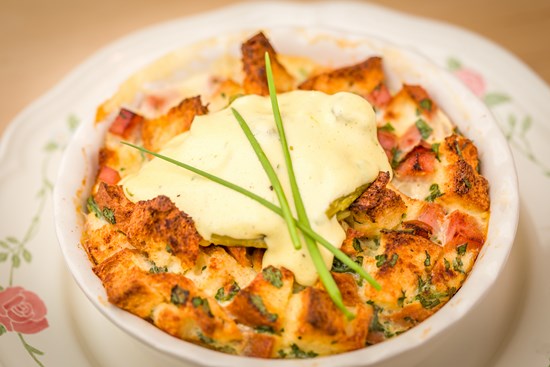
Baked Gluten-Free Eggs Benedict with Easier Hollandaise Sauce or Dairy-Free Hollandaise
May 1, 2015Baked Gluten-Free Eggs Benedict with Easier Hollandaise Sauce or Dairy-Free Hollandaise
From Chef Oonagh Williams ofRoyal Temptations Catering
I found the original wheat recipe for this on the Jones Dairy Farm website. I’ve used only their sausage roll for years for stuffing and homemade patties. My husband loves for me to buy the big bag of their ready cooked sausage for breakfast in preference to bacon. What I really appreciate is that I think they were one of the first to clearly label their products as gluten-free. Yes, meat should be gluten free but many manufacturers add things to their food.
I adapted their recipe to be gluten-free and made their Hollandaise Sauce by an easier method. As a chef, I can make Hollandaise, but I haven’t made it by the traditional method for years. My method uses a microwave and an immersion blender. My gluten-free cookbook, Delicious Gluten Free Cooking , also includes my easier Hollandaise sauce, plus a lime variation that is good with fish.
My husband had bought me a bag of Udi’s bagels at Trader Joe’s without my asking (how good is that?), so I rewarded him with a variation for breakfast. I had some of the thin Alfresco chicken apple maple sausage (7 sausages to 8 oz). For the 2 people quantity below, I substituted 2 of those sausages cut into very thin slices, white of a bunch of green onions cooked in 1 teaspoon of olive oil in microwave, and about 1 oz./2 Tbsp. goats cheese crumbles stirred in. Very pleasant, but very mild and at husband’s suggestion (he’s getting good isn’t he?), we had it with some of Trader Joe’s peach salsa on the side. Think about using one of the Al Fresco chipotle chorizo sausage and some roasted red pepper for more of a kick.
Makes 2 servings
For the Butter Hollandaise and Dairy-Free Hollandaise recipes, click here.
Ingredients:
- ½ an Udi’s plain bagel, Cut into tiny cubes about ½ inch square (I also tried this with a gluten-free English muffin and prefer the texture from an Udi’s bagel.)
- 1 egg or ¼ cup gluten-free egg substitute
- 2 oz. ham (I prefer Jones Canadian bacon or ham steak cut into small dice rather than slices)
- ½ cup milk (Fat-free is fine. In fact, you don’t feel quite so guilty when you then indulge in Hollandaise)
- Pinch of onion powder
- 1 Tbsp. finely scissored green of green onion
- 1 Tbsp. finely chopped fresh parsley
- Salt and pepper to taste.
- Smoked Paprika to garnish (I use Penzey’s Smoked Spanish Paprika for flavor as well as color.)
Directions:
- I mix the casserole ingredients in a glass bowl/jug, then cover and refrigerate overnight. In the morning, spray the baking dish and then pour in ingredients. This makes it far easier to clean the dish. Put egg, milk, ham, onion powder, fresh herbs and salt and pepper to taste in glass bowl, mix well. Stir in bread cubes and then refrigerate overnight.
- In the morning preheat oven to 350 degrees, stir the bread mix well to make sure ham/bacon is evenly distributed, and then pour into sprayed baking dish. Sprinkle lightly with smoked paprika. For this quantity, I use a small pyrex casserole of 2 cup capacity. Place on baking dish and bake in preheated oven for about 30-40 minutes. It will rise, brown and there should be no liquid “sloshing” around in the middle when it is cooked. Do not cook above 350 degrees.
Four times the recipe will fit an 8 cup, 8×8 inch casserole dish and will need to cook for about 45 minutes. With fruit on the side and Hollandaise it is a very festive, tasty dish. Without the Hollandaise, it is boring to me.
About Chef Oonagh Williams
 Like Chef Oonagh at Gluten Free Cooking with Oonagh on Facebook, where she posts recipes, her appearances on NH ABC WMUR TV, Local and National radio, products she’s tried, where she will be speaking next. Contact Chef Oonagh on Skype for consultations on food for the gluten-free and other food allergy diets. Her gluten-free cookbook, Delicious Gluten Free Cooking has over 200 pages with full color photos. Click the link for photos and a list of all recipes. E-mail at [email protected].
<< Back to Recipes
TAGS: DAIRY-FREE, BREAKFAST
Red Pepper and Garlic Hummus
March 30, 2015Red Pepper and Garlic Hummus
![]()
Courtesy of Crunchmaster
Prep Time: 10 minutes
Cook Time: 30 minutes
Makes 6 servings
Ingredients: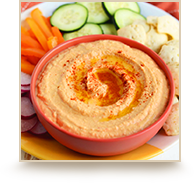
- 1 can garbanzo beans, cooked
- 1 red pepper, large (or 2 small)
- 3 Tbsp. tahini
- 1/2 lemon (or 3 Tbsp. lemon juice)
- 2 Tbsp. extra virgin olive oil
- 1 Tbsp. garlic, minced
- 1/2 tsp. ground cumin
- Pinch of paprika
- Sea salt, to taste
Directions:
- First, preheat oven to 450ºF. Then, place your red pepper (whole) on a tin foil-lined baking sheet.
- Roast for 15 minutes, before flipping sides. Roast for another 15 minutes. At this point, there should be black spots all over the red pepper. If there isn’t, roast longer.
- Once the red pepper has blackened, transfer into a sandwich bag and seal. Let sit for about 15 minutes. This will create steam and make it easier to remove the skin. Peel the red bell pepper. Remove any seeds from the insides and slice into large chunks.
- In a small food processor, place roasted red peppers and the rest of your ingredients. Pulse until smooth.
- Serve with Crunchmaster Popped Edamame Chips and raw vegetables.
<< Back to Recipes
TAGS: VEGETARIAN, VEGAN, DAIRY-FREE, APPETIZERS/SNACKS

