Mexican Salad
August 30, 2018Mexican Salad
Spice up your lettuce with this delicious gluten-free spicy Mexican Salad…
From Chef Oonagh Williams of Gluten-Free Cooking with Oonagh
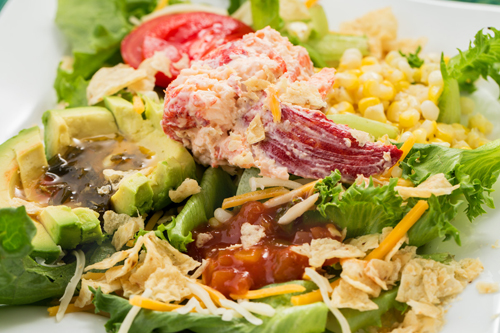 The key to this zesty recipe is the pepper jelly. There are quite a few varieties of pepper jelly on the market. You can also make your own pepper jelly by following the directions for pepper jelly in a packet of Certo pectin. Obviously there is a difference in both taste and heat between individual brands, so use half the stated quantity of pepper jelly to start with and then add more to your individual taste. Even if you used exactly the same pepper jelly as I did, your taste could want more or less heat. Also realize that the vinaigrette tasted on a spoon will taste far hotter than once it is mixed with a salad. The sweetness of the jelly mellows the vinaigrette and makes a vinaigrette with a sweet spicy but mild kick. Just enough to realize the heat without your nose running and lips tingling madly.
Gluten-Free Mexican Salad
Ingredients:
Vinaigrette:
- 2 tbsp (30ml) gluten-free hot pepper jelly placed in small microwave safe bowl and melted in microwave 10-20 seconds. I like to clean, sterilize and reuse jam jars for these sauces as you can see what’s in them in the fridge. I buy Trappist Hot pepper jelly.
- 1 tsp (5 ml) honey
- Zest of 1/4 lime
- 2 tbsp (30 ml) fresh lime juice – about ½ to 1 lime. Half of a lime can produce only about 1+1/2 tablespoons of juice, you need to add more to total 2 tablespoons. The extra little bit of lime does make a difference in taste for me.
- ½ teaspoon salt (or more or less to taste)
- freshly ground pepper to taste
- 1/2 cup avocado oil (120 ml)
- 2 teaspoons (10ml) Koops Arizona heat mustard, labeled gluten-free
- green of 2 green onions
- about 2 tablespoons of fresh parsley and/or cilantro
Salad:
- Deliberately leftover, 2 corn on the cob, roasted or bbq’d and niblets cut from cob
- Shredded romaine or other lettuce, enough for 4 people
- Tomatoes, either large cut up, or small grape or cherry
- 1 ripe avocado, halved, depitted and cut into small dice
- Mexican cheese of your choice, shredded or crumbled
- Gluten-free salsa of your choice for heat
- ½ red pepper deseeded and cut into ½” dice – optional
- ½ c cooked chick peas – optional
- fresh cilantro chopped – optional
- Whatever other salad ingredients you personally like
- Tortillas – I like the crunch of Tostitos, labeled gluten-free, crushed a little
- I got real lobster salad at the market – that was fabulous, but salad shrimp, cooked chicken, spicy sausage, pulled pork without sauce. Or an egg and it can be vegetarian
Directions:
1. Mix all vinaigrette ingredients together, lightly pulse with immersion blender to chop herbs and also thickens vinaigrette and leave for about 1 hour for flavors to blend together.
2. On individual plates or one large platter, attractively arrange lettuce and top with circles of tomatoes, avocado, red pepper and any other salad ingredients you think would be suitable. Top with crushed chips just before serving.
3. You can also leave shrimp, chicken, in 1/4 c vinaigrette for an hour to absorb flavor. Then pour shrimp, chicken and vinaigrette on top of salad.
Vinaigrette keeps in fridge for several days. If you used olive oil it will appear solidified, like melted butter chilled.
<< Back to Recipes
TAGS: APPETIZERS/SNACKS, VEGETARIAN, LUNCH, DINNER
Fruit Jelly
August 2, 2018Fruit Jell-O aka Fruit Jelly
Made with fresh ingredients, a gluten-free light version of a classic recipe (adult version with wine included too!)
From Chef Oonagh Williams of Gluten-Free Cooking with Oonagh
Have you taken a good look at what’s in commercial packets of fruit Jell-o? They say no artificial sweeteners but also make one that’s sugar free. Artificial flavor, color, and lots of sugar. What are those chemicals doing to our bodies and more particularly the kid’s bodies? I haven’t used one in several years.
This recipe goes back to the basics of fruit juices set with packaged gelatin(e). One of my English cookbooks has fruit set with sweetened wine. It was delicious, but even though I would happily drink a glass of this wine, in a jelly (the English name for the dish, this is not jam) it was too strong. Make this just with fruit juices, and check that the juices have as many real ingredients as possible and have high fruit content, not just flavored water. Think of various berry juices with raspberries, peach juice with nectarines, and mango juice (I love the Best brand from Egypt with 50% juice) with fresh mangoes (not frozen, I thought they were horrible). If you use wine, you have to use a wine you like the taste of in the glass, like a Moscato, Prosecco with bubbles, Reisling, fruit wine, or even one of the small bottles of champagne.
Ingredients:
Basic proportions for 4 generous ramekins, custard cups or cocotte dishes:
- 1 packet of Knox gelatin(e) 7 g packet from orange box in grocery store
- 1 cup (250 ml., 8 fl oz) fruit juice or wine and fruit juice mixed 50/50. You can make it 100% wine, I just thought it too strong
- 2 Tbsp (1 oz, 30 ml) sugar
- 1 Tbsp (15 ml) liqueur to enhance flavor—optional with either wine or fruit juice for adults.
- 1 tbsp water
- 1 cup fruit of choice – I tend to buy the fresh container of mixed cut strawberries, raspberries, blueberries and blackberries, but I find you need to make this the day you buy the berries or they taste fermented or go moldy rapidly.
Directions:
- Arrange fruit in ramekins. Don’t overfill with fruit or you won’t taste the wine or juice. Put the prettiest fruit on the bottom as you’ll be turning it out.
- Pour the water in a bowl and sprinkle the gelatin on top of the water. Stir in the gelatin and it will turn into solid lump.
- Microwave the lump for about 11 seconds. It will turn to a pale gold, see-through liquid with no lumps.
- Dissolve sugar in 1/4 cup of juice and/or wine in microwave.
- Combine the gelatin mix, sugar mix and the rest of the plain wine and/or juice, and stir. Taste to see if you want more sugar or teaspoon more liqueur, and then gently divide liquid among 4 dishes.
- Refrigerate for several hours, then turn out onto plates. I like to use vanilla Greek yogurt as a sauce.
<< Back to Recipes
TAGS: VEGETARIAN, DESSERT
White Chocolate Almond Raspberry Cake
White Chocolate Almond Raspberry Cake
This delectable gluten-free cake uses almond flour for a wonderful flavor.
From Chef Oonagh Williams of Gluten-Free Cooking with Oonagh
Another variation of my master almond cake that was a 4 page cover wrap for Food and Wine magazine. Substitute different nut flour.
The geraniums are Martha Washington, and so were quite suitable for a July 4th party.
White Chocolate Almond Raspberry Cake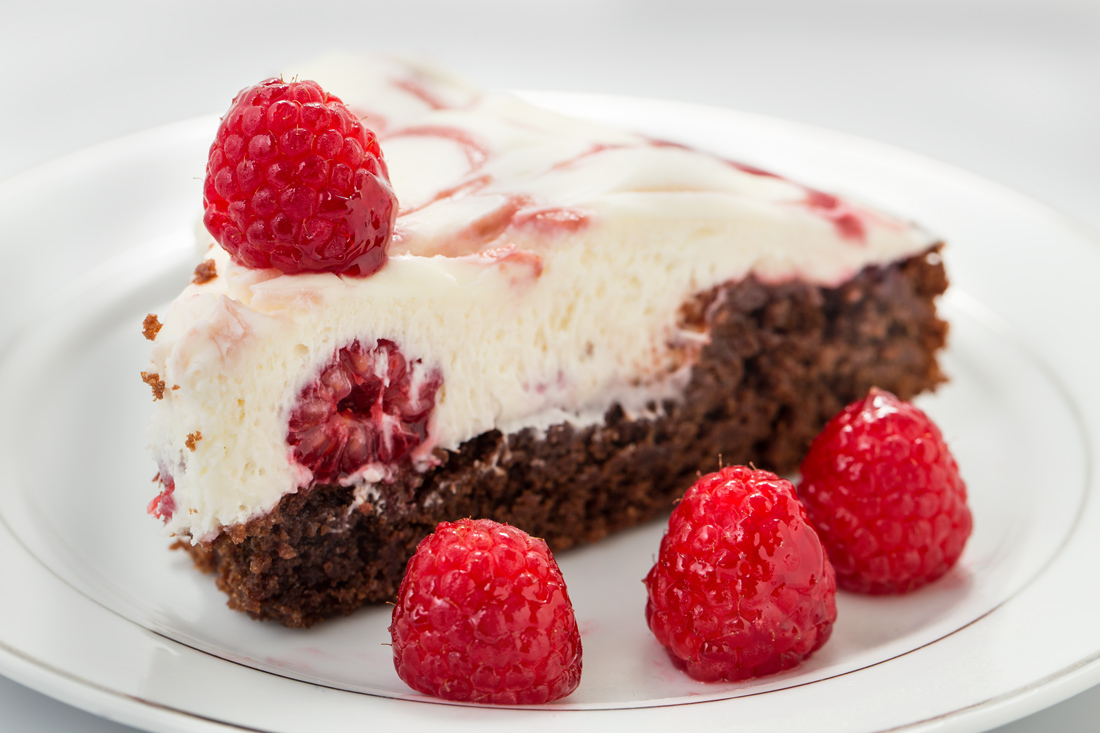
Cake
- 2 oz (1/2 stick, 56 g) very soft butter or coconut oil
- 2 oz (1/3 c, 80 ml) gf semi sweet chocolate chips
- 4 oz (1/2 c, 112 g) sugar
- 4 oz (1 c, 112 g) almond flour
- 3 eggs
- 2 tbsp cocoa (30 ml, 1/2 oz)
- 1 tsp (5 ml) gf baking powder
- salt
- 1 tsp almond or vanilla extract
Filling
- 1/2 c (120 ml) seedless raspberry jam or jelly – add 1-2 tbsp Chambord to jam if you want.
- Punnet fresh sweet raspberries
White Chocolate Topping
I like the flavor of Lindt white chocolate but I’m still uncertain about safety. I have made this with Kraft Baker’s white chocolate that do say they will tell us if there are ingredients containing gluten. Why can’t it just be labeled gluten-free!!
- 8 oz (224g) cream cheese, softened, I do use lite but it makes a softer frosting
- 1 x 4 oz (112g) Lindt white chocolate bar or Baker’s white chocolate. I don’t like most store brand white chocolate chips as they taste waxy.
- 1/4 c (60 ml) cream to melt white chocolate
- 1/4 c (60 ml, 1 oz) powdered sugar
- 1/2 c ( 4oz, 120 ml) cream, whipped to 1 c.
- 2 tbsp (30 ml) seedless raspberry jam or jelly
Directions
1.Melt butter with chocolate chips in microwave. Add rest of cake ingredients and beat together until smooth and then beat for 1-2 minutes, until fluffier.
2. Bottom line 9+1/2 ” spring form, spray bottom and sides with gluten-free food spray, dust with cocoa
3. Bake for 30 minutes in 350 degree oven
4. Remove from oven, top with seedless raspberry jam, let soften for a few minutes then spread out evenly
5. Once cool, arrange most of raspberries on top, saving a few for decoration.
6. Heat 1/4 c cream in microwave for about 40 seconds, break up white chocolate, add to cream, wait a minute, then stir until smooth.
7. Beat cream cheese and powdered sugar until smooth.
8. Beat in melted white chocolate cream mix.
9. Gently beat in whipped cream and spoon on top of cooled raspberry topped cake. At this stage the frosting is almost runny, you can let it flow down sides, it will set in fridge. Large raspberries will show through the frosting.
10. Put 2 tablespoons of seedless raspberry jam in microwaveable bowl. Gently heat until runny but not boiling hot. Spoon jam into snack size ziploc, snip off tiny corner and pipe parallel lines across cake, the more lines you make, the fancier the design.
11. Then take small skewer and draw tip of skewer through raspberry lines all in one direction or alternating. Garnish with a few leftover raspberries.
Keeps well in the fridge, but serve at room temperature.
Note, I did try making this with strawberry jam, fresh strawberries and semi sweet chocolate in topping rather than white chocolate but I have a weakness for raspberries and white chocolate.
<< Back to Recipes
TAGS: VEGETARIAN, DESSERT
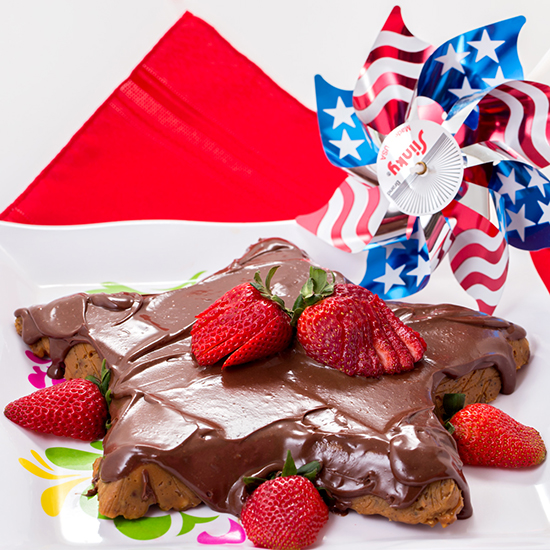
No-Bake Nut Cake – Tortas Rieŝutėlis
July 1, 2018No-Bake Nut Cake – Tortas Rieŝutėlis
A no-bake gluten-free version of a Lithuanian nut cake.
 From Chef Oonagh Williams of Gluten-Free Cooking with Oonagh
The original wheat version of this recipe came from Darbštuolė – a Lithuanian recipe magazine similar to Pillsbury Monthly. The recipe states it is from Laima Andrijauskaitė.
The original has one making an unsweetened dough, that is chilled, grated (presumably by hand like potato pancakes) and then baked to make a crunchy mix. I tried this and it was pretty awful, but it did stay very crunchy for several days in the creamy mix. So in my wheat flour days, I used a very neutral shortbread cookie ‘Sandies, simply shortbread by Keebler.’ They also boiled the can of condensed milk as we used to, to make a caramelized condensed milk. That is now available as Nestle – La Lechera – Dulce de Leche about $3 in the Goya/Mexican food aisle. Make sure you buy the right can, they also do ordinary condensed milk that looks the same but isn’t caramelized. My friend and I agreed that we had to add some rum. And then I used my chocolate ganache of cream and real chocolate melted as a topping, rather than cocoa, milk and sugar. It is very rich, so it could be cut as a small candy rather than sliced as a dessert.
Gluten-Free No-Bake Nut Cake
Ingredients
Cake
- 1 x 7.25 oz (206g) packet of Pamela’s gluten-free butter shortbread, broken into large pieces. This is quite a soft shortbread but it doesn’t turn to mush.
- 1 x 380g (13.4 oz or thereabouts) of Nestle Dulce de Leche caramelized condensed milk
- 2 cups, (8 oz, 250g), nuts, coarsely chopped and toasted in 350 degree oven for about 10 minutes. I used almonds and pecans. Walnuts would have been more available.
- ½ stick (2oz, 56g) butter melted
- 2-4 tbsps (30-60 ml) rum, brandy or chocolate liqueur. Or go for orange or almond liqueur to your own preference. I used 4 tbsp Myers dark rum. 2 tbsps give a nice flavor, 4 tbsps you can notice the alcohol. Plain rum should be naturally gluten-free, it’s the flavors added that are the dangers.
Topping/glaze:
- 1 c (8 fl oz, 224ml) heavy or whipping cream
- 1 c (6 oz, 168g) gluten-free semi sweet chocolate chips
- 2 tbsp (30 ml) sugar
- 2-4 tbsps (30-60 ml) rum, optional
Instructions
- Open can of dulce de leche and empty into 4-6 c (1-1+1/2 ltr) microwave safe bowl. Add solid butter and microwave for a short time, stirring, until milk softens and butter is melted.
- Stir in some of alcohol to give a smooth even mix.
- Stir in nuts and shortbread. Now taste and decide if you want some more alcohol. Remember strength of flavor develops and you’ll be adding rum to topping/glaze.
- Spoon mix into 9-10” spring form pan (for a fancy dessert) or 8×8” brownie pan to cut into candy pieces. OR line star, christmas tree or heart shape pan or other designs with plastic wrap and press mix into all the corners so design turns out crisp. The mix is ‘lumpy’ so won’t press into detailed design mold.
- Smooth out as much as possible and then take a piece of plastic wrap, press onto surface of cake and press out even more to smooth top and compress mix and prevent too many air bubbles.
- Refrigerate for several hours until firm enough to cut. I had originally tried this with cream instead of butter, but butter firms mix up more.
- While mix is chilling, heat cream and sugar together, add chocolate and stir until chocolate has melted and is smooth and creamy, it should look like a cross between condensed milk and Hershey’s syrup – no lumps. Stir in alcohol and chill. I usually use an immersion blender to make it smooth.
- Remove ‘torte’ from fridge, remove from spring form, remove plastic wrap and place on decorative plate. Pour about half of chocolate mix over top of cake and allow to start dribbling down sides. If the mix is too runny when you stir once you remove from fridge, then beat it slightly with electric mixer so it doesn’t ‘run’ so easily.
- Beat remainder of chocolate mix with electric mixer until consistency of whipped cream and then pipe around top/bottom of cake. Finish with nuts, or any decoration you want.
This lasts for several days in fridge, easily made in advance of summertime parties, but will soften too much if left out in sun during party. Still delicious, but spoonable not cutable after sun.
<< Back to Recipes
TAGS: VEGETARIAN, HOLIDAY, DESSERT
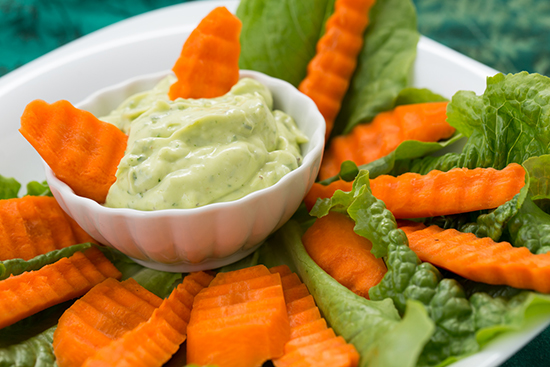
My Father’s Real Mayonnaise
June 29, 2018My Father’s Real Mayonnaise
A simple gluten-free recipe for homemade mayonnaise that can be jazzed up with spices for a variety of dishes!
 From Chef Oonagh Williams of Gluten-Free Cooking with Oonagh
My father always made real homemade mayonnaise, in a bowl with a whisk. It was velvety smooth, just as it has been made for centuries. For years I made mayo in food processor using his quantities along with lots of fresh herbs from my garden, then I found this immersion blender version. It’s very very quick and an immersion blender is far cheaper and takes up so much less space than a food processor.
I now also serve this mayo as a dip with veggies or add garlic to make aioli for beef fondue. Spice it up any way you like!
Gluten-Free Mayonnaise from Scratch
Ingredients:
- 1 large egg, room temperature
- 1/2 tsp (3 ml) salt
- 50 ground pepper
- 1 tsp (5 ml) sugar
- 1/2 tsp dry English gluten-free mustard or jarred mustard
- Green of 2 green onions, cut small
- 1/4 c loose fresh parsley
- 1/4 tsp garlic powder or fresh chopped garlic
- 3/4 c + 2 tbsp(210 ml, 7 fl oz) neutral flavored gluten-free oil, I use avocado oil
- 2 tbsp (30 ml) extra virgin olive oil
- 1 tbsp (15 ml) genuine white wine vinegar or lemon juice
- Boiling water, if needed
- 15.5 oz (440 g) empty jar (such as one used for salsa) – you want a jar the head of an immersion blender can fit into
Directions:
- Put salt, pepper, sugar, mustard, vinegar and herbs in jar. Add oil. Add egg.
- Wait for egg to fall to bottom of jar – room temperature egg, it falls almost immediately.
- Insert immersion blender almost to thebottom of jar, you need to leave a space for blender to start pulling up ingredients and blend. It won’t work if you have blender at top of jar. Egg needs to be allowed to form an emulsion with oil and egg is at the bottom of jar.
- Turn on immersion blender, run slightly above bottom of jar, for about 20 seconds and then very slowly raise the blender up from the bottom. By the time you reach top of jar everything should be nicely blended, all oil blended in. Run blender a little longer if you need to. If it doesn’t seem to be thickening push blender to bottom of jar again and run a little longer.
- Remove blender, taste and adjust seasoning as needed. It can be difficult to remove blender from jar as there’s very little space. If mayo is too thick, add boiling water teaspoon at a time.
Note: herbs will make mayo either completely green or flecked with green. Of course you can make plain mayo and then finely chop herbs and add them on top to keep the white color.
<< Back to Recipes
TAGS: VEGETARIAN, SIDE DISHES, APPETIZERS/SNACKS
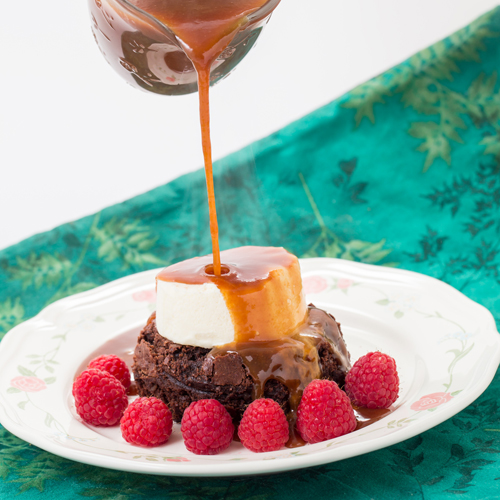
Sweet Sauces – Caramel Sauce, Raspberry Sauce and Chocolate Ganache
June 11, 2018Sweet Sauces – Caramel Sauce, Raspberry Sauce and Chocolate Ganache
This delicious and versatile gluten-free sauces should be a staple in your kitchen!
From Chef Oonagh Williams of Gluten-Free Cooking with Oonagh
Gluten-Free Caramel Sauce
I have only seen a few brands of caramel sauce actually labeled gluten-free, but with far more ingredients than this recipe. Too many ice cream/sweet sauces are based on corn syrup and flavorings.
Summertime, parties, BBQ’s – what’s easier than your favorite brownie, pound cake, sliced with selection of sauces and ice cream or just ice cream sundaes. Everyone loves that!
Ingredients:
- 3/4 c sugar (6 oz, 180g)
- 1/4 c (2 fl oz, 60 ml) water
- 1 c heavy cream
- 2 tbsp (30 ml. 1 oz) butter
- 1 tsp (5 ml) gluten-free vanilla extract
- pinch of salt
Directions:
1. Put sugar in 8″ skillet with water, cover and bring to slow boil while sugar melts. Swirl pan to dissolve all sugar or sugar crystals will form.
2. Once sugar is totally dissolved, remove lid and boil syrup swirling pan as syrup changes color. You want a nice golden brown color, not dark brown. It only takes a few minutes so don’t walk away. The syrup browns at different rates so swirling pan gently mixes it all together. If pan starts smoking, it’s overcooked. Undercooked is tasteless.
3. Add cream and stand back as caramel will spatter, boil up and solidify in places. Stir to dissolve caramel. Add butter, vanilla and salt and stir all together.
4. Sauce will thicken as it cools.
Dairy-free Option: Make with Asian style coconut milk and add coconut butter.
For Adults: To sauce add 1/4 c toasted chopped pecans and 1-2 tbsp rum or other alcohol. Serve with grilled pineapple rings or grilled halved peaches and ice cream, match made in Heaven.
Warning: Don’t make caramel sauce with kids or animals underfoot, sugar burns are really dangerous, plus if you’re distracted, sugar over cooks rapidly and burns, so you have to throw it out.
Gluten-Free Raspberry/Berry Sauce
Ingredients:
- 1 x 12 oz – 16 oz (375 – 500g) bag of frozen raspberries or bag of frozen mixed berries
- ½ c (4 oz 125 g) ordinary sugar
- 1/2 c (120 ml, 4 fl oz) water
- ½ c (120 ml, 4 fl oz) Seedless raspberry jam or jelly for extra oomph of flavor
- Raspberry liqueur, Amaretto, brandy, rum for adults.
- Choose different jams and alcohols that match the fruit
Directions:
1. Melt sugar and water together, add raspberries (or other fruit), and simmer for just a few minutes. Stir in raspberry jam until it melts. Depending on ripeness of raspberries and your personal taste you might want to add more sugar.
I like to buy baskets of fresh raspberries in season and freeze them. Somehow they don’t break up nearly as much as bought frozen raspberries when they are simmered in sugar and water.
You can sieve the sauce and make it a ‘couli,’ so there are no seeds.
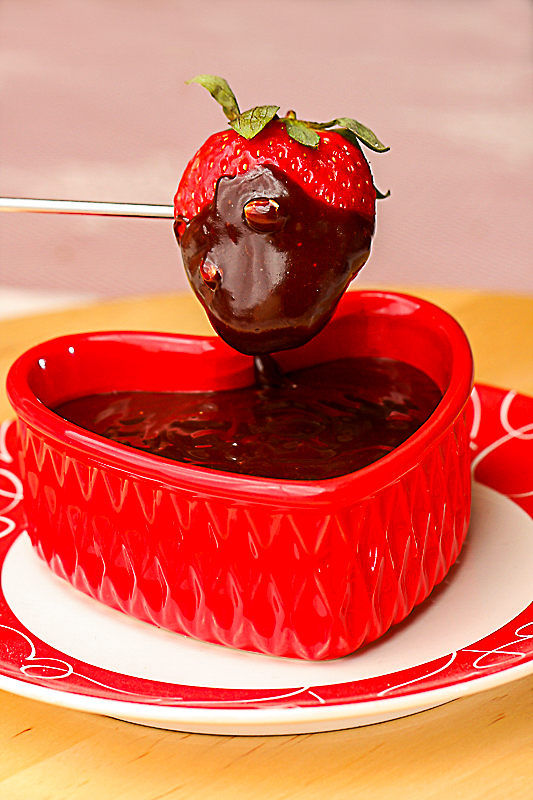 Gluten-Free Chocolate Ganache
Melt together 1 pint (2 cups) heavy cream and 11 oz bag of Tollhouse semi-sweet chocolate or with Sodelicious vanilla or hazelnut creamer mixed with gluten-free chocolate. I use an immersion blender to make sauce totally smooth. Thicken as it cools, very runny when hot. Add some sugar if too ‘dark’ for kids.
This can also be used as a dipping sauce for fruit.
<< Back to Recipes
TAGS: FOR KIDS, DESSERT, DAIRY-FREE
Chilled Beet Soup
May 30, 2018Chilled Beet Soup
This chilled gluten-free Lithuanian soup, also known as šaltibarščiai(pronounced shaltee-barsh-chay), is ideal for a summer luncheons and garden parties.
F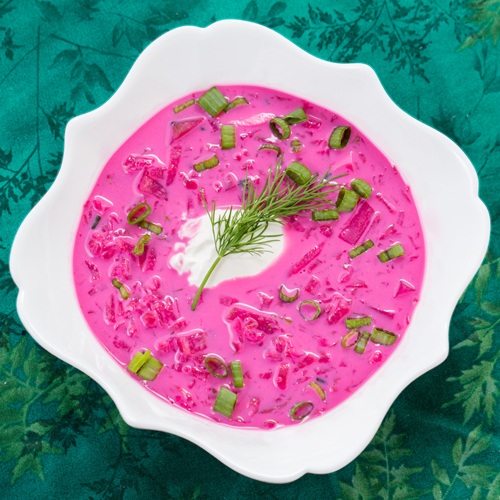 rom Chef Oonagh Williams of Gluten-Free Cooking with Oonagh
I gave Lithuanian cooking classes demos for about 10 years at our local ethnic library and spent July 2005 in a Lithuanian language course at the University of Vilnius, capital of Lithuania. And no, I am not of Lithuanian descent, but I was given so many old and new Lithuanian cookbooks, tried the recipes, made them for class and was told they brought back memories of grandmother making them. This particular recipe is a mix of two cold beet soup recipes. One is taken from the Lithuanian Heritage magazine and the other is from ‘Treasures of Lithuanian Cooking.’ The recipes are almost identical as to ingredients. Now I give talks with vibrant photos of Lithuania with history, culture, and a gluten-free Lithuanian buffet to libraries, clubs etc.
Chilled Beet Soup
Makes about 12 half-cup servings
Ingredients:
- About 1 lb raw beets, cooked, peeled, and shredded in food processor
- Half a European cucumber, peeled, quartered lengthwise and finely diced
- 2 eggs, hard boiled, peeled and finely diced – optional
- 4 green onions, leaves only finely scissored
- 2 c buttermilk (I buy Kate’s of Maine that is genuine buttermilk, labeled gluten-free, not from a culture)
- 1 c cold water or beef broth
- ¼ tsp sugar or honey or more to taste once chilled
- salt and pepper
- ¼ c sour cream (or more)
- 2 tablespoons finely chopped fresh dill – dill is a strong flavor, so don’t add too much at first
Directions:
1.Mix all the ingredients together and chill for 1-2 hours or overnight. The flavor does improve on chilling as everything melds together.
2. Taste after chilling and add more salt, pepper or herbs to taste.
Traditionally this soup is served with a dollop of sour cream (100% of course – Friendship brand is most authentic) in the middle of each bowl and an individual plate of slices of hot, plain boiled potato. You take a spoonful of hot potato from the plate and dip the spoon into the cold soup so you get the contrast of hot and cold in each mouthful. It tastes really good this way.
<< Back to Recipes
TAGS: SOUPS/STEWS, SIDE DISHES, LUNCH, APPETIZERS/SNACKS
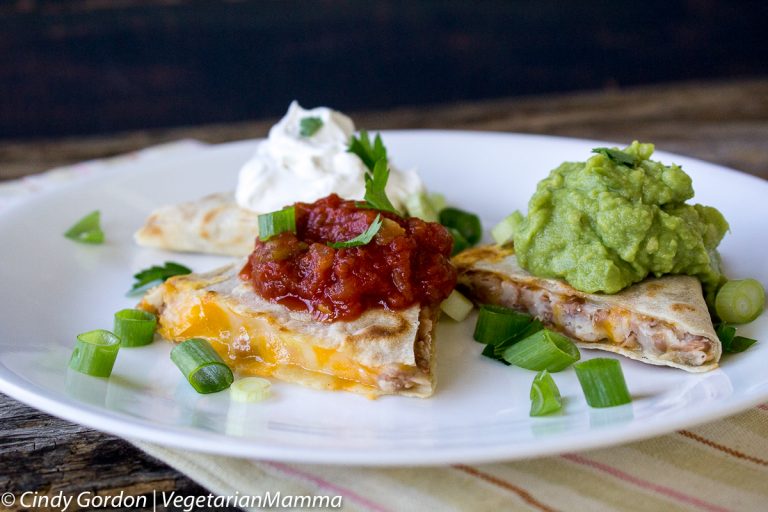
Colby Jack Cheese Quesadilla
May 9, 2018Colby Jack Cheese Quesadilla
From Cindy Gordon of Vegetarian Mamma
 When it comes to eating gluten-free, we need to make sure that the food we are putting into our bodies is indeed gluten-free. When it comes to cheese, you do need to be cautious. Love deli cheese? You have to be cautious of cross contamination from the cheese slicer in the deli. If you want to be safe and not worry, you need to search out Boar’s Head Cheese.
Boar’s Head is a family owned business that started in New York City over 110 years ago. Frank Brunckhorst founded the company out of his dissatisfaction with the quality of deli meats available at the time. He set out to create a brand that focused on quality meat, and started the line of deli meats, cheeses, and condiments that we still enjoy today. Boar’s Head prides themselves as being master craftsmen in their industry, and skilled artisans in the art of meat and cheese making. They hold themselves to high standards of quality, use only the finest ingredients, and their entire product line is gluten-free.
Boar’s Head offers 25 varieties of cheese, in styles from all over the world. You can find Vermont cheddar, Danish blue cheese, Swiss cheeses, French goat cheese, and more at your local deli. Boar’s Head has 6 varieties of Gouda cheese, fresh mozzarella, and two varieties of hard Italian cheese as well.
Boar’s Head Cheese is delicious enough to eat as a stand-alone item or on your favorite sandwich. We recently created a delicious and quick lunch option that uses Boar’s Head Cheese.
Lunch time on the weekends is hectic around my house. There always seems to be something going on. We rely on Boar’s Head to provide us with delicious tasting gluten-free cheese. Our latest creation was a quesadilla.
For this quesadilla we used the Colby Jack cheese from Boar’s Head. Colby Jack is a tasty mixture of Colby and Monterey Jack cheeses. It is a semi soft cheese that is sold in many shapes. For our quesadilla, we used the Coby Jack cheese slices.
Boar’s Head Colby Jack Cheese Quesadilla
Ingredients:
- 1 gluten-free soft tortilla shell
- ½ cup pinto beans, smashed
- 2 slices of Boar’s Head Colby Jack Cheese
- optional garnish: Sour Cream, Guacamole, Salsa, Cilantro, Green Onions
Directions:
- In a medium skillet over medium heat, warm the soft tortilla shell.
- Place one slice of Boar’s Head Colby Jack cheese on half of the tortilla.
- Next, layer the smashed beans on top of the cheese slice.
- Place the remaining Colby Jack cheese slice on top of the smashed beans.
- Fold the tortilla in half. Warm each side to a golden brown or until the cheese melts.
- Garnish with your favorite extras such as sour cream, guacamole, salsa, cilantro or green onions.
ENJOY!
Boar’s Head Cheese is a great option for my family. We love that the cheese slices come in resealable containers. This works out very well for my family. The cheese stays fresh and protected in the containers.
Check out the full selection on their website, you’re sure to find your favorite.
Guest Author, Cindy Gordon, is the owner and writer behind VegetarianMamma.com Cindy shares recipes that are gluten-free and vegetarian on her site. Her site also shares insight to her gluten-free travel experiences and provides tips on where to safely travel while gluten-free.
<< Back to Recipes
TAGS: VEGETARIAN, LUNCH, FOR KIDS, DINNER
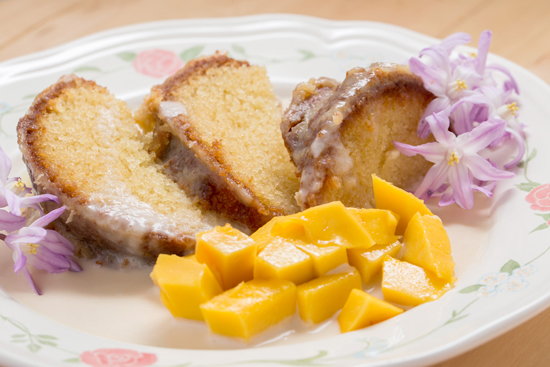
South African Malva Pudding Cake
April 30, 2018South African Malva Pudding Cake
A gluten-free recipe for a delightful South African dessert!
 From Chef Oonagh Williams of Gluten-Free Cooking with Oonagh
I’ve never tasted the wheat flour version of this South African dessert, but girlfriend who made wheat flour original approved of my gluten-free version.
For my talks on South Africa with a gluten free buffet, I make 2 x 8×8 pans from this recipe, cooked for about 25 minutes, removed from oven, then poured over sauce.
In England we used to make different liqueur versions of this for weddings in a 16 inch square deep cake pan using a complete bottle of sherry or brandy until the cake was literally sitting in a puddle of alcohol laced syrup.
I made this for a bridal shower with bride and mother of the bride, both with celiac disease, with orange juice and orange liqueur.
Gluten Free South African Malva Pudding Cake
Ingredients:
Cake:
- 1+ ½ sticks melted butter (6oz, 170 g) very soft (Earth Balance is a good substitute. You can use melted coconut oil but coconut flavor was obvious to me unless you use strong orange or coffee version)
- ¾ c sugar (6 oz, 170g). Use light brown sugar by weight for more flavor.
- 3 extra large eggs or 4 large eggs
- 1 tbsp (15 ml) gluten-free vanilla extract
- 2 tbsp (30ml) gluten-free apricot jam
- Zest of one large orange
- 1/3 c gluten-free almond flour 1+1/4 oz/35 g
- 1 c, 4+1/2 oz King Arthur gluten-free flour (no xanthan gum, all-purpose)
- 4 tsp (20ml) gluten-free baking powder
- pinch of salt
- 1 tbsp (15ml) milk
Syrup:
- 1+1/2c (12 fl oz, 360 ml) cream
- 1/2 c (4 fl oz, 120 ml) milk
- 1 stick (4 oz, 112 g ) butter
- 1 tsp (5 ml) gluten-free vanilla extract
- 1/2 c (4 oz, 112g) light brown sugar
- Amarula, a South African liqueur, optional
Directions:
1. Preheat oven to 350*/180* and grease and gluten-free flour a 10”/25 cm across the top Bundt pan with food spray. A spring form pan can also be used but the cake would then have to be placed in a different container for the syrup to soak in.
2. Place melted butter, sugar, eggs, vanilla extract, flour, almond flour, baking powder, milk and salt in mixing bowl and beat with electric mixer until soft, fluffy and creamy – at least 3 minutes. (Stir in orange zest, it tends to stick to beaters and you then have to scrape zest off. If you added orange zest.) Don’t skimp on this beating. Mix will look whiter as air is beaten in. It might look slightly curdled but that won’t affect taste or texture.
3. Spoon batter into prepared bundt pan, (it will only about half fill pan) smooth top and bake in preheated oven for approx. 30-40 minutes until cake is well risen, deep golden brown and deeper brown around the edges. It might have a crack in the middle but this will be hidden when you invert the cake. Note: a dark pan will darken cake sooner.
4. Remove cake from oven and leave to cool in pan for 10 minutes. Then use a thin spatula or thin plastic knife to release all edges of cake including center hole.
6. Turn cake out of pan onto plate. There is no need to let cake cool further.
7. While cake is baking, make syrup by dissolving sugar slowly in cream, milk, butter and vanilla, bring to the boil and simmer gently for 1 minute. Remove from heat, cool for a few minutes (and add alcohol if using). I like to use an immersion blender to blend the sauce or it sometimes looks curdled.
8. Pour half of prepared syrup into bundt pan and return cake to bundt pan. (No need to wash pan first). Pour half of remaining syrup over cake and leave in pan for about 10 minutes until cake has absorbed all syrup. It will look as if it is swimming in liquid at first. For 8×8 pans don’t turn cake out, just stab with fork, and pour sauce over. Serve straight from 8×8 pan.
9. Carefully turn out onto serving plate (otherwise it might break) and leave to finish cooling. Don’t leave it in the Bundt pan to cool, it becomes difficult to turn out. Most recipes like to serve it with extra cream, ice cream, English custard.
<< Back to Recipes
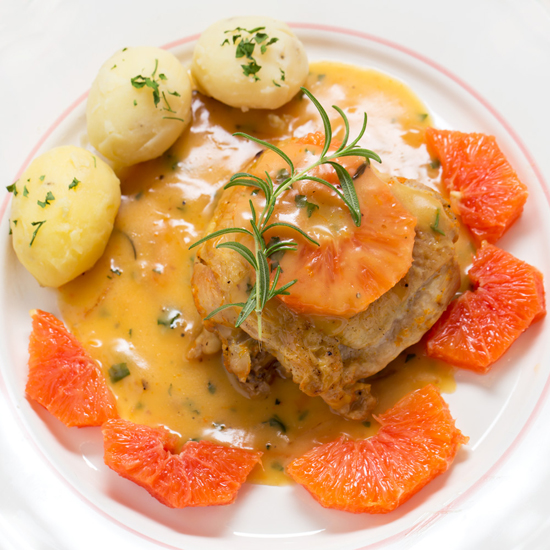
Pork with Orange Sauce
April 25, 2018Pork with Orange Sauce
A dynamic gluten-free recipe that can be shaken up by using chicken, salmon or even scallops in place of pork!
 From Chef Oonagh Williams of Gluten-Free Cooking with Oonagh
This recipe is great because it can be made with a wide variety of proteins, including scallops, strips of chicken breast, whole chicken thighs, or strips of pork sirloin rather than pork tenderloin. Just adjust the cooking time according to size of meat used.
It’s an easy meal for dinner, a brunch, girl’s night, bridal shower, graduation party and more!
Gluten-Free Pork with Orange Sauce
Serves 3-4
Ingredients:
- 1+1/4 lb pork tenderloin
- 2 Tablespoon olive oil
- 1 small onion, peeled and finely chopped
- 2 cloves garlic, peeled and finely crushed
- 1 Tablespoon brandy
- 1 Tablespoon orange liqueur
- 1 cup orange juice
- 1 cup chicken stock
- 2 Tablespoon orange marmalade, preferably a marmalade with small, thin pieces of orange peel
- 2 teaspoon dried rosemary tied up in a coffee filter bag, or just cut 2 x 3 “ stems of fresh rosemary and add to liquid
- For Mexican flavors, use some spicy pepper with cilantro instead of rosemary
- Try subbing basil for more Italian flavors
- 1 orange, zest grated and orange segmented
- 2 teaspoon cornflour mixed with 1 Tablespoon water
- 1/3 cup cream—optional
Directions:
- Trim all fat and gristle from pork tenderloin and cut into 1/2” slices – you should get between 12-16 slices.
- Heat a non-stick skillet over medium heat, then add oil. When hot, add the pork a slice at a time.
- Cook for about 3 minutes on medium heat until starting to brown, then flip meat and cook for another 3 minutes.
- Add onion and garlic and stir in well, cook for further 3 minutes until starting to soften.
- Pull skillet to one side of the flame, add brandy and orange liqueur and flame. The safest way to do this if you are not used to setting fire to a pan is to use the gas gun for the grill. Don’t just use an ordinary match. And don’t bend your face over the pan. Shake the pan gently until flames die down. Make sure the kids and animals aren’t nearby.
- Add orange juice, orange zest, stock, rosemary bag and marmalade and simmer covered for about 15 minutes until tender.
- Thicken with cornstarch and water mix. If the skillet lid doesn’t fit well, then a lot of liquid might have evaporated, and the salt flavor will increase. Top up with more orange juice. Allow cornstarch mix to cook for additional 2 minutes. Taste and adjust seasoning and add cream if you want.
- Serve on top of linguini or rice with green beans, broccoli or carrots. Or with tiny Yukon gold potatoes. Garnish with orange segments.
<< Back to Recipes
TAGS: DINNER
Showing 151-160 of 937
< 1 2 … 15 16 17 … 93 94 >