Gluten-Free Recipes for Dinner
Mexican Salad
August 30, 2018Mexican Salad
Spice up your lettuce with this delicious gluten-free spicy Mexican Salad…
From Chef Oonagh Williams of Gluten-Free Cooking with Oonagh
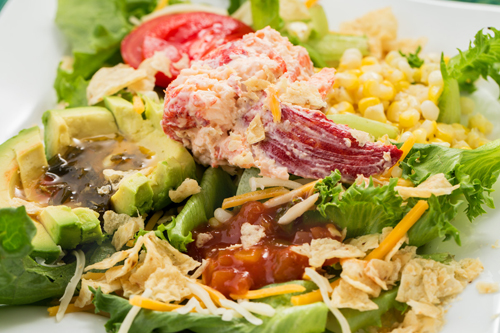 The key to this zesty recipe is the pepper jelly. There are quite a few varieties of pepper jelly on the market. You can also make your own pepper jelly by following the directions for pepper jelly in a packet of Certo pectin. Obviously there is a difference in both taste and heat between individual brands, so use half the stated quantity of pepper jelly to start with and then add more to your individual taste. Even if you used exactly the same pepper jelly as I did, your taste could want more or less heat. Also realize that the vinaigrette tasted on a spoon will taste far hotter than once it is mixed with a salad. The sweetness of the jelly mellows the vinaigrette and makes a vinaigrette with a sweet spicy but mild kick. Just enough to realize the heat without your nose running and lips tingling madly.
Gluten-Free Mexican Salad
Ingredients:
Vinaigrette:
- 2 tbsp (30ml) gluten-free hot pepper jelly placed in small microwave safe bowl and melted in microwave 10-20 seconds. I like to clean, sterilize and reuse jam jars for these sauces as you can see what’s in them in the fridge. I buy Trappist Hot pepper jelly.
- 1 tsp (5 ml) honey
- Zest of 1/4 lime
- 2 tbsp (30 ml) fresh lime juice – about ½ to 1 lime. Half of a lime can produce only about 1+1/2 tablespoons of juice, you need to add more to total 2 tablespoons. The extra little bit of lime does make a difference in taste for me.
- ½ teaspoon salt (or more or less to taste)
- freshly ground pepper to taste
- 1/2 cup avocado oil (120 ml)
- 2 teaspoons (10ml) Koops Arizona heat mustard, labeled gluten-free
- green of 2 green onions
- about 2 tablespoons of fresh parsley and/or cilantro
Salad:
- Deliberately leftover, 2 corn on the cob, roasted or bbq’d and niblets cut from cob
- Shredded romaine or other lettuce, enough for 4 people
- Tomatoes, either large cut up, or small grape or cherry
- 1 ripe avocado, halved, depitted and cut into small dice
- Mexican cheese of your choice, shredded or crumbled
- Gluten-free salsa of your choice for heat
- ½ red pepper deseeded and cut into ½” dice – optional
- ½ c cooked chick peas – optional
- fresh cilantro chopped – optional
- Whatever other salad ingredients you personally like
- Tortillas – I like the crunch of Tostitos, labeled gluten-free, crushed a little
- I got real lobster salad at the market – that was fabulous, but salad shrimp, cooked chicken, spicy sausage, pulled pork without sauce. Or an egg and it can be vegetarian
Directions:
1. Mix all vinaigrette ingredients together, lightly pulse with immersion blender to chop herbs and also thickens vinaigrette and leave for about 1 hour for flavors to blend together.
2. On individual plates or one large platter, attractively arrange lettuce and top with circles of tomatoes, avocado, red pepper and any other salad ingredients you think would be suitable. Top with crushed chips just before serving.
3. You can also leave shrimp, chicken, in 1/4 c vinaigrette for an hour to absorb flavor. Then pour shrimp, chicken and vinaigrette on top of salad.
Vinaigrette keeps in fridge for several days. If you used olive oil it will appear solidified, like melted butter chilled.
<< Back to Recipes
TAGS: APPETIZERS/SNACKS, VEGETARIAN, LUNCH, DINNER
Colby Jack Cheese Quesadilla
May 9, 2018Colby Jack Cheese Quesadilla
From Cindy Gordon of Vegetarian Mamma
 When it comes to eating gluten-free, we need to make sure that the food we are putting into our bodies is indeed gluten-free. When it comes to cheese, you do need to be cautious. Love deli cheese? You have to be cautious of cross contamination from the cheese slicer in the deli. If you want to be safe and not worry, you need to search out Boar’s Head Cheese.
Boar’s Head is a family owned business that started in New York City over 110 years ago. Frank Brunckhorst founded the company out of his dissatisfaction with the quality of deli meats available at the time. He set out to create a brand that focused on quality meat, and started the line of deli meats, cheeses, and condiments that we still enjoy today. Boar’s Head prides themselves as being master craftsmen in their industry, and skilled artisans in the art of meat and cheese making. They hold themselves to high standards of quality, use only the finest ingredients, and their entire product line is gluten-free.
Boar’s Head offers 25 varieties of cheese, in styles from all over the world. You can find Vermont cheddar, Danish blue cheese, Swiss cheeses, French goat cheese, and more at your local deli. Boar’s Head has 6 varieties of Gouda cheese, fresh mozzarella, and two varieties of hard Italian cheese as well.
Boar’s Head Cheese is delicious enough to eat as a stand-alone item or on your favorite sandwich. We recently created a delicious and quick lunch option that uses Boar’s Head Cheese.
Lunch time on the weekends is hectic around my house. There always seems to be something going on. We rely on Boar’s Head to provide us with delicious tasting gluten-free cheese. Our latest creation was a quesadilla.
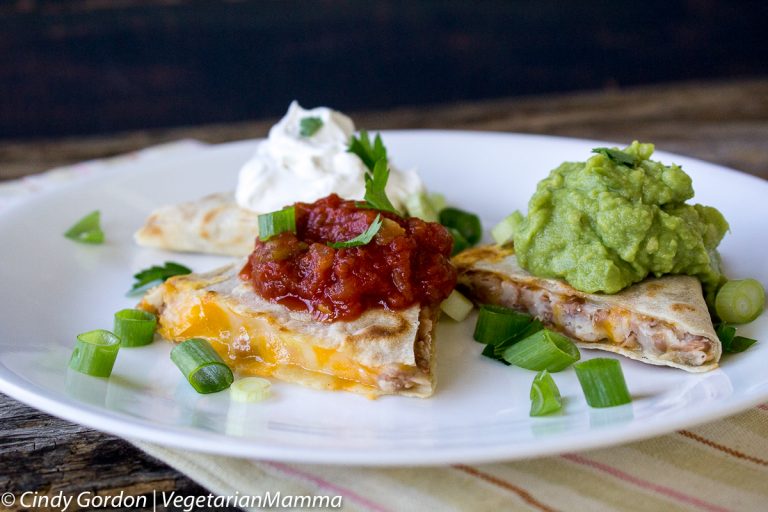
For this quesadilla we used the Colby Jack cheese from Boar’s Head. Colby Jack is a tasty mixture of Colby and Monterey Jack cheeses. It is a semi soft cheese that is sold in many shapes. For our quesadilla, we used the Coby Jack cheese slices.
Boar’s Head Colby Jack Cheese Quesadilla
Ingredients:
- 1 gluten-free soft tortilla shell
- ½ cup pinto beans, smashed
- 2 slices of Boar’s Head Colby Jack Cheese
- optional garnish: Sour Cream, Guacamole, Salsa, Cilantro, Green Onions
Directions:
- In a medium skillet over medium heat, warm the soft tortilla shell.
- Place one slice of Boar’s Head Colby Jack cheese on half of the tortilla.
- Next, layer the smashed beans on top of the cheese slice.
- Place the remaining Colby Jack cheese slice on top of the smashed beans.
- Fold the tortilla in half. Warm each side to a golden brown or until the cheese melts.
- Garnish with your favorite extras such as sour cream, guacamole, salsa, cilantro or green onions.
ENJOY!
Boar’s Head Cheese is a great option for my family. We love that the cheese slices come in resealable containers. This works out very well for my family. The cheese stays fresh and protected in the containers.
Check out the full selection on their website, you’re sure to find your favorite.
Guest Author, Cindy Gordon, is the owner and writer behind VegetarianMamma.com Cindy shares recipes that are gluten-free and vegetarian on her site. Her site also shares insight to her gluten-free travel experiences and provides tips on where to safely travel while gluten-free.
<< Back to Recipes
TAGS: VEGETARIAN, LUNCH, FOR KIDS, DINNER
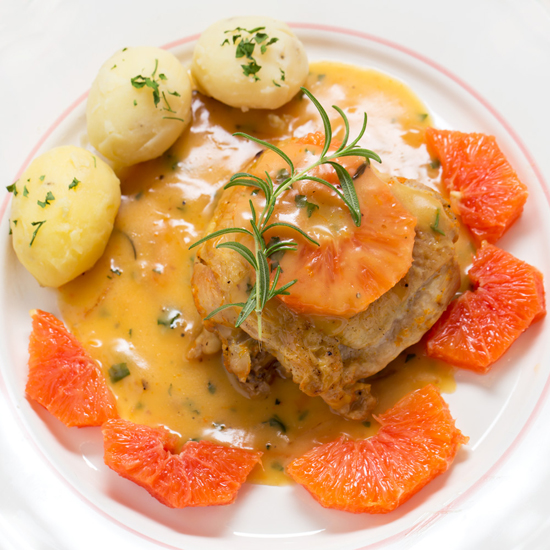
Pork with Orange Sauce
April 25, 2018Pork with Orange Sauce
A dynamic gluten-free recipe that can be shaken up by using chicken, salmon or even scallops in place of pork!
 From Chef Oonagh Williams of Gluten-Free Cooking with Oonagh
This recipe is great because it can be made with a wide variety of proteins, including scallops, strips of chicken breast, whole chicken thighs, or strips of pork sirloin rather than pork tenderloin. Just adjust the cooking time according to size of meat used.
It’s an easy meal for dinner, a brunch, girl’s night, bridal shower, graduation party and more!
Gluten-Free Pork with Orange Sauce
Serves 3-4
Ingredients:
- 1+1/4 lb pork tenderloin
- 2 Tablespoon olive oil
- 1 small onion, peeled and finely chopped
- 2 cloves garlic, peeled and finely crushed
- 1 Tablespoon brandy
- 1 Tablespoon orange liqueur
- 1 cup orange juice
- 1 cup chicken stock
- 2 Tablespoon orange marmalade, preferably a marmalade with small, thin pieces of orange peel
- 2 teaspoon dried rosemary tied up in a coffee filter bag, or just cut 2 x 3 “ stems of fresh rosemary and add to liquid
- For Mexican flavors, use some spicy pepper with cilantro instead of rosemary
- Try subbing basil for more Italian flavors
- 1 orange, zest grated and orange segmented
- 2 teaspoon cornflour mixed with 1 Tablespoon water
- 1/3 cup cream—optional
Directions:
- Trim all fat and gristle from pork tenderloin and cut into 1/2” slices – you should get between 12-16 slices.
- Heat a non-stick skillet over medium heat, then add oil. When hot, add the pork a slice at a time.
- Cook for about 3 minutes on medium heat until starting to brown, then flip meat and cook for another 3 minutes.
- Add onion and garlic and stir in well, cook for further 3 minutes until starting to soften.
- Pull skillet to one side of the flame, add brandy and orange liqueur and flame. The safest way to do this if you are not used to setting fire to a pan is to use the gas gun for the grill. Don’t just use an ordinary match. And don’t bend your face over the pan. Shake the pan gently until flames die down. Make sure the kids and animals aren’t nearby.
- Add orange juice, orange zest, stock, rosemary bag and marmalade and simmer covered for about 15 minutes until tender.
- Thicken with cornstarch and water mix. If the skillet lid doesn’t fit well, then a lot of liquid might have evaporated, and the salt flavor will increase. Top up with more orange juice. Allow cornstarch mix to cook for additional 2 minutes. Taste and adjust seasoning and add cream if you want.
- Serve on top of linguini or rice with green beans, broccoli or carrots. Or with tiny Yukon gold potatoes. Garnish with orange segments.
<< Back to Recipes
TAGS: DINNER
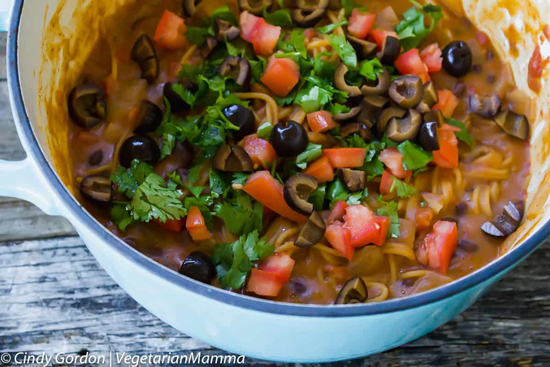
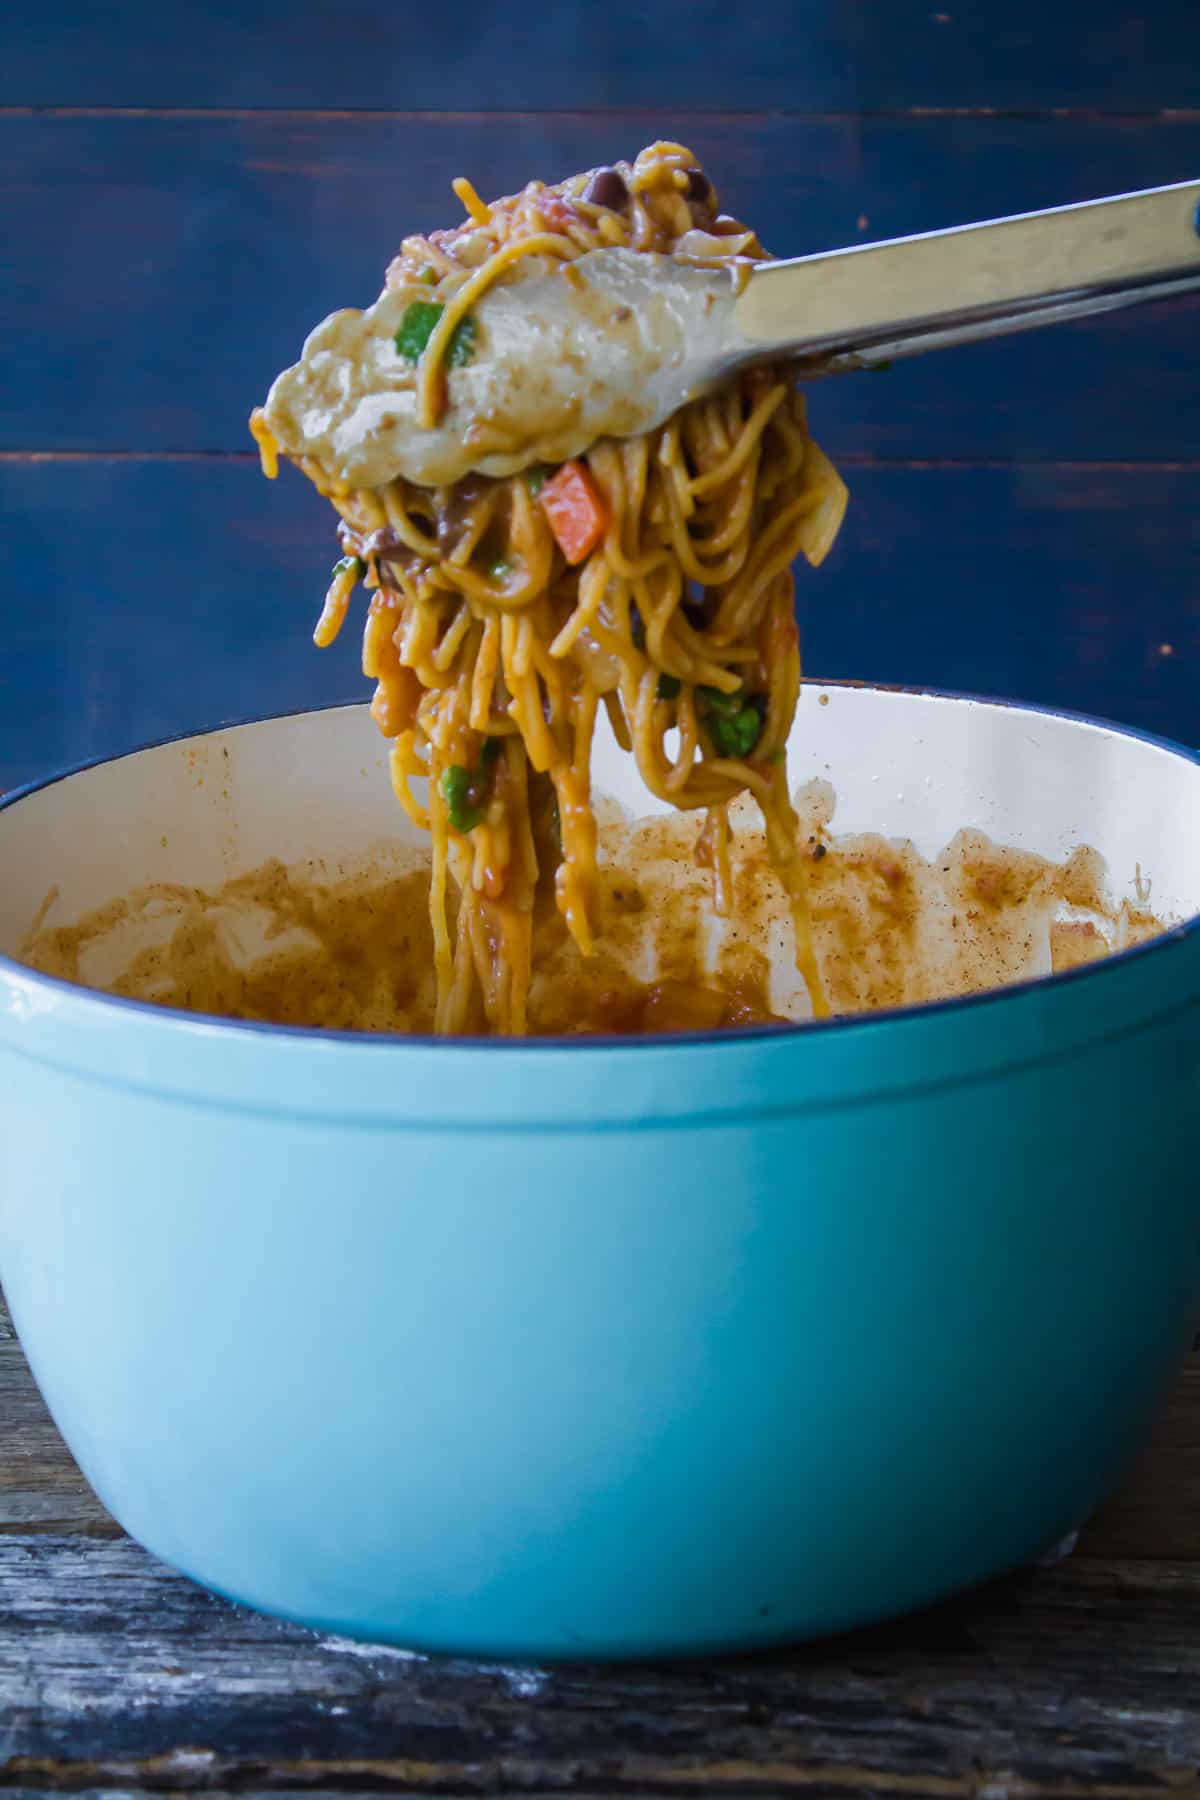
One Pot Taco Spaghetti
April 16, 2018One Pot Taco Spaghetti
One Pot Taco Spaghetti is a delicious and comforting gluten-free dish that you can whip up in a snap for your family!
 From Cindy Gordon of Vegetarian Mamma
Pasta is certainly a comfort food for me. Finding an easy recipe like Gluten-Free One Pot Taco Spaghetti is perfect for my busy nights.
I have been wanting to try a one pot pasta meal for a long time. I knew that I would have to use my favorite pasta. I used Explore Cuisine’s Organic Chickpea Spaghetti for this dish.
This dish starts by frying up some onion in a large soup type pot. Heat up that oil and throw in the oils! Can you smell them yet?
Then you are going to add in the black beans and taco seasoning. Be sure to check the label to make sure the taco seasoning is gluten-free.
Gluten has a sneaky way of finding its self into taco seasoning. So if you need to be gluten-free, please check the label.
Next up, we are adding in the remaining ingredients and three cups of water. You can leave your pasta full length or break in half.
It is up to you! Then we cover and wait! Not much longer!
Once your pasta is done, give the pasta a toss. Hopefully, you remembered to stir in that last two minutes so it didn’t stick. BUT if it did stick…no worries. It happens to the best of us! Promise!
Ingredients:
- 1 tbsp oil
- 1 cup onion diced
- 1 can black beans drained and rinsed
- 1.4 oz package of taco seasoning make sure its gf
- 10 oz diced tomatoes with jalapeño and cilantro or similar
- 8 oz of Explore Cuisine Chickpea Spaghetti
- ½ tomato diced
- ½ c black olives quartered
- Cilantro for garnish
<< Back to Recipes
TAGS: VEGETARIAN, FOR KIDS, DINNER
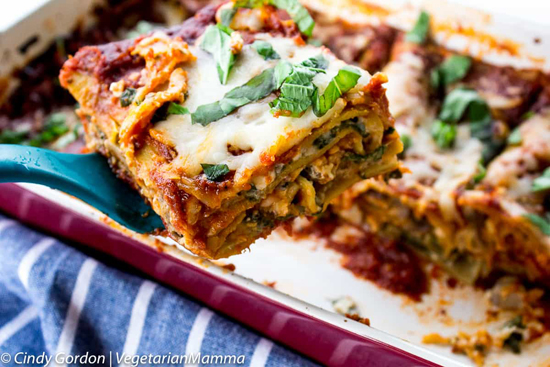
Spinach Mushroom Lasagna
February 12, 2018Spinach Mushroom Lasagna
This gluten-free and vegetarian lasagna is a simple and delicious comfort food dish. It’s a snap to prep and you’ll be begging for seconds!
 From Cindy Gordon of Vegetarian Mamma
To me lasagna is the ultimate comfort food. I have so many memories of eating lasagna growing up. That robust smell of tomato sauce, blending together with spices, gooey cheese and noodles. YUM!
For this recipe, we used some earthy mushrooms and spinach to add flavor, depth and texture to this dish.
Ingredients:
- 16 oz cottage cheese
- ½ c fresh basil, sliced into ribbons
- ½ c fresh parsley
- 1 t garlic salt
- 1 t Italian Seasoning
- 1 egg
- 1 T oil
- 2 c fresh mushrooms, quartered
- 2 c fresh spinach
- 8 oz of uncooked lasagna from Explore Cuisine
- 32 oz of spaghetti sauce
- 2 cups (or more) of shredded mozzarella cheese
- Garnish: additional basil cut into ribbons
CLICK HERE TO GET THE FULL GLUTEN-FREE RECIPE ON VEGETARIAN MAMMA
<< Back to Recipes
TAGS: VEGETARIAN, DINNER
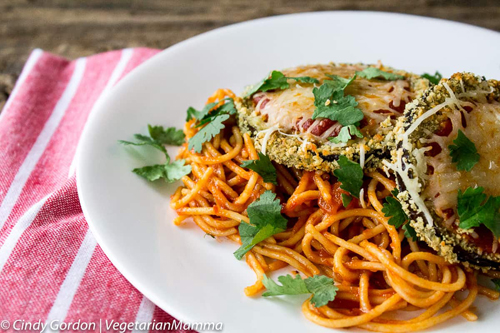
Eggplant Parmesan
January 22, 2018Eggplant Parmesan
Gluten-free eggplant parmesan is easy to make! This dish is baked, not fried! Dairy-free and vegan options too!
 From Cindy Gordon of Vegetarian Mamma
Eggplant is actually one of my husband’s favorite food items. It is not something that I often use in my cooking. I need to get better about that.
But with this Gluten-free eggplant parmesan dish, I think I’ll be using it a whole lot more!
It is recipe time! I can’t wait to give you this SUPER easy recipe! It is literally one of the BEST things we’ve made and eaten in this house!
Ingredients:
- 1 box (8 oz) of Explore Cuisine, Organic Chickpea Spaghetti
- 2 cup of your favorite marinara sauce
- 1 medium eggplant
- 2 eggs
- 1.5 cups gluten-free panko crumbs
- c parmesan cheese (optional)
- 1 T Italian Seasoning
- 1 cup mozzarella cheese, shredded
- fresh basil and cilantro
<< Back to Recipes
TAGS: DAIRY-FREE, VEGETARIAN, VEGAN, DINNER
Smokemaster Black Forest Ham Kale Salad
December 18, 2017Smokemaster Black Forest Ham Kale Salad
 Courtesy of Boar’s Head
This gluten-free salad celebrates the joy of the sweet and salty contrast of the dates and Boar’s Head’s SmokeMaster Beechwood Smoked Black Forest Ham, as well as the healthy and textural use of chickpeas and kale. This is a great salad for someone who doesn’t think he or she likes kale!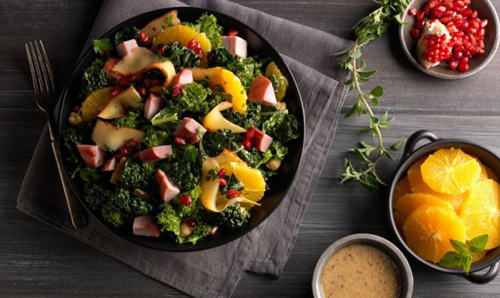
Ingredients:
- 2 bunches Kale Lacinato or similar variety
- ½ lb SmokeMaster Beechwood Smoked Black Forest Ham diced
- 1 can (15 ounces) Chickpeas
- ½ cup Dates
- ¼ cup Red wine vinegar
- 2 tbsp Delicatessen Style Mustard
- 1 clove Garlic minced
- 1 tbsp Honey
- 2 tbsp Fresh cilantro chopped
- 2 tbsp Lemon juice fresh
- ½ cup Olive oil
- ½ tsp Kosher salt
- ¼ tsp Black pepper freshly ground
- ½ cup Bold Chipotle Gouda Cheese shaved
- ½ cup Mandarin orange
- 2 tbsp Pomegranate seed
Directions:
- Thoroughly wash kale, spin dry and strip stem from leaves. Chop into bite-size pieces.
- Dice ham into small pieces, reserve.
- Strain liquid from the can of chickpeas.
- Remove pit from dates, and cut the dates into rings.
- In a mixing bowl, add red wine vinegar, Dijon mustard, garlic, honey, cilantro and lemon juice. Slowly incorporate olive oil until it emulsifies with the rest of the ingredients. Season with salt and pepper.
- Toss kale, ham, chickpeas and dates with dressing. Place in clean bowl and shave Boar’s Head Chipotle Gouda cheese on top. Garnish with oranges and pomegranate seeds.
<< Back to Recipes
TAGS: LUNCH, DINNER, APPETIZERS/SNACKS
Bold Ichiban Teriyaki Style Chicken Lettuce Cups
December 4, 2017Bold Ichiban Teriyaki Style Chicken Lettuce Cups
Courtesy of Boar’s Head
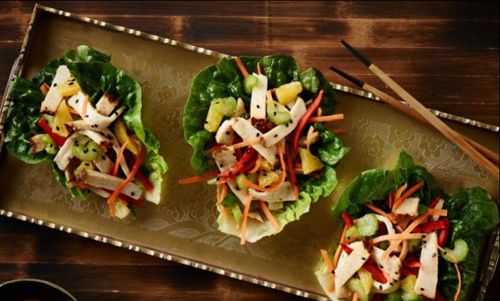 Try a light alternative to traditional sandwiches. Boar’s Head’s Bold Ichiban Teriyaki Style Chicken Lettuce Cups are bursting with freshness and great for entertaining or for family-style meals.
- 4 slices Boar’s Head Bold Ichiban Teriyaki Style Chicken Breast, sliced thick and julienned
-
1 stick Celery, chopped finely
-
½ cup Carrot, julienned
-
cup Pineapple, chunked
-
cup Red pepper, sliced
-
½ tsp Sesame seeds
-
2 tbsp Gluten-free Tamari
-
1 head Butter lettuce
- In a large mixing bowl combine the julienned chicken, celery, carrots, pineapple, red pepper, and sesame seeds.
- Add the tamari and gently toss until evenly distributed.
- Once combined, place the mixture inside the leaves of lettuce and serve.
<< Back to Recipes
TAGS: LUNCH, DINNER
Wine and Mushroom Sauce for Roast Beef
November 28, 2017A savory gluten-free sauce that’s perfect for the holidays.
From Chef Oonagh Williams of Gluten-Free Cooking with Oonagh
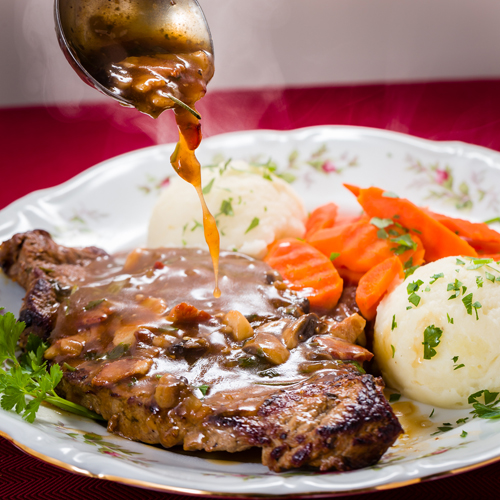 We have Beef Tenderloin (fillet) for Christmas Day with this sauce. Easily and best made in advance, refrigerate, slowly reheat and then thicken with cornstarch. If your family don’t mind rosemary leaves in a sauce, add some rosemary as you simmer it. A dash of gluten-free Worcestershire sauce also adds to the meatiness of the sauce. I’ve made this for years.
I made this sauce for a party with beef sirloin marinated for 24 hours in olive oil, balsamic vinegar, garlic and crushed rosemary. Then remove meat from marinade, sear in hot pan, cook in 350 degree oven for 15-17 minutes per lb until very rare. Chill overnight, then slice extremely thinly and place back in cold sauce and leave to marinate (24 hours is fine) until ready to slowly reheat in sauce and place in toasted rolls as sliders.
Gluten-Free Wine and Mushroom Sauce
Ingredients:
- 2-4 tbsp (30-60 ml) olive oil
- Large onion, peeled and finely chopped
- 2 cloves garlic, peeled and finely crushed
- 3 slices of gluten-free bacon, finely scissored
- 8 large mushrooms, cleaned and very finely chopped
- 1 c Marsala wine or favorite red wine. Do not use the cheapest wine you can find. If you don’t like the taste in a glass, you won’t like it in the sauce. But you don’t need to use an expensive wine
- 4 cups, 1 qt, 1 ltr gluten-free beef stock
- 2 tsps (10 ml) gluten-free Dijon mustard
- pepper
- 1/4 c (60ml) freshly chopped parsley
- 4 tsps (20 ml) gluten-free cornstarch (UK cornflour) mixed with ¼ cup/60 ml water.
Directions:
1. Use an 8 c/2 ltr saucepan. Cook onion and bacon together gently until onion is totally soft and nicely golden brown, not burnt.
2. Add mushrooms and garlic and cook until mushrooms are shrinking, giving up their juices and browning nicely. Don’t let garlic burn.
3. Add wine, stock, mustard, freshly ground black pepper, bring to a boil, simmer for 10 minutes. I don’t normally add salt since bacon, stock and mustard contain salt. Taste.
4. Either refrigerate once cool or thicken, add fresh parsley and serve with beef.
TAGS: THANKSGIVING, DINNER
Bread Pudding with Butternut Squash, Bacon and Onion
October 24, 2017The perfect gluten-free Thanksgiving side dish.
From Chef Oonagh Williams of Gluten-Free Cooking with Oonagh
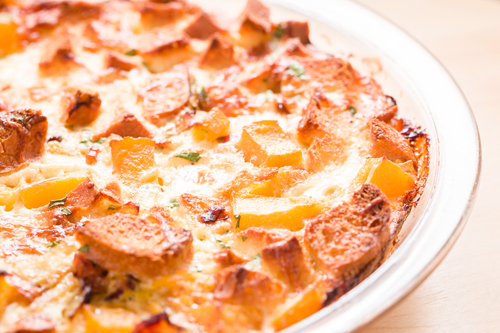 Make this as a side dish for Thanksgiving or use leftover roasted butternut squash or mashed butternut squash and serve with leftover turkey for breakfast or dinner. Bagel, egg and milk mix can be prepared in fridge before Thanksgiving and the rest of ingredients added. This is mild comfort food.
I normally use an Udi’s gluten-free plain bagel, it doesn’t disintegrate and doesn’t have any funny taste. I do also like Canyon Bakehouse gluten-free plain bagels, which has even more of a roll’s softer texture to me. Aldi has gluten-free hamburger rolls that I do like for hamburgers, but haven’t tried them for bread pudding. We love Against the Grain tapioca cheese bread, but it was wrong texture to us for bread pudding.
Gluten-Free Butternut Squash Bread Pudding
Ingredients:
- 2 plain gluten-free bagels. Cut into tiny cubes about ½ inch square
- 4 eggs or 1 c (250 ml) gluten-free egg substitute. I normally use 50/50 whole egg and egg substitute
- 6-8 slices of Jones Dairy Farm Bacon or Oscar Mayer center cut, both are labeled gluten-free. Or leftover ham. Cut small
- 1 medium onion, peeled and finely chopped
- 2 cloves of garlic, peeled and finely crushed
- 1 Tbsp oil (15 ml)
- 2c (500 ml) milk, fat free is fine, but cream and whole eggs are wonderful
- 12 oz (375g) peeled butternut squash, cut into small cubes, no more than 1″ square. Or use leftover roasted squash or mashed squash
- 2 tbsp (30 ml) finely scissored green of green onion
- 2 tbsp (30ml) finely chopped fresh parsley
- 1 c (4oz, 125 g) shredded Swiss cheese or Sharp Cheddar cheese
- Salt and pepper to taste. If you used leftover roasted squash or mashed squash be aware of existing salt or fat content
- 2 Tbsp (30 ml) maple syrup added to bread pudding and more to serve. Optional, maple syrup is in most NE fridges
- 8×8 baking dish
Directions:
1. If you are using raw bacon, then put oil and bacon in saucepan or microwave safe dish and cook bacon until it starts releasing its juices. Add onion, garlic and raw butternut squash, stir, cover and cook for about 5 minutes until onion is soft and squash is just cooked. If using leftover cooked squash, just cook bacon, onion and garlic then stir in leftover cut up butternut squash or mashed squash.
2. Then I like to mix the casserole ingredients in a glass bowl/jug, cover and refrigerate overnight.
3. In the morning preheat oven to 350*, make sure to spray the 8×8 baking dish as this makes it far easier to clean dish. Stir the bread mix well to make sure bacon/squash is evenly distributed, and then pour into sprayed baking dish. Place on baking sheet and bake in preheated oven for about 40-50 minutes. It will rise, brown and there should be no liquid ‘sloshing’ around in the middle when it is cooked. Do not cook above 350*. Photo shows half quantity cooked in 9″ pie plate.
Serve with maple syrup, or my hard apple cider gravy (recipe below).
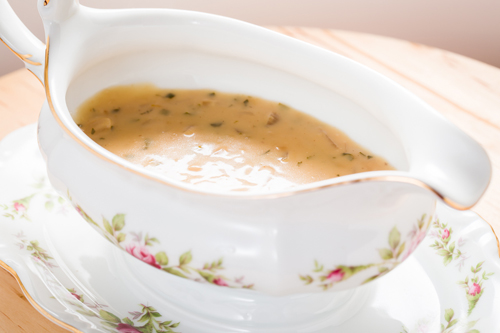
Gluten-Free Hard Apple Cider Gravy
makes about 3 cups (750 ml)
I grew up on what is known as just ‘cider’ in England; English and Irish brands are now being sold in US and in New England we have quite a few cider makers. Every cider tastes different depending on apple variety used, some are sweet, some dry, some even effervesce (bubble) so every gravy will taste different. I can buy a six pack of Woodchuck Amber Cider for $9.99 in my local store, so quite a reasonable price. With hard apple cider you do need to check that it says gluten-free on bottle or on website. For some unknown reason some cider makers ferment the cider with barley so it’s no longer naturally gluten-free. Hard apple cider is definitely alcoholic and goes down very easily so you don’t notice the effect of the alcohol when you drink it. I’ve always drunk hard apple cider in preference to beer and cook with it.
Use this as a different, gluten-free gravy at Thanksgiving, serve with ham, pork, sausages, even fish and with the butternut squash, bacon, onion bread pudding/strata I make. You can make this a few days in advance of Thanksgiving without thickening with cornstarch, refrigerate, then reheat and thicken when you want it. Sauces thickened with corn starch can be quite lumpy when reheated from the fridge.
Ingredients:
- 2 x 12 oz (2 x 375ml) bottles or cans of gluten-free hard apple cider
- 1 medium onion, peeled and finely chopped
- 2 cloves of garlic, peeled and finely crushed
- 1 tbsp (15 ml) butter
- 1 tbsp (15ml) neutral oil
- 3/4 c (180 ml) cream
- 1 tbsp (15 ml) gluten-free cornstarch (UK cornflour) mixed with 2 tbsp (30ml) water.
- 1/2 tsp (3 ml) gluten-free chicken stock concentrate, I often use this as a way of adding seasoning not just salt to sauces.
- fresh pepper
- 2 tbsp (30ml) chopped fresh parsley plus stalks
- 4 sage leaves, fresh or dried
- 1-2 tbsp (15-30 ml) maple syrup, optional if needed
Directions:
1. Gently cook onion and garlic with butter and oil in 1 quart (1 litre) saucepan until very soft and only slightly golden.
2. Add cider, some stalks of parsley and sage leaves and let mix simmer for 10-20 minutes until reduced to about 2 cups (500 ml). The higher the heat the quicker it reduces so watch that it doesn’t boil away to nothing. This is known as a reduction (really a concentration). Note that if you reduce a salt containing mix the final sauce can be quite salty, if you reduce a cream containing sauce then the fat content per serving will be higher.
3. Add cream and stock concentrate, very light grinding of pepper and simmer for a few minutes.
4. Taste sauce. If too tangy for you or family add maple syrup. Remove parsley stalks and sage leaves.
5. Add cornstarch slurry, bring to the boil, simmer for 2-3 minutes until sauce thickens and raw cornstarch flavor is cooked out.
6. Taste and adjust seasonings, add chopped fresh parsley for color.
PERMALINK
TAGS: THANKSGIVING, SIDE DISHES, DINNER