Gluten-Free Recipes for Dessert
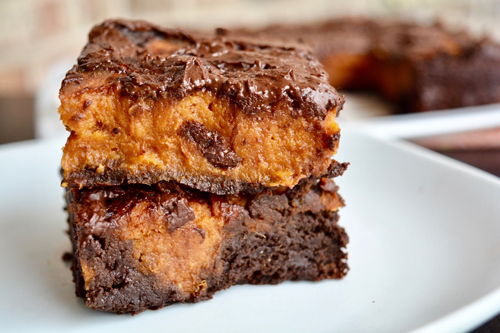
Brownie-Bottom Pumpkin Bars
October 23, 2017Brownie-Bottom Pumpkin Bars
 Courtesy of Enjoy Life
Makes about 16 large bars
Ingredients:
For the brownie mixture:
- 1 box Enjoy Life Foods Brownie Mix
- 3/4 C. cold water
- 2 T. mild olive oil or grapeseed oil
For the pumpkin mixture:
- 1 1/4 C. mashed pumpkin
- 1/4 C. pure maple syrup
- 1/4 C. Enjoy Life Foods All-Purpose Flour
- 1 t. ground cinnamon
- 1/2 t. vanilla extract
- 1/4 t. ground nutmeg
- 1/4 t. ground ginger
- Pinch ground cloves
- Pinch salt
For the topping:
- 1/4 C. Enjoy Life Foods Mini Chips
- 2 t. mild olive oil or grapeseed oil
Directions:
- Preheat the oven to 375˚F. Line an 8×8-inch baking pan with parchment paper.
- To make the brownies, put the Brownie Mix in a large bowl. Add the cold water and oil. Stir until well mixed.
- Scrape the mixture into the prepared pan, smoothing evenly. Bake for 15 minutes.
- While the brownies are baking, prepare the pumpkin mixture. Put the mashed pumpkin, maple syrup, All-Purpose Flour, cinnamon, vanilla extract, nutmeg, ginger, cloves, and salt in a large bowl. Briskly whisk until well combined.
- After the brownies have baked for 15 minutes, remove from the oven. Dollop the pumpkin mixture onto the par-baked brownies, swirling throughout the batter.
- Bake for an additional 35 to 40 minutes, until a toothpick inserted in the brownies comes out clean, and the pumpkin portions are firm to the touch. Let cool in the pan for at least 1 hour.
- To prepare the topping, put the Mini Chips and oil in a microwave safe bowl. Microwave on high for 15 seconds and stir. Repeat in 10 second intervals until melted and smooth. Drizzle the chocolate mixture over the top of the brownies.
- Carefully remove the brownies from the pan, then cut into squares.
- Serve, storing leftovers in an airtight container in the refrigerator for up to 3 days, and any other leftovers to the freezer.
<< Back to Recipes
TAGS: DAIRY-FREE, DESSERT, FOR KIDS, HOLIDAY, THANKSGIVING, VEGAN, VEGETARIAN
Pumpkin Pie Dip
September 11, 2017Pumpkin Pie Dip
Courtesy of Chobani
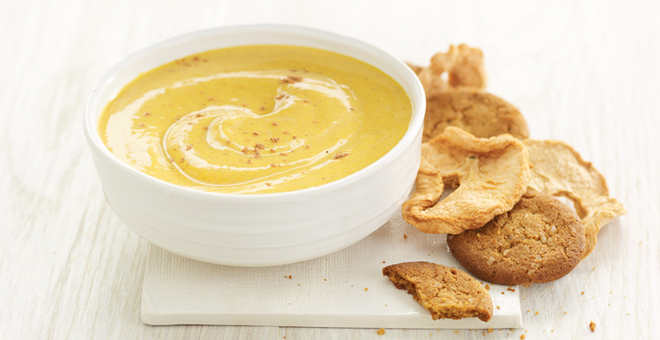 Get seasonally pumpkin spicy with this delicious gluten-free pumpkin pie dip—perfect for fall parties, Halloween haunts or for whenever the desire for pumpkin hits!
Ingredients:
- 1¼ cup Chobani Whole Milk Plain Greek Yogurt
- ¼ cup reduced fat cream cheese, softened
- ¾ cup powdered sugar
- 1 cup canned pumpkin pie filling
- 1 tsp ground cinnamon
- ½ tsp ground nutmeg
- Pinch of salt
- Fresh apple slices
- Gluten-free gingersnap cookies
Directions:
- Using an electric mixer, beat cream cheese and sugar together on medium speed until smooth.
- Add pumpkin, spices and seasonings, beating well. Fold in Chobani yogurt on low speed until fully blended.
- Cover and chill 8 hours. Serve with apple slices and gluten-free gingersnaps for dipping.
<< Back to Recipes
TAGS: APPETIZERS/SNACKS, SIDE DISHES, HOLIDAY, FOR KIDS, DESSERT
Caramel Apple Muffins
August 28, 2017Caramel Apple-Muffins
Courtesy of Enjoy Life
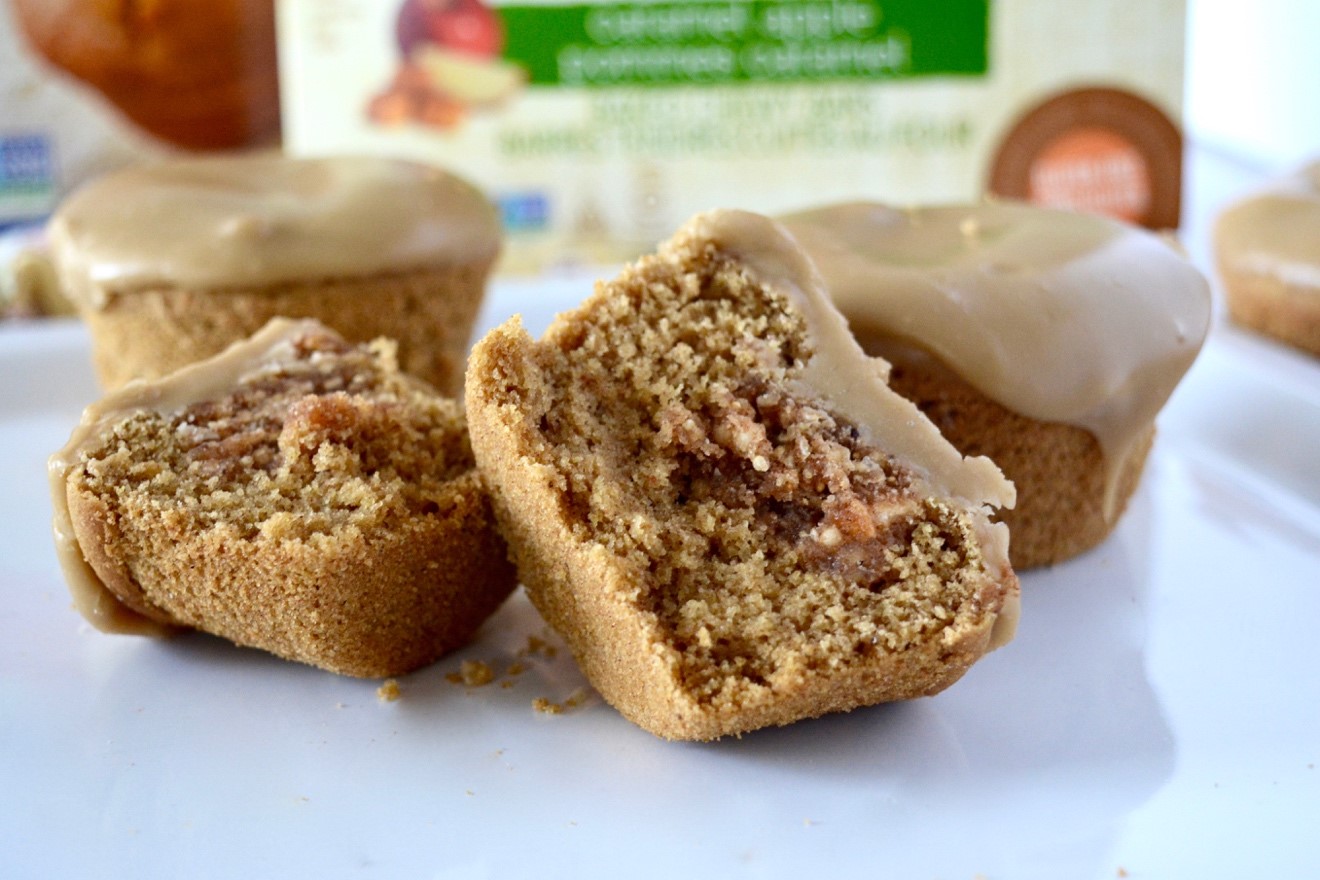 The perfect gluten-free breakfast for fall!
Muffin Ingredients:
Makes 1 dozen gluten-free muffins
- 1 box Enjoy Life Foods Muffin Mix
- 1 tsp ground cinnamon
- 1/4 tsp ground nutmeg
- 1 cup cold water
- 3 tbsp allergy-friendly oil (we recommend olive or grapeseed oil)
- 5 Enjoy Life Foods Caramel Apple Chewy Bars, (1 box) broken into thirds
Glaze Ingredients:
- 1/4 cup packed brown sugar
- 2 tbsp dairy-free buttery spread
- 1 tbsp dairy-free milk
- 1 cup confectioners’ sugar, sifted
- 1 tbsp vanilla extract
Directions:
- To make the muffins, preheat the oven to 350˚F. Line a 12-cup muffin pan with paper liners or spray lightly with oil.
- Combine the Muffin Mix, cinnamon, and nutmeg in a large bowl. Whisk to combine. Add the water and oil. Whisk until well-combined.
- Divide the mixture into the prepared baking pan, filling each cup about two-thirds full. Press a third of a Chewy Bar into the middle of each filled cup.
- Bake for 20–30 minutes until golden brown and a toothpick inserted comes out clean. Let cool 10 minutes, then transfer each one to a wire rack to cool completely.
- Once the muffins are cool, make the glaze. Combine the brown sugar, buttery spread, and milk in a small saucepan. Bring to a boil and let bubble for 1 minute. Remove from heat and add the confectioners’ sugar, whisking vigorously to combine. Stir in the vanilla extract. Let cool 10 minutes.
- Dip each muffin into the glaze, putting them back onto the wire rack to let the glaze firm, about 5 minutes.
- Serve, storing leftovers in an airtight container at room temperature for up to 2 days and any other leftovers in the freezer.
<< Back to Recipes
TAGS: VEGETARIAN, VEGAN, FOR KIDS, DESSERT, DAIRY-FREE, BREAKFAST
Allergy-Friendly Brownie-Bark
August 7, 2017Allergy-Friendly Brownie-Bark

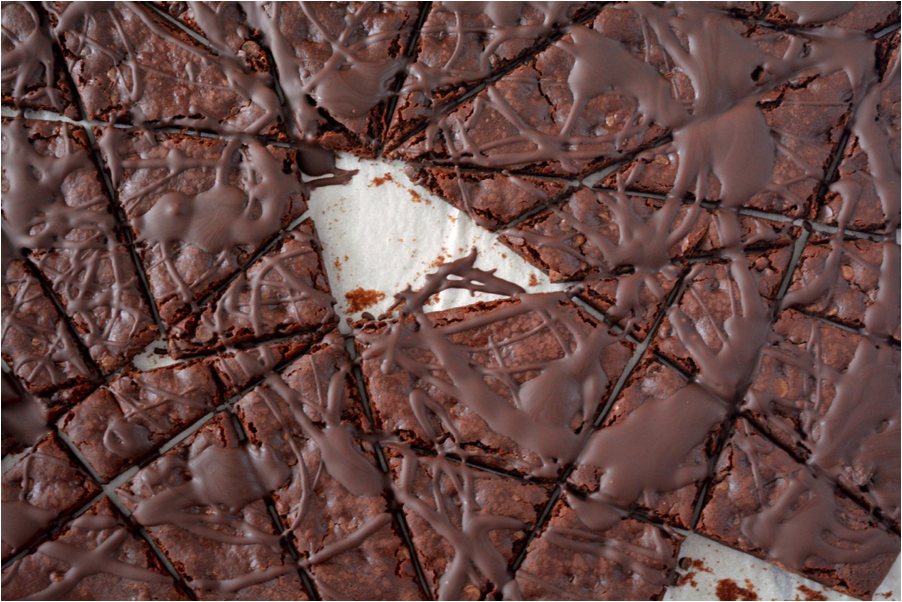 Use Enjoy Life’s gluten-free Brownie Mix and dairy-free Mini Chips to make this amazing Brownie Bark recipe!
Makes about 25 pieces, depending on size
Ingredients:
- 1 box Enjoy Life Foods Brownie Mix
- 1/2 cup cold water
- 4 tbsp allergy-friendly oil, divided (we recommend olive or grapeseed oil)
- 1/2 cup Enjoy Life Foods Mini Chips
- 1 tbsp allergy-friendly oil
Directions:
- Preheat the oven to 300˚F and line a baking sheet with parchment paper.
- Combine the brownie mix, cold water, and 3 tablespoons of oil in a large bowl. Whisk until smooth. (Note: these directions and ingredient amounts are different than what is written on the brownie mix box).
- Spread the mixture on the prepared pan, about 1/8-inch thick. Bake for 15 minutes, then use a pizza cutter or sharp knife to score the brownies into 2-inch pieces (any shape is fine!). Bake for an additional 12 to 18 minutes, until firm to the touch. Let them cool on the pan until room temperature. The brownies will firm as they cool.
- Once the brownies are cool, gently break them into pieces along the scored lines. Leave them on the parchment paper.
- Combine the Mini Chips and 1 tablespoon of oil in a microwave safe bowl. Microwave on high in 15-second intervals until melted and smooth.
- Drizzle the melted chocolate mixture over the broken pieces.
- Serve. Refrigerate the leftovers in an airtight container for up to 3 days, and any other leftovers to the freezer.
<< Back to Recipes
TAGS: FOR KIDS, VEGETARIAN, DESSERT, DAIRY-FREE
Chocolate Caramels
December 1, 2015Chocolate Caramels
From Tina and Miranda Jade Turbin of GlutenFreeHelp.info
Ingredients:
- 2 Tbsp. unsalted butter
- 4 oz. unsweetened chocolate, chopped
- 1 ½ cups heavy cream
- 2 cups sugar
- ½ cup light corn syrup
- Pinch of salt
- 1 ½ tsp. vanilla extract
Directions:
1. Line a 9-in. square baking pan with parchment paper, ensuring that the paper comes up all sides of the pan.
2. Combine all the ingredients except vanilla in a small saucepan and heat on medium-low. Keep stirring until the sugar is melted and the mixture is uniform throughout. Insert a candy thermometer and keep your spoon and hands off the candy to ensure an accurate reading, watching until the temperature hits 245 degrees.
3. Remove from heat and immediately stir in the vanilla, then pour into the prepared pan. Set pan on wire rack and let it cool until it is room temperature.
4. Remove caramel from the pan and slice into cubes. I recommend wrapping each cube individually in wax paper or plastic wrap.
<< Back to Recipes
TAGS: DESSERT, FOR KIDS, HOLIDAY
Popcorn Balls
November 5, 2015Popcorn Balls
Ingredients:
- 10-12 cups of popcorn
- 1 bag gf marshmallows
- 1/2 stick buter
- Optional decadence: candy corn, gummies, etc. (just make sure it’s gluten-free!)
Directions:
1. Kids can dump out the popcorn into a big bowl. If you are adding extra candy, dump that in, too and stir with a big spoon.
2. A grown-up can melt the butter and marshmallows over low heat…be careful not to burn!
3. A grown-up can pour the butter/marshmallow mixture over the popcorn. Let it cool for a minute or two.
4. Give kids a large wooden spoon to stir the mixture
5. Let the mxture cool for another minute or two until it is just warm to touch.
6. Show the kids how to take a scoop full of the mixture and press it into a firm ball.
7. Place the popcorn balls on a sprayed sheet. Let sit out for an hour or two until they are firm.
Yum!
<< Back to Recipes
TAGS: FOR KIDS, DESSERT
Pumpkin Whoopie Pies
October 25, 2015Pumpkin Whoopie Pies
From Chef Oonagh Williams of Royal Temptations Catering
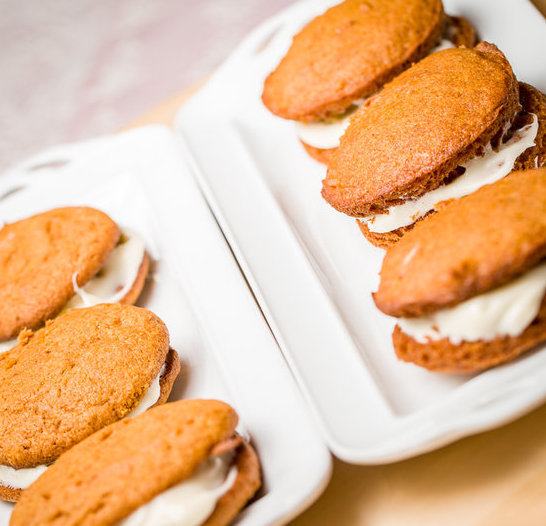
Makes about 2 dozen 2 inch pies
Ingredients:
- ½ cup (1 stick) soft butter
- ½ cup vegetable oil
- 2 cups light brown sugar, firmly packed
- 2 Tbsp. maple syrup
- 1 tsp. gluten-free vanilla extract
- 2 large eggs
- 1 ½ cups canned pumpkin (Ensure only pumpkin is listed in ingredients – don’t use pie filling)
- 2 1/3 cups Oonagh’s Gluten-Free Flour Blend
- 1 ½ tsp. xanthan gum
- 2 tsp. baking powder
- 1 tsp. baking soda
- 1 tsp. salt
- 4 tsp. pumpkin pie spice
Directions:
- Preheat oven to 375 degrees. Grease two baking sheets or line with parchment paper or non-stick liner.
- Beat together butter, oil, sugar, maple syrup, and vanilla for about 3 minutes. Beat until lighter in color and fluffier. The mix will still look slightly grainy. Scrape down sides.
- Beat in the eggs, one at a time, beating well after each addition, until fluffier.
- Gently beat in pumpkin.
- Add flour, xanthan gum and the rest of the dry ingredients, mixing well. The mix will start to thicken because of xanthan gum and baking powder.
- Use a 2 tablespoon scoop or a rounded tablespoon quantity to drop batter onto prepared sheets, leaving about 2 inches between each scoop.
- Bake in preheated oven for about 18 – 20 minutes until cookies feel firm, but are still soft. When you think they are cooked, give them about 3 more minutes. I found they have a tendency to deflate if not cooked enough.
- Remove from oven and leave to cool on a cooling rack.
Filling Ingredients:
- 8 oz. package of soft cream cheese (light is fine)
- 2 cups powdered/icing sugar
- 1 tsp. gluten-free vanilla extract
- ¼ cup diced crystallized ginger (optional)
- 2-4 Tbsp. heavy cream (optional)
Filling Directions:
- Beat cream cheese, sugar and vanilla together until very smooth and creamy.
- Sandwich two cookies together with 2 tablespoons cream cheese filling.
Tip from Oonagh:
You can overfill the whoopie pies with filling and roll them in Halloween sprinkles or take a single cookie, top with some filling as a frosting and decorate with various gluten-free Halloween candy or toppings.
<< Back to Recipes
TAGS: FOR KIDS, DESSERT
Gluten-Free Chunky Peanut Butter and Oatmeal Chocolate Chip Cookies
September 5, 2015Gluten-Free Chunky Peanut Butter and Oatmeal Chocolate Chip Cookies
From Chef Oonagh Williams of Royal Temptations Catering
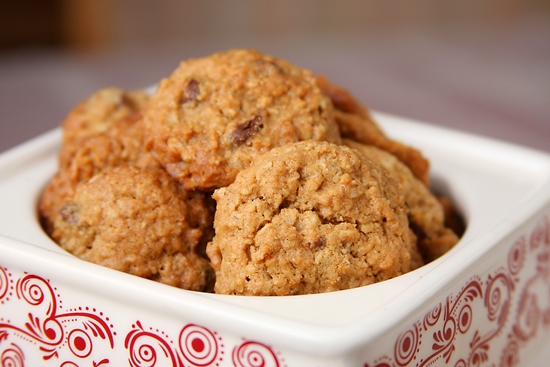
Adapted from The Best American Recipes 2004-2005.
Makes 40 x 2 inch cookies/biscuits.
Ingredients:
- 1+1/2 cup certified gluten-free oats (I prefer rolled over instant)
- ½ cup (2 oz., 60 g) Oonagh’s Gluten-Free Flour Mix
- 1 tsp (5 ml) cinnamon
- ¼ tsp (2 ml) salt
- ½ tsp (3 ml) baking soda
- ½ cup (4 oz., 125 g) butter, at room temperature
- ½ cup (4 oz., 125 g) peanut butter
- ¼ cup granulated sugar (1+3/4 oz)
- ½ cup (3 oz., 85 g) packed light brown sugar
- ¼ cup chopped nuts
- 1 large egg
- 2 tsp (10 ml) vanilla
- ¾ cup (4+1/2 oz., 130g) gluten-free semi-sweet chocolate chips
No xanthan gum needed.
Directions:
1. Preheat oven to 350 degrees.
2. Line two baking sheets with parchment paper.
3. Beat the soft butter, peanut butter, granulated sugar and brown sugar together until smooth and creamy.
4. Add the egg and vanilla, beat in well.
5. Mix together and then slowly beat in gluten-free oats, flour, salt, cinnamon, baking soda until blended.
6. Add nuts and chocolate chips and mix in
7. Using a 1 tablespoon (15 ml) scoop, drop scoops of dough onto baking sheet, about 2 inches (5 cm) apart.
8. Use a fork to flatten slightly and bake in preheated oven for 15-20 minutes until cookies are golden brown and firm around the edges. Remove from oven and cool for about 10 minutes until you can lift them onto a cooling rack. They do firm up as they cool.
Tips & Alternatives:
I found if I let the oven cool down a little, then put the cookies back into residual heat, I get a crisper cookie without over browning them. But, timing this and gauging the oven heat is not an easy thing to do, so I wouldn’t recommend this unless you’ve had some practice.
<< Back to Recipes
TAGS: FOR KIDS, DESSERT
Lucy’s Gluten-Free Brownie Crisps
July 13, 2015Lucy’s Gluten-Free Brownie Crisps

Courtesy of Lucy’s
Ingredients:
.jpg)
- 1 bag of Lucy’s Gluten-Free Brownie Crisps
Directions:
- Pop open a bag of Lucy’s Gluten-Free Brownie Crisps
- Enjoy!
Alternative Ideas:
Lucy’s Gluten-Free Brownie Crisps are tasty enough to enjoy on their own, right out of the bag and they make a great companion to a wide variety of foods! Here are some ideas for your next indulgence.
- Use the Brownie Crisps as bookends for the ice cream sandwich
- Crumble Brownie Crisps on top of your favorite ice cream
- Dip Brownie Crisps in peanut, soy nut or almond butter
- Sprinkle over popcorn for a salty/sweet effect
<< Back to Recipes
TAGS: FOR KIDS, DESSERT
Mini Shortbread Flag Tarts
July 4, 2015Mini Shortbread Flag Tarts for 4th of July
A delicious and adorable gluten-free treat perfect for Independence Day, Memorial Day, Flag Day or when you’re just feeling hungry and Patriotic!
From Chef Oonagh Williams of Royal Temptations Catering
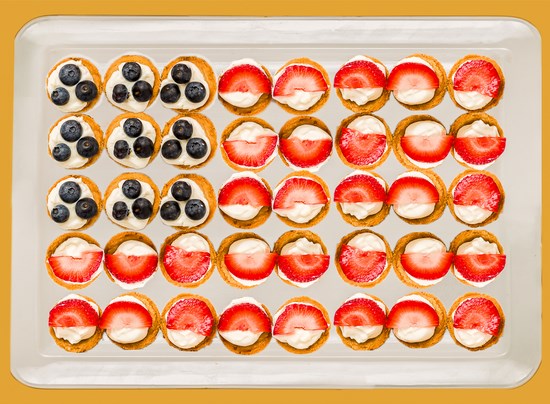
These are based on my English Viennese Fancies shortbread recipe – a piped shortbread easily made at home. I make tiny ones similar to the size of a Hershey Kiss for client parties, and drizzle them with melted chocolate and chopped, toasted almonds once they’re cooked. In England, it is also sold in bakeries with raspberry jam and buttercream (frosting), sandwiched between two cookies. They remind me a bit of the American spritz cookie or melting moments. I have only made them with butter, but Earth Balance should work as a substitute.
Pre-gluten-free diet, I used to buy Athens mini filo tart shells. In all my cooking class dinner parties I would make a different appetizer using these shells. A recent e-mail from Athens Foods showed the mini filo tarts filled and arranged as a Stars and Stripes Flag. An individually portioned dessert is so easy for parties; you only bring out so many at a time, and doesn’t look “attacked” like a cake or cheesecake once cut.
Fill them with Greek Yogurt, sweetened cream cheese, my real cream “cool whip” dirt pie mix, and vanilla pudding. My dirt pie recipe is an easier option to be made into a flag with fruit in a 9” x 13” pan. Regular whipped cream should only be used just before serving because it melts the quickest in heat. These are also great for children’s parties. If you have a mini muffin pan that is no longer non-stick, line the pan with red, white and blue cupcake liners. I thought it was a cute idea to continue the red, white and blue theme, plus the liners make the shortbread more finger portable.
You need to make three or four times the shortbread recipe (42 or 56 tarts) to have enough for the flag.
2 x 24 hole mini muffin pan, plus leftover dough plopped on cookie sheet.
Gluten-Free Mini Shortbread Flag Tarts – Perfect for the 4th of July!
Makes about 14 minis
Ingredients:
- 1 stick of butter (4 oz., 115 g) softened at room temperature
- ¼ cup (25 g, 1 oz.) powdered (icing/confectioners) sugar
- 1 ½ tsp. (8 ml) gluten-free vanilla extract/essence
- ¾ cup less 1 Tbsp. (2 ½ oz., 75 g) Oonagh’s Gluten-Free Flour Mix (see below for recipe)
- 1 Tbsp. (15 ml) gluten-free cornstarch. Put the cornstarch in the ¾ cup measure and then add gluten-free mix to ¾ cup level. Put 15 ml cornstarch in bowl then add 2 ½ oz. (75 g) gluten-free mix to bowl)
- ¼ cup (3/4 oz., 25 g) gluten-free almond meal/almond flour/ground almonds
- 1/8 tsp. xanthan gum
- Salt
Filling Ingredients:
- 2 x 8 oz. (2 x 250 g) cream cheese, at room temperature
- Either 2/3 cup powdered sugar plus ¼ cup honey for flavor, or 1 cup powdered sugar
- 1 pint, 2 cups heavy or whipping cream
- Container of blueberries, washed and dried
- More strawberries than you thought you would need. Leftover filling can have any liqueur you like added and served as a dip for leftover strawberries. Plus, you need to choose small strawberries to halve and then slice to fit in tarts.
Tart Directions:
- Preheat oven to 350 degrees. Beat butter and sugar together until light and creamy, stir in vanilla and mix well.
- Add flours, xanthan gum, and salt and mix until a soft dough is formed. Bake as directed. They are still soft when baked and firm up when cool. They are very melt-in-your-mouth, crumbly, same as a good shortbread. Don’t add more xanthan gum. Think about different flavored extracts in dough.
- No need to refrigerate the dough. These are a very tender shortbread, so it might be easier to line the mini muffin pan with paper cases for easy removal and so they don’t disintegrate. Using a number 60, 1+1/4 inch, 3.2 cm across scoop or a 1 Tbsp. metal scoop, scoop the dough into mini muffin pans. Bake in 350 degree oven for 25 minutes until nicely light golden brown. Don’t cook until dark brown or else they don’t taste very good at all. Remove from oven and leave to cool before removing from pan. You could also make these in regular muffin cup cases in a large muffin pan, pressing dough down to make larger shortbread cases to fill with even more fruit and cream. Adjust cooking time. Tarts still dome in the middle.
Filling Directions:
- Combine cream cheese, confectioners’ sugar, vanilla and honey in a 6-8 cup bowl. Beat until smooth.
- Whip the 2 cups of cream until stiff in a separate bowl and gently whisk into cream cheese mix. I find if you let the electric hand mixer gently mix cream in, you don’t need to gently fold the cream in by hand. Taste and see if it is sweet enough for you. If not, add some powdered sugar 1 Tbsp. at a time and gently beat in. Put filling in large sandwich bag, cut off corner and pipe filling into cooled tarts. Since these shortbreads don’t make a ‘big hole’ for the filling, you need a stiffer filling that can be mounded above shortbread, won’t run over sides and can carry weight of fruit. Plus, you want more filling to taste anyway.
- Arrange 48 tarts, 6×8, on a platter. Cut the tip off of the bag, and fill each tart with the filling. Place 3 blueberries on each of the upper left corner 9 shells, a 3×3 square. To make the stripes: for each row of shells, alternate placing strawberry semi-circles at the top and bottom of the shells. Repeat this process with the strawberries until you have completed the red and white stripes of the flag.
Oonagh’s Gluten-Free Flour Mix
- 1 x 14 oz. bag potato starch (3 ½ cups)
- 1 ¾ cup of tapioca starch (7 oz.)
- Just under 1 cup of amaranth or millet (actually ¾ cup plus 2 Tbsp. or 4 oz.)
- Just under 1 cup of sorghum (actually ¾ cup plus 2 Tbsp. or 4 oz.)
<< Back to Recipes
TAGS: HOLIDAY, FOR KIDS, DESSERT